The Poet Creek Express - Foamie Hybrid

Canvas covered foamies (Thrifty Alternatives...)

Moderator: eaglesdare

Re: The Poet Creek Express - Foamie Hybrid

Postby KCStudly » Thu Oct 18, 2012 6:04 pm

Okay, let's get caught up again.

Last Wednesday (week ago yesterday) I put the second cabinet face frame together.
Dry fit and mask up.
Image

Glue and clamp.
Image

I don't think I've shown my glue brush keeper set up before. It's a large DD ice coffee cup. I use the cheap 1 inch chip brushes and just wipe them a bit w/ paper shop towel after use; poke it up through the straw hole in the lid just enough to expose the hole in the brush handle; fold the end of the straw in half and stuff it through the hole in the handle (trim straw to length); replace the water filling just up to the bottom step every once in a while; and it keeps the bristles clean and soft, and the ferrule relatively rust free (as opposed to just dropping the brush in a cup, which leaves the bristles down in the gunk and the ferrule in the water to rust more).
Image
The brushes are only about a buck, but they last indefinitely for TB2 this way.

Wiped some minwax Gun Stock oil stain onto a scrap of Okoume and placed it near the maple for color contrast.
Image

Thursday last I stripped the clamps and masking, trimmed biscuits, and sanded the slight variations in flush at the joints. Turning and re-clamping the glue and screw portions made a big difference there.
Image

Couple of bonus shots of parts "in the queue".
Image
Image

Slapped some semi gloss poly on the Gun Stock/Okoume (wet here, yellow is from glare). On left is a test joint of maple with minwax Golden Oak oil stain (too dark for my taste and a bit blotchy...extra dark area is grain discoloration in the wood). On the right is maple with minwax Natural oil stain. I like it against the red Gun Stock.
Image

Here they are closer together and swapped around.
Image

Couple of angles with and w/o flash to vary the lighting. That yellow streak on the upper left of the Okoume is a blotch of glue that didn't take stain well.
Image
Image

Some off topic stuff.
Bad news. Yvette's 89 year old mother had a severe stroke and later passed away. Pretty good run for her, and although she had suffered from zero short term memory for some time now, she had made her wishes known previously and did not linger needlessly in the end.

As mentioned previously, Saturday was a trip to Framingham, MA to prep the ballista for travel. Pulled off the winter coverings, inventoried and organized gear, cut out some hokey wiring and got a tail light working again, fixed a broken fender mount, etc.

Monday I stayed after work and made these bow line separators out of 5/8 round aluminum. There are two bow lines that run from arm tip to arm tip on top and bottom, and at the center is a pouch that cradles the pumpkin. The attachment points on the tips of the arms are closer together than the pumpkin is fat, so these bow line separators spread the bow lines to keep them from cutting the pumpkin as it exits the pouch. The little knock in the ends registers on the bow line and the thru hole allows us to lash them to the bow line using thin nylon twine, that way when they hit the bundle stanchions with great force and break apart, we can replace them w/o having to restring the bow line. Hence the 3 pairs, one pair for each competition shot.
Image
Image

Yesterday I went to Mecca but got distracted by the ultimate wood working tool (saw dust teaser pic...story and more pics later).
Image
KC
My Build: The Poet Creek Express Hybrid Foamie

Poet Creek Or Bust
Engineering the TLAR way - "That Looks About Right"
TnTTT ORIGINAL 200A LANTERN CLUB = "The 200A Gang"
Green Lantern Corpsmen
User avatar
KCStudly
Donating Member
 
Posts: 9640
Images: 8169
Joined: Mon Feb 06, 2012 10:18 pm
Location: Southeastern CT, USA

Re: The Poet Creek Express - Foamie Hybrid

Postby Wobbly Wheels » Thu Oct 18, 2012 6:18 pm

Hehe...I worked on a site for a couple years where there was a guy came in with a woodmizer and milled 10,000bf of the cedar we felled. There was tons of cedar and fir left over: I've built two boats of it so far and am using the last of it in the trailer.
Once I win the lottery and start shopping for toys, that's near the top of the list.
Below the main battle tank, but still near the top.... :lol:
User avatar
Wobbly Wheels
Donating Member
 
Posts: 1080
Joined: Tue Mar 15, 2011 9:51 am

Re: The Poet Creek Express - Foamie Hybrid

Postby KCStudly » Fri Oct 19, 2012 4:50 pm

If you're gonna dream, dream big!

I would go drag racing (BBC Super Comp rail and work my way up..."The best way to make a small fortune in drag racing is to start with a big one!"), have a huge yacht (crew, stewards and chef), have a personnal chef (food porn everyday), a really nice contemporary home with fully outfitted shop (wood and metal works) and a property manager to operate and maintain it all! Ha, Powerball wanna be.

Some of you may think I'm crazy for dreaming about a better shop, but you can never have too much shop, nor too many tools. Never enough benches or clamps! URR, Urr, urrrrr (Tim Allen grunt).

Anyway, here's a link to what distracted me from getting anything done on Wednesday evening.
Ultimate Sawdust Machine

I've got very little excuse for yesterday or today. :wine:
KC
My Build: The Poet Creek Express Hybrid Foamie

Poet Creek Or Bust
Engineering the TLAR way - "That Looks About Right"
TnTTT ORIGINAL 200A LANTERN CLUB = "The 200A Gang"
Green Lantern Corpsmen
User avatar
KCStudly
Donating Member
 
Posts: 9640
Images: 8169
Joined: Mon Feb 06, 2012 10:18 pm
Location: Southeastern CT, USA
Top

Re: The Poet Creek Express - Foamie Hybrid

Postby Wobbly Wheels » Fri Oct 19, 2012 6:29 pm

...and a property manager to operate and maintain it all!


Hehe, that's me.
I pulled the guy's Whaler out of the water today for the season and winterized it, then did an oil & service on the quads to get them ready for a week-long hunting trip late next week. On Monday there's a shower leak to track and a bunch of light fixtures to swap out in the brand new house because his wife didn't like what the designer and contractor installed.

Not that this is a job application for when you win, but... :lol: :lol:

Now back to work on TCPE and keep buying those Powerball tix !
User avatar
Wobbly Wheels
Donating Member
 
Posts: 1080
Joined: Tue Mar 15, 2011 9:51 am
Top

Re: The Poet Creek Express - Foamie Hybrid

Postby KCStudly » Sat Oct 20, 2012 11:11 am

Wobbly Wheels wrote:Not that this is a job application for when you win, but...


LOL :lol: :lol: :lol:

Today is a two-fer. Chunker parts and TPCE, in that order. Fall colors are in full swing here.
KC
My Build: The Poet Creek Express Hybrid Foamie

Poet Creek Or Bust
Engineering the TLAR way - "That Looks About Right"
TnTTT ORIGINAL 200A LANTERN CLUB = "The 200A Gang"
Green Lantern Corpsmen
User avatar
KCStudly
Donating Member
 
Posts: 9640
Images: 8169
Joined: Mon Feb 06, 2012 10:18 pm
Location: Southeastern CT, USA
Top

Re: The Poet Creek Express - Foamie Hybrid

Postby KCStudly » Wed Oct 24, 2012 3:21 pm

Discussion about an alternate hatch hinge style over on Richard Miller’s build thread (linky) got me thinking some more about what I will do with regard to the radius corners I plan for the wall-to-roof joint on TPCE. How will I run the hinge past the face of the side wall for rain diversion without interrupting the line of the radius or having the rain diverter stick out awkwardly?

I was thinking a piano hinge that stops short of the radii and a rubber cap strip that runs long. Fasten the rubber strip down on the cabin side with an aluminum FB backer that is formed over the radii and down the side just a bit, then on the hatch side stop the FB short of the radii but let the rubber flap run past and down the side a bit, same as on the roof side. When the hatch is closed the flap should lay over the radii fairly nicely, and, hopefully, when opened the flap would have enough flex and stretch to allow the hatch to open w/o tearing or straining the adjacent fasteners. The flap might even form a wing, or trough, enough to direct water coming off of the roof down the side wall ahead of the hatch. Schmaybe.

The other option would be to interrupt the radii at the hinge and do the traditional hurricane hinge sticking past, but I am afraid it will be a constant eyesore for me (especially if I walk into it!) Others have said that they find this method (the hinge sticking out from the wall, some with extra diverters added on) to be unobtrusive, but I don’t know. Guess I’ll have to see one in person in order to decide to go this way.

Any other ideas or thoughts?

Didn't get to the point of working on TPCE the other day, but I did pick up another piece of maple to make up for the shelf front that I had overlooked previously. Off now to finish up a few bits for the ballista. Pumpkins are getting ripe!
KC
My Build: The Poet Creek Express Hybrid Foamie

Poet Creek Or Bust
Engineering the TLAR way - "That Looks About Right"
TnTTT ORIGINAL 200A LANTERN CLUB = "The 200A Gang"
Green Lantern Corpsmen
User avatar
KCStudly
Donating Member
 
Posts: 9640
Images: 8169
Joined: Mon Feb 06, 2012 10:18 pm
Location: Southeastern CT, USA
Top

Re: The Poet Creek Express - Foamie Hybrid

Postby KCStudly » Tue Oct 30, 2012 7:58 pm

Okay, prepare to go OT. It is fall
Image
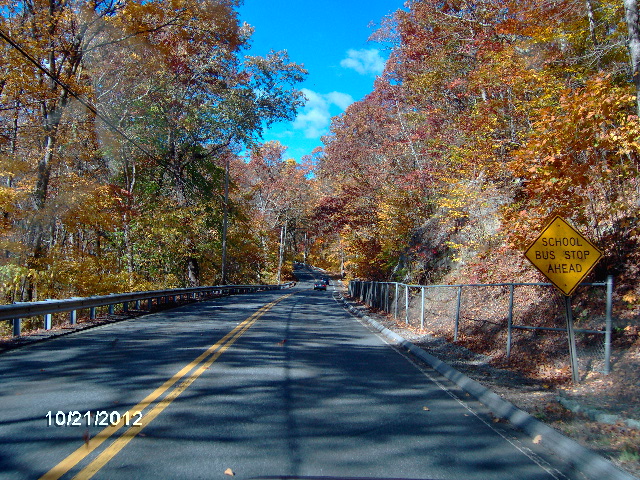
in New England and that means that the pumpkins are ripe and, what is a boy to do?

Well, it's punkin chunkin time! http://www.punkinchunkin.com/

If you have not heard of the growing craze that is gaining popularity among a ton of backyard engineers, a few genuine engineers, and lots of hardcore fabricators then you are missing out on some crazy excitement, and dare I say, a bit of danger, too!

Check out Siege-Engine.com for the whole story on Mista Ballista, the world's most successful competition ballista (...oh yeah, it's the world's only full size competition ballista :roll: ).

We compete in the very popular torsion division where bundles of twisted rope are used to power our “not really a catapult like device” to throw a 10 lb. pumpkin as far as we can. Our personal best is 1060 ft. The record for our class is over 3600 ft! That's over 1/2 a mile!

A ballista is similar to a cross bow, except that the twisted rope is the spring and the arms are relatively rigid (whereas on a crossbow the arms are the springs and are flexy). We are going to attempt to compound our bow string this year, and in typical fashion, our team has consternated and discussed and procrastinated to the point where I felt that the only way to make it happen was to take a few days off of TPCE and focus on fabricating the necessary parts. Karl has been very busy making deadlines on paying jobs, and Sandy is throwing a monkey wrench into the whole mess, but the days “off” from work due to the storm have allowed me to spend some extra time getting these things done.

Last week Dave, Jeff D. (Nerd Herd Jeff, not smoked rib Jeff), Eric and myself met up at Eric’s place in MA to do the final pack up of both Mr. B and the small utility trailer that we use to tow support equipment (so towing is involved and that is how I justify using bandwidth here!). It was a drizzly day, but we made good time getting things ready. Despite checking the extensive lists of what goes where, it still seemed like we had lots more empty space than we should have, at least until we got everything in its place.

Since we travel on Thursday, we like to have Mr. B all packed up and over at Dave’s place for the transit down to Mecca (there is always some last minute fab work that needs to get done, and since the ride to DE is so long, Dave likes to pre-stage here on Wed. and have a driving partner for our early Thur. departure. On the same token, I will be towing the ute again this year, so I wanted to have that packed up and down here at Mecca, too. We used to leave late night Wed. and drive all night, but that gets old fast.

With the storm, Eric was reluctant to load his generator onto the ute, so we left that spot empty waiting to see who would end up with power after the storm. Karl’s power is not restored yet, so he is reluctant to commit his welder/generator. Still working that out, but we will need elec. power in the field, so … (update: Eric has power, so Dave will bring Eric's unit with him...Eric and others pile into mini van, so no room for genie there).

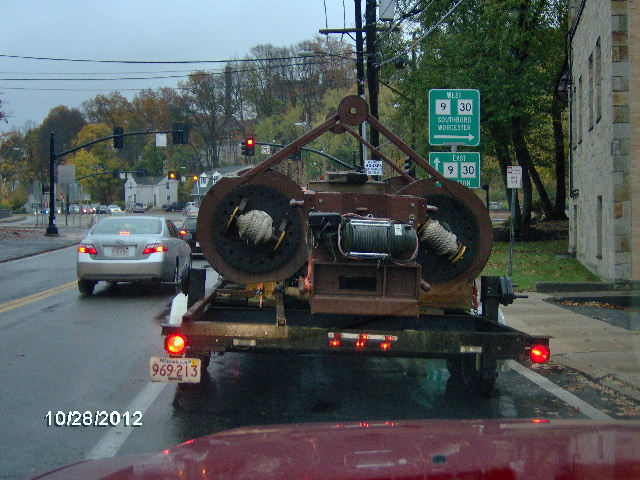
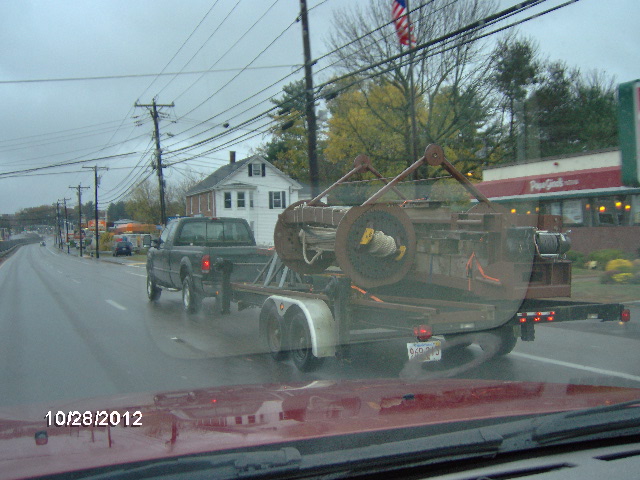
Here are a couple of shots of Mr. B on the road as Dave and I left Eric’s place. The rope bundles and forward stanchions are laid down on their backs and slide back over the axles during travel. The big black disks are 36 inch sprockets that we use to wind the rope bundles. The white blobs in the center of each disk (modioli… it’s Greek for “washers”) are the rope bundles consisting of 30 or 40 some odd wraps of 1 inch dia twisted nylon rope stretched really tight as it is wrapped into the bundle. The little round disks at the top with the holes in them are where we attach the hydraulic ram that we use to pull on the sprockets to twist the bundles. Between the ram and the sprockets we use a piece of roller chain, like on your bicycle, except that the rollers are 7/8 in dia and the pitch of the chain is 1 inch (IIRC). The side links on the chain are 1/4 inch thick! We call the chain "The Anaconda" because it is like wrangling one to handle it.
Image
Image

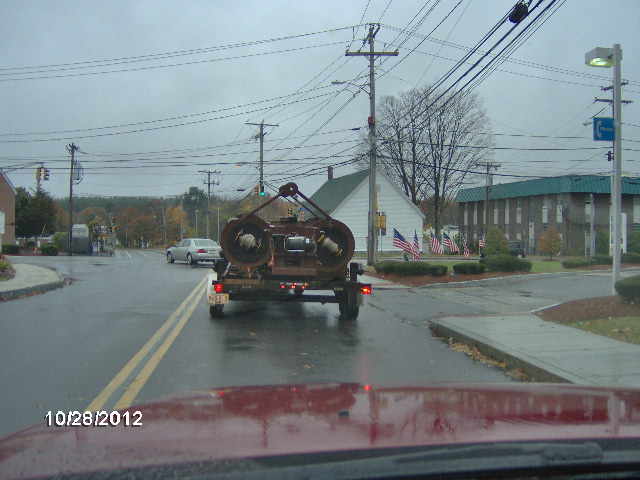
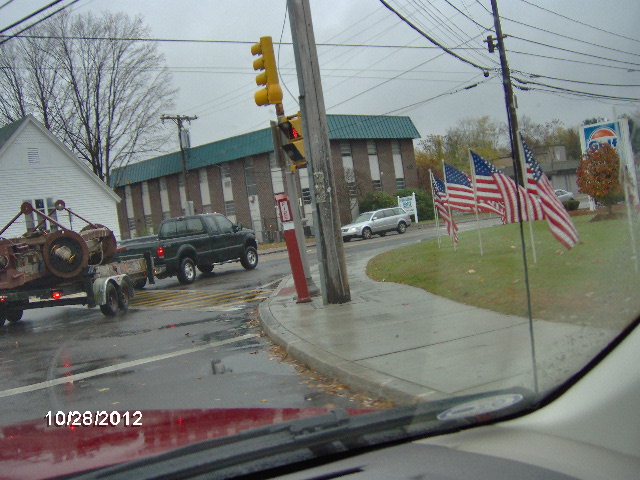
The winch on the back is a 15k lb Warn.
Image
Image

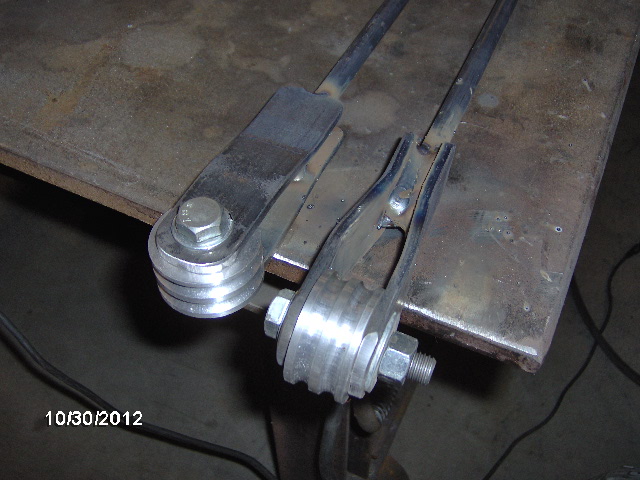
Anyway, here are some of the parts that I have been making for the compound bow line setup. These pulleys are fixed to the ends of the arm tips to give the eye splices in the bow lines something to wrap around. In order to compound we will be extending the bow lines (there are top and bottom lines that support a pouch for the pumpkin) so that a portion of line glides around each pulley (even tho the pulleys are fixed and should not rotate). The plan was to put a keeper loop around the front edge of the pulley to keep the bow lines from slipping off. Here you can see the two holes that Karl and I drilled in each pulley, and the little slugs of 5/8 round alum. that will be drilled thru to act as the keepers.
Image

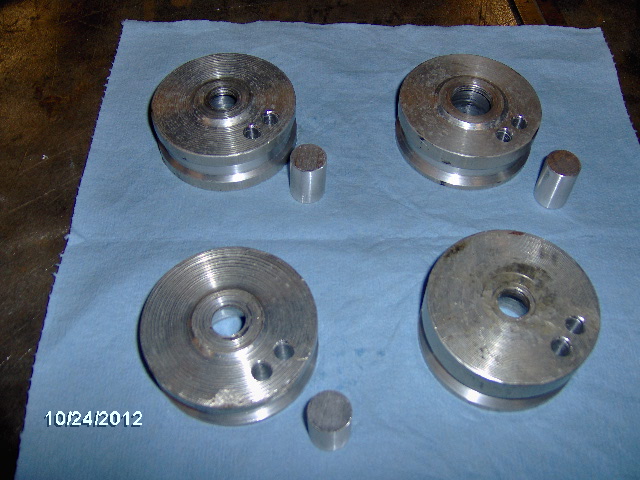
Whipped up some alum. tabs, drilled a few holes, and presto, arm tip pulley keepers.
Image
Image

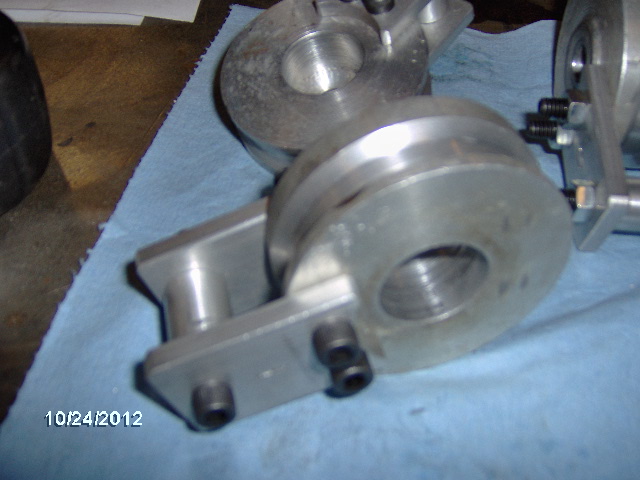
In order to extend the bow line (which is some super swanky Vectran synthetic stuff, super light, super strong, does not stretch) with maximum strength, we needed a way to interconnect eye splices. Jeff D. came up with the idea from some electrical insulators and I ran with it making these couplers from 2 inch dia alum round. First I shaped a HSS cutter to groove the diameter; then I parted them off in 1/2 inch thick “pulleys”; then I drilled a couple of holes in each so that we could wrap the line with tie wraps to make sure that the couplers don’t flip out during moments of slack (like during installation and set-up); then mill a slot in each so that they can key together to form the coupler. Dry fit.
Image

MIG welded on generator power.
Image

We don’t have enough of the expensive Vectran to reach all the way back to the available anchor point on the winch frame, and we would rather use material on hand than have to go out and buy wire rope cable and related hardware, so I devised these solid round bar link arms made from 1/2 inch round steel (about 4700 lbs. tension). The end that will get welded to the winch frame once we have Mr. B set up in the field and can figure out the final length of the links is shown dry fit here. The two tabs will get welded onto the winch frame with a little bit of space between for articulation. The hole in the strap tab that will get welded to the rod is just a touch over size, also for articulation. The bolt is 1/2 inch Gr 5.
Image

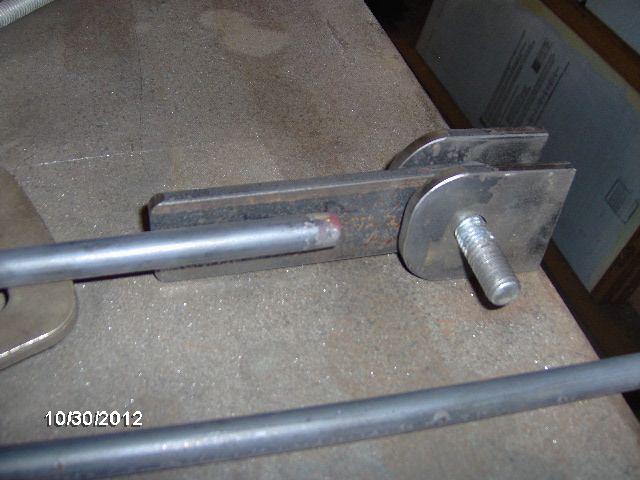
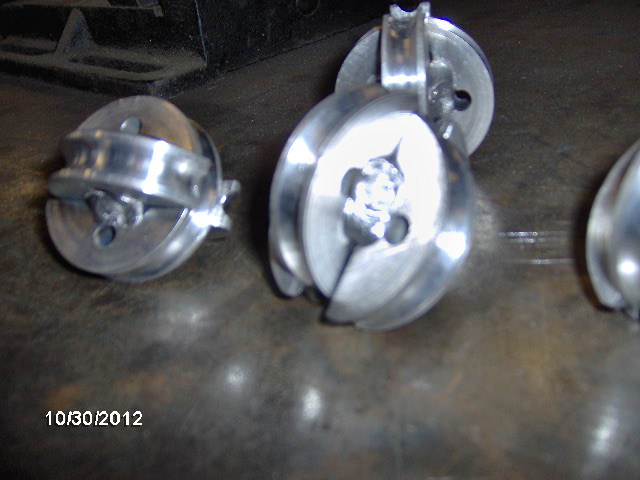
The other end of the link needs to accept the bow line extenders and the best way to attach those is with more eye splices. In order for the eye splices to not slip out, they need to have some angle to the splice, which means that they need to wrap around something with some girth (hence the pulley like couplers above). So at the front end of the anchor link rod I devised a clevis consisting of bent flat bar tabs and alum double groove pulleys. Here are the formed clevis yoke halves tack welded onto the rods just before Karl MIG welded down all sides of the rod.
Image
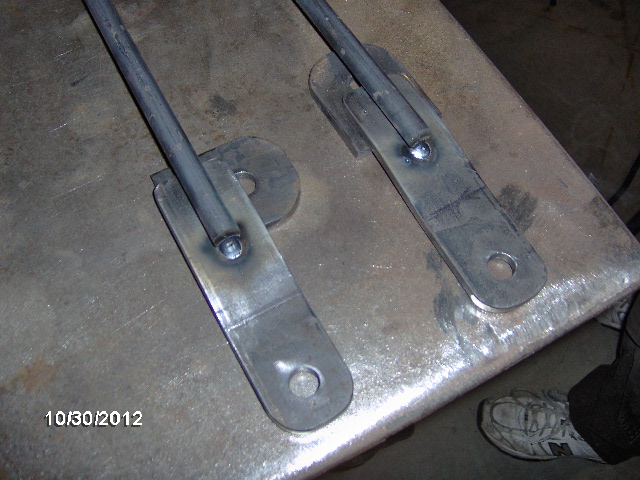
(The other tabs are just sitting underneath as temporary shims during welding.)

Here are the completed clevis' after bolting on the other sides using the pulleys as spacers and welding to the rod down both sides.
Image

The two bow line extenders from each side of the ballista will be laid into one pair of grooves with one link rod located on each side of the winch frame.

So to recap, the pumpkin and pouch will be in the middle of the arms (think cross bow); the top and bottom bow lines will run out to the couplers which will be located near the arm tips; the bow line extenders will pass through the pulley keepers sliding around the arm tip pulleys where they will be anchored on the double groove pulleys at the front end of the link rods; the back end of the rods will be anchored to the back of the machine.

Eric's math says that we should get a better push at the end of the throw doing this. If it doesn't work we will just pull the extenders and couplers off and reattach the regular bow line back onto the arm tips.

Wish us luck.
KC
My Build: The Poet Creek Express Hybrid Foamie

Poet Creek Or Bust
Engineering the TLAR way - "That Looks About Right"
TnTTT ORIGINAL 200A LANTERN CLUB = "The 200A Gang"
Green Lantern Corpsmen
User avatar
KCStudly
Donating Member
 
Posts: 9640
Images: 8169
Joined: Mon Feb 06, 2012 10:18 pm
Location: Southeastern CT, USA
Top

Re: The Poet Creek Express - Foamie Hybrid

Postby eaglesdare » Wed Oct 31, 2012 10:59 am

lots of luck coming your way! :wine:
Louella
May the foam be with you.
User avatar
eaglesdare
Donating Member
 
Posts: 3168
Images: 13
Joined: Tue Aug 26, 2008 7:06 pm
Top

Re: The Poet Creek Express - Foamie Hybrid

Postby Bogo » Wed Oct 31, 2012 11:22 am

Reminds me of the time I made a trebuchet from office supplies. Soon there were wars in the engineering department. :lol: Somebody did make a ballista.
User avatar
Bogo
500 Club
 
Posts: 658
Images: 39
Joined: Tue Oct 02, 2012 4:32 pm
Location: The land between two rivers.
Top

Re: The Poet Creek Express - Foamie Hybrid

Postby KCStudly » Fri Nov 09, 2012 9:15 pm

Re: Spewing pumpkins seen on the Thrifty thread (Spewing Pumpkin Instructible). I much prefer to hurl the pumpkin than the other way around!

Here's a brief overview of our trip to the punkin chunk - Siege-Engine.com

We reset our own unofficial world record for a ballista by throwing an 8.3 lb. pumpkin 1213 feet. That's close to 1/4 mile! :thumbsup:

Whew, that was like work...but fun.

Anyway, let's see if I can get some momentum going on TPCE again.

Tonight I went up to Mecca and glued up the last of the regular cabinet face frames; same as previous ones except shorter. This one is for the upper rear cabinet in the cabin. I took 2 pic's and will post eventually.

Left to do along those lines is the galley under counter face frame and the frame that makes up the front rails of the upper galley shelves. The later has a couple of vertical stiles in the center to tie the two shelves together.

Then it's back to the walls and setting all the blocking into place, skinning the inside, trimming the profile, etc. etc.

I am starting to get worried about the lack of heat up in the loft. We have had a cold snap with a touch of snow/wintry mix and Karl had the stairwell hatch closed to keep the wood stove heat down. No insulation upstairs yet. The issue is both for storage and application temperatures of the glue and other liquid products needed to build a TD.

Tomorrow is waiting for the cable guy to come (I have been informed that we have "signal leakage"...I asked if this was something that the technician found when he was out a couple of weeks ago to fix our lack of phone service...corrosion at the pole...and why he did not fix it at that time, but was met with BS silence), then I need to get a new tarp cover over the boat before we get any real snow, then I need to get the 6 new tires for TPCE and the Jeep all mounted up.

Then maybe I can get some more done on the camper proper.
KC
My Build: The Poet Creek Express Hybrid Foamie

Poet Creek Or Bust
Engineering the TLAR way - "That Looks About Right"
TnTTT ORIGINAL 200A LANTERN CLUB = "The 200A Gang"
Green Lantern Corpsmen
User avatar
KCStudly
Donating Member
 
Posts: 9640
Images: 8169
Joined: Mon Feb 06, 2012 10:18 pm
Location: Southeastern CT, USA
Top

Re: The Poet Creek Express - Foamie Hybrid

Postby KCStudly » Sat Nov 10, 2012 9:56 pm

Hung out at the house this morning waiting for the cable guy. As soon as he got here he's like, "I'm going to start by changing the cable from the pole to the house." Like, huh. You already know that that needs doing? Why didn't the previous guy do that when he was here? And what's with the BS about signal leakage from the customer service dude? :x I mean, just tell me straight, "We should have fixed this when we were here the first time, but our technician was lame and we have to sell you some BS to try to snow you over."

By the time I got freed up from that there was no time to pull the tarp off of the boat, so I just loaded all of the tires and wheels up into the Jeep; 4 new tires for the Jeep and the 2 tires and wheels for TPCE. 31 inch tires...6 of them... in a Jeep. :frightened: I couldn't see out of the back or passenger side. Got to the tire shop 1/2 hour before closing and they turned me away. Drat. These pics where taken later, but you can see how crowded it was in there.
Image
Image
Image

Anyway, on to Mecca. Yesterday I had masked up and glued the upper rear cabinet face frame.
Image
Image

And today I stripped it down and sanded all of the joints flush, broke the edges a tad, and parked it with the rest of the pile-o-parts.
Image
Image
Image

Karl commented that the face frames are looking good, so I guess I am doing something right! :thumbsup:

Then I masked and glued up the under counter face frame for the galley. This only covers the left and middle bays. The cooler bay on the curb side needs a little more height so the counter will only be supported by the trim edge on that side.
Image

Then I moved onto the missing shelf edge, slotting the dado on the table saw and rounding over the edges on the router. This piece of wood has a slightly different color, a little more brown/coffee/chocolate than the white/yellow color of the first batch of maple. I'm hoping that it will not be so noticeable with the shelf set back under the upper forward cabinet, and once stained. That's it on the left of the three.
Image

Tomorrow, Sunday, I need to try to find some place that is open that can mount all of these tires (maybe Sears), and still need to do that tarp, and the wife wants to spend some time together, and the drag finals from Pomona (my original home town) are on in the evening, so it's not looking good for getting trailer stuff done, except for the tires I guess. But hey, progress is progress. Build on.

I'm picking up some speed again, so GPW better get cracking, or I just might finish before the Foamstream. :lol: :D
Last edited by KCStudly on Sun Nov 11, 2012 10:26 am, edited 1 time in total.
KC
My Build: The Poet Creek Express Hybrid Foamie

Poet Creek Or Bust
Engineering the TLAR way - "That Looks About Right"
TnTTT ORIGINAL 200A LANTERN CLUB = "The 200A Gang"
Green Lantern Corpsmen
User avatar
KCStudly
Donating Member
 
Posts: 9640
Images: 8169
Joined: Mon Feb 06, 2012 10:18 pm
Location: Southeastern CT, USA
Top

Re: The Poet Creek Express - Foamie Hybrid

Postby GPW » Sun Nov 11, 2012 6:30 am

Unfortunately , the FS will feature none of the elegant minutiae of the TPCE... Just a shelter , on an old boat trailer ... :oops: The Race is On ... My deadline is June 1 2013 ... KC , likely you’ll be finished before that ... sans spherical Orange distractions ... :D
There’s no place like Foam !
User avatar
GPW
Gold Donating Member
 
Posts: 14920
Images: 546
Joined: Thu Feb 09, 2006 7:58 pm
Location: New Orleans
Top

Re: The Poet Creek Express - Foamie Hybrid

Postby KCStudly » Sun Nov 18, 2012 3:14 pm

During the week I completed the cabinet and shelf face frames. Here's how it went.

Changed the 1/4 round over bit in the router out for a straight flute. While I was at it I took the depth adjuster body/shoe assembly off and cleaned all the sawdust out of the big thread to free it up again; it had been getting difficult to adjust.
Image

Moving on with the galley shelf face frame, I set the router depth to match the shelf slots in the back of the shelf face frame rails, laid out and clamped on some guides, and sort of partially freehand routed out some pockets for the galley shelf stiles.
Image

And here is a mock-up of the shelf face frame to give you a better idea of what I've been trying to describe. The two front edge rails for the lower and upper galley shelves are laying face down on the bench with the lower rail to the right and the upper rail to the left. The two stiles (that are spaced the same as all of the other cabinet stiles) are fit into the pockets shown in the previous pic, and the slivers of scrap 5mm ply represent the shelf panels.
Image

Here I am checking the dry fit from the front of the shelf face frame (er...that will be facing to the rear of the camper).
Image
Image

Not a lot of meat under the upper shelf slot, so when I pre-drilled and counter sunk for the screws I toed them in at about 60 deg. Had to do some careful checking of the drill depth setting, depth of countersink, and screw length to make sure that it didn't poke through the front side.
Image

Masking tape, glued and screwed.
Image
Image

Here is the under counter face frame that trims out the two dividers that will support the galley counter and divide the space into three compartments. It was built in the same fashion as the other cabinet face frames. There will be another rail that runs across the top of this spanning between the walls of the galley and trimming out the front edge of the counter underlayment. That piece will overlap by the thickness of the counter, leaving a shadow line that will reveal the top rail on this piece. The third bay has been left open to give a little more clearance for the cooler on its slides without having the counter top get that much higher.
Image

Okay, confession time. When I laid this out I did it to the drawing, but I was working from the rear and the drawing showed the front. Sooooo...the pre-drilled Kregg holes to attach it to the left side wall (and the biscuit for the leg on that side that sticks out the hidden side), and the second leg on the open end that was Kregg screwed up into the rail so that the open end would not show any biscuit both ended up on the wrong end...with the middle leg offset to the wrong side. (huh?...It was all bass-ack-wards). So the simple solution with the least impact to the final finish appearance was to relocate the middle leg (unscrewed it; popped the glue joint; sanded away the glue; filled the two tiny little screw holes in the underside of the rail; repositioned, masked, glued and screwed) and slide the frame over relocating the cooler from the curb to the street side. My cooler has clam shell lids that can be swapped end for end, so there is no problem with which way the cooler opens vs. where the drain hole is, and I was smart enough to include the extra blocking in the wall in case I wanted to add sliders to the street side bay, so it worked out okay.

Here's a closeup of the right side front joint showing the exposed biscuit and the Kregg screw holes that would have been exposed if I didn't flip the cooler over to the other side. This now goes up against the curb side wall, and the cooler goes in the open bay on the street side.
Image

And the Pile-O-Parts grows.
Image

Karl and Rover Mike moved the rover back into the CT and out of the shop, allowing Karl to reorganize the shop to make the final push to get the chip drying mill done and out. Hopefully there will be a window for me to use the big steel tables to get the wall blocking and inner skin work done before the next big steel project. Since the insulation in the loft does not look like it will get done this season, Karl and I will be working harder to stay coordinated and keep the main shop tables freed up between our shifts.
KC
My Build: The Poet Creek Express Hybrid Foamie

Poet Creek Or Bust
Engineering the TLAR way - "That Looks About Right"
TnTTT ORIGINAL 200A LANTERN CLUB = "The 200A Gang"
Green Lantern Corpsmen
User avatar
KCStudly
Donating Member
 
Posts: 9640
Images: 8169
Joined: Mon Feb 06, 2012 10:18 pm
Location: Southeastern CT, USA
Top

Re: The Poet Creek Express - Foamie Hybrid

Postby RandyG » Tue Nov 20, 2012 4:31 pm

Hey, it's been a while since I checked on ya, a lot of other stuff going on here. I like your shelf design, should be lighter than others I've seen, do ya mind if I use it on my TD?
I have been thinking of an idea for an alternate hinge type since nothing I have seen has impressed me much. I can't do a hurricane cause "everyone else is doing it". So let me let you in on my two ideas and maybe we can inspire each other.
1. a SS piano hinge with a metal shim going over it, fastened to the camper side but not to the hatch to allow it to move as you open it. My thought is the water will run over the shim and not get to the hatch. The problem I see here is the shim being bent when you open the hatch, then you have a spoiler.
2. same piano hinge with a piece of rubber over it, the rubber should not be stout enough to hinder you from opening and will buckle upwards when opening the hatch.
I know there is another way but that's all I got at the moment.
Randy
Aircraft fabricator, novice carpenter, electrical apprentice, audio engineer dropout.
Build thread - http://www.tnttt.com/viewtopic.php?f=50&t=54126
User avatar
RandyG
500 Club
 
Posts: 695
Images: 115
Joined: Thu May 10, 2012 6:52 pm
Top

Re: The Poet Creek Express - Foamie Hybrid

Postby KCStudly » Tue Nov 20, 2012 9:09 pm

Hey RandyG, thanks for checking in. It looks like we are both thinking about trying your second option there.

I think the keys to the rubber-over-piano-hinge version is that the piano hinge has to be substantial enough to hold up over time (not too thin or small in pin diameter, stainless steel preferred), the rubber needs to stand up to the sun (like EPDM), and it needs to be fastened down over the hinge with more flat bar (FB) so that a good seal is formed. I suppose that the rubber could go under the hinge, eliminating the need for the additional FB, but then the hinge itself would be susceptible to weather and debris, and the rubber would collect more stuff, rather than shed it.

I don't see how your first option would work better. The rubber needs the FB to back it up and complete the seal along its face, and I don't see how the shim (or flashing) can do that on the hatch side if it isn't attached (or did you plan on doing both shim and FB?). My concern would be that any flashing material that is flexible enough to articulate, would likely be either too flimsy, or would be sharp and dig into the paint.

Feel free to copy anything you see, I would be honored and flattered... just don't blame me if it doesn't work well :lol: :oops: ... I obviously haven't had a chance to test anything out in the wild yet, including my storage arrangment. I am still keeping mesh netting, tote type baskets or sealed containers, and/or full doors in mind to keep things organized and in their places.

A little more on the cabinet plan. As noted, the face frames will also act as structural "spars" between the walls and supporting the roof. I'm not sure that I have described how the shelves/cabinet bottoms will be supported. In additin to the slots (dados) at the "fronts" (back sides of face frames), there will be additional 1/4 rnd trim fastened and glued under the "backs" and sides of each shelf/cabinet floor panel. I'm still pondering my blocking plan, and second guessing myself. The bulkhead and side walls are pretty well figured out, as far as the cabinets and shelves go, but I may need a few more points in the front wall. I need to spend some more time with the CAD model and do some tests trying to nail small maple trim... or resort to pre-drilling and doing it the old fashion way with a hammer.

Looking at the last Pile-O-Parts pic it looks like the stiles in the galley shelves are not spaced the same as the rest of the cabinets... hmm :? :o Maybe I screwed up... again? :roll: :oops:
KC
My Build: The Poet Creek Express Hybrid Foamie

Poet Creek Or Bust
Engineering the TLAR way - "That Looks About Right"
TnTTT ORIGINAL 200A LANTERN CLUB = "The 200A Gang"
Green Lantern Corpsmen
User avatar
KCStudly
Donating Member
 
Posts: 9640
Images: 8169
Joined: Mon Feb 06, 2012 10:18 pm
Location: Southeastern CT, USA
Top

PreviousNext

Return to Foamies

Who is online

Users browsing this forum: DrAlvarez and 11 guests