The Poet Creek Express - Foamie Hybrid

Canvas covered foamies (Thrifty Alternatives...)

Moderator: eaglesdare

Re: The Poet Creek Express - Foamie Hybrid

Postby KCStudly » Mon Nov 26, 2012 3:48 pm

Thanks for the advice, Ned B. That cutting board looks sharp! (See what I did there with that little pun? 8) ;) )

Yeah, I have a small electric heater that I will bring once I figure out where it is; should be enough to keep me warm if I stand right in front of it. That's not really the problem; I don't mind the cold so much as long as I keep moving... I have plenty of personal insulation. The problem is that the loft has ridge and soffit vents so if we try to heat the whole space w/o sealing it up and insulating, it will be like heating the whole outdoors! I'm already using a bunch of Karl's hospitality, so it doesn't seem fair to also tack a huge number on to his utility bill or firewood cost. :o I did suggest putting my little CI wood stove in up there to supplement the big stove downstairs, but until we seal things up it's just wasted energy. That's why he built the hatch over the stairway, so he doesn't have to heat the upstairs (downstairs isn't the Sahara desert either!).

As far as hauling stuff around goes; that just doesn't seem practical to me. I'm already hauling my box of glues and what not with me to keep them "warm-ish", and that alone is a pita. Don't forget that I'm 20 min away from the shop from home and 30 min from work. Can't fit the whole enchilada in my small SUV anyway, so there needs to be another solution...just not sure what it's going to end up being.

I don't mean to whine, just trying to keep it real.
KC
My Build: The Poet Creek Express Hybrid Foamie

Poet Creek Or Bust
Engineering the TLAR way - "That Looks About Right"
TnTTT ORIGINAL 200A LANTERN CLUB = "The 200A Gang"
Green Lantern Corpsmen
User avatar
KCStudly
Donating Member
 
Posts: 9640
Images: 8169
Joined: Mon Feb 06, 2012 10:18 pm
Location: Southeastern CT, USA

Re: The Poet Creek Express - Foamie Hybrid

Postby RandyG » Mon Nov 26, 2012 4:40 pm

What about a hot box? Just a wooden or metal box whatever size you need and a couple (or just one) flood lamps on it. I have some reptiles that need heat and it is fairly easy to heat up a small space. We keep it at 70* F in the house and under one of my 75 watt bulbs it is close to 100* F. Couple of bulbs would only run about $10. It's only Nov., just gunna get colder up there!
Randy
Aircraft fabricator, novice carpenter, electrical apprentice, audio engineer dropout.
Build thread - http://www.tnttt.com/viewtopic.php?f=50&t=54126
User avatar
RandyG
500 Club
 
Posts: 695
Images: 115
Joined: Thu May 10, 2012 6:52 pm

Re: The Poet Creek Express - Foamie Hybrid

Postby wagondude » Mon Nov 26, 2012 6:28 pm

You should be able to use a universal coller support on those routers. It is just a piece of plexiglass with a hole drilled in the center for the coller. Then you remove the screws holding the shoe to the base and use the shoe to mark where the holes need to be drilled. Also look at drop in router table plates. This kit should work for you: http://www.woodcraft.com/product/200485 ... g-pin.aspx
Bill

TnTTT ORIGIONAL 200A LANTERN CLUB
101137
User avatar
wagondude
1000 Club
1000 Club
 
Posts: 1535
Images: 35
Joined: Sun Jan 16, 2011 7:41 pm
Location: Land of the Jayhawks
Top

Re: The Poet Creek Express - Foamie Hybrid

Postby KCStudly » Mon Nov 26, 2012 11:10 pm

Well the hot box sounds like a good idea on the surface, but how big would be big enough? Hatch size? Cabin size? Maybe I should just build the cabin and heat it! ...but then it will be insulated and I will need to glue stuff on the outside, too, so... :thinking:

Forgive me for always playing the devil's advocate. It is in my nature. :D

Thanks Wagondude for that link. I had actually looked at that previously and seemed to miss the fact that it was also a universal/drill to fit deal. I also saw this one and intend to inquire further.
rockler.com

Not sure if this kit includes the base plate, too, or just the collars, but will ask when I call.

Tonight I continued making the "riblets", the ribs for the 13-1/2 inch radius at the front of the cabin. Here's a pic of Karl's antique band saw. Works great!
Image

Rough cut all of the ribs.
Image

The first course on this evenings menu is a nice uniform grain of maple sawdust.
Image

Then I fiddled around with another not so good router option before deciding that, because the part is small and narrow, the router table would be a better option. Here you can see the end of a rib with the template carpet taped underneath next to the top bearing flush cutting bit set in the table with the bearing adjusted to ride on the template.
Image

Even though I made sure to make the cut in the climbing direction, near the leading edges of the first piece the cutter bit in due to the angle of the grain, tending to chip and grab the piece from my hands. I found that so long as I started in from the end where the grain was leading back into the curve of the part, I didn't have that problem. But I did have to reposition the template on to the other side of each part to complete the cut; with the rest now leading into the grain again.

For our second course, a nice big pile of fluffy maple shavings...oops, no pic (...but since I broke the cardinal rule and did not sweep up after myself, I will have another chance to take a pic).

After hand sanding the glue joints and pencil marks with the little oak block and the curvy block, getting the chatter and chip out fair, labeling them for orientation (curb, 2x mid, and street), and knocking off the appropriate inner edges a touch, here they are, substantially identical.
Image
Image
Image
The utility knife is there for scale.

Just need to push a dab of filler into the little screw holes from the clamp set up, then later, when fitting them to the cabinet frame and ledger, I will make the notch and add Kregg pockets in the outer edges (where they will be hidden by the ceiling panel).

Tomorrow night I will spend a little time making drawings of the cabinet floor and shelf bottom ledgers so that I can get those organized and through the saw, and get the router collar kit on order. Wednesday I will see if Karl is available to help me haul the big parts upstairs, and will swing by the hardware store for some lumber to make a "low stand". The low stand will be a simple frame that I can use on top of saw horses to support the floor assembly evenly so that I can use it as a work table for routing out the wall blocking and wire ways, and later to hold the floor assembly up off of the loft floor to make working on the cabin assembly easier. At least that's the current plan.
KC
My Build: The Poet Creek Express Hybrid Foamie

Poet Creek Or Bust
Engineering the TLAR way - "That Looks About Right"
TnTTT ORIGINAL 200A LANTERN CLUB = "The 200A Gang"
Green Lantern Corpsmen
User avatar
KCStudly
Donating Member
 
Posts: 9640
Images: 8169
Joined: Mon Feb 06, 2012 10:18 pm
Location: Southeastern CT, USA
Top

Re: The Poet Creek Express - Foamie Hybrid

Postby Wolffarmer » Tue Nov 27, 2012 12:34 am

Instead of building a " hot box " I would think about just leaving the glued up parts on the table and throw some old blankets, quilts, canvas tarps over them, draping to the floor and put some light bulbs or little heater under the table to keep them warmish. Might work but you should start with wood about the right temp. Doesn't have to be kept room temperature, what ever that is.

Your work is looking good. It is to cold here for me to do any gluing and such. Plus I am lazy and have a vehicle in my shop up on the lift. Might get it down in another week or two. Nothing serious, just replacing a door handle. Might replace an electric window regulator while i have that door apart. Check oil in the gear boxes. Vacuum out the the interior. It is a whole lot easier to vacuum when I have it on the first stage of the lift, That raises it about 8 inches. When I get it out and a car in there and cleaned up might be time to start cutting metal. Of course I been saying that for about a year.

Randy
"these guys must be afraid of the dark"
User avatar
Wolffarmer
Donating Member
 
Posts: 4612
Images: 309
Joined: Wed May 02, 2007 1:32 pm
Location: Idaho Rupert
Top

Re: The Poet Creek Express - Foamie Hybrid

Postby Bogo » Tue Nov 27, 2012 2:24 pm

RandyG wrote:What about a hot box? Just a wooden or metal box whatever size you need and a couple (or just one) flood lamps on it. I have some reptiles that need heat and it is fairly easy to heat up a small space. We keep it at 70* F in the house and under one of my 75 watt bulbs it is close to 100* F. Couple of bulbs would only run about $10. It's only Nov., just gunna get colder up there!

Just big enough for what needs to be warmed.

BTW: ceiling mounted radiant heaters are very good for heating in areas where warmed air would escape. Use them while you are working and gluing up. Then when the glue sets, cover the part with an insulated mat that extends down to the floor. A bunch of old blankets would work nicely. Then place a small space heater under the table to keep it all warm. This one is a bit expensive, but it give an idea of what is out there: http://www.farmtek.com/farm/supplies/pr ... 07002.html

Ideally your insulated mat would have an air barrier. A sheet of plastic would do nicely. It can be placed on the inside or outside. :thinking: You may want the plastic layer on the inside to separate the blankets from the work piece so the glue doesn't bind them together.

If you don't have lots of old blankets, consider the bubble foil insulation. Get some of it, and some foil tape to tape it together. Because the stuff is moderately stiff, it will hold some shape to it. A "tent" for the table could be made, and lifted on and off as needed. If a structure is needed to hold the insulating tent up off the work pieces, plastic electrical conduits can be taped together with a few wraps of nearly any strong tape, duct tape being a good example. Fittings aren't even needed.

Note, most space heaters have poor temperature regulation. An external thermostat can be used to regulate the temperature. A thermostat example: http://www.farmtek.com/farm/supplies/Pr ... ber=CR2095 I have one of these wired into the middle of a 10 gauge extension cord. I use it with a space heater to heat a room in the corner of my barn. There are some thermostats used for built in electric heating that may also work. They would take mounting in a junction box. Look for ones designed to switch the power to the electric heater. I've seen them down as low as $15, but you have the added cost of the junction box.

Timers are harder to find one shot count down ones that are cheap. Intermetic sells some timers that can have adjustable on and off times. They use different pin placements for turning on versus off. This means they can be setup to just turn off or just turn on. http://www.farmtek.com/farm/supplies/pr ... 09077.html I use them to control power to the engine block heaters on my tractors. I took a couple 12 gauge extension cords, and cut them about 10 feet from the plug end. Then I wired the timers into that point. I then hang the timer on the wall by the outlet, and the plugin end can be run to the tractor. Last night I setup the timer as I knew it was going to be a cold night. At about 5am the timer turned on the heaters in the tractor. When I plugged the tractor back in after using it this morning, I verified the power was working. A small pilot light lights on the tractor when the heaters are on. I then turned off the timer, and set it up to go on tomorrow. Looking around, here is a cheaper one aimed at consumers at Amazon: http://www.amazon.com/Intermatic-TN311C ... B00002N5FO Don't know the quality as I don't use it.

You would use the timer to heat the part only long enough for the glue to properly set, then let it cool after. That would save a few kWh.
User avatar
Bogo
500 Club
 
Posts: 658
Images: 39
Joined: Tue Oct 02, 2012 4:32 pm
Location: The land between two rivers.
Top

Re: The Poet Creek Express - Foamie Hybrid

Postby pete42 » Tue Nov 27, 2012 10:41 pm

KC I'm sure you already know this I find a starter pin mounted in the router allows me to ease into a cut
but end cuts can be a hard thing to get right.

looks good

pete
User avatar
pete42
Super Lifetime Member
 
Posts: 2203
Images: 13
Joined: Sat Nov 07, 2009 11:52 am
Location: SouthWest Ohio
Top

Re: The Poet Creek Express - Foamie Hybrid

Postby KCStudly » Tue Nov 27, 2012 10:53 pm

Thanks Randy, Bogo and Pete. I appreciate your input and suggestions. It's all a learning experience, isn't it?
KC
My Build: The Poet Creek Express Hybrid Foamie

Poet Creek Or Bust
Engineering the TLAR way - "That Looks About Right"
TnTTT ORIGINAL 200A LANTERN CLUB = "The 200A Gang"
Green Lantern Corpsmen
User avatar
KCStudly
Donating Member
 
Posts: 9640
Images: 8169
Joined: Mon Feb 06, 2012 10:18 pm
Location: Southeastern CT, USA
Top

Re: The Poet Creek Express - Foamie Hybrid

Postby KCStudly » Sat Dec 01, 2012 12:56 am

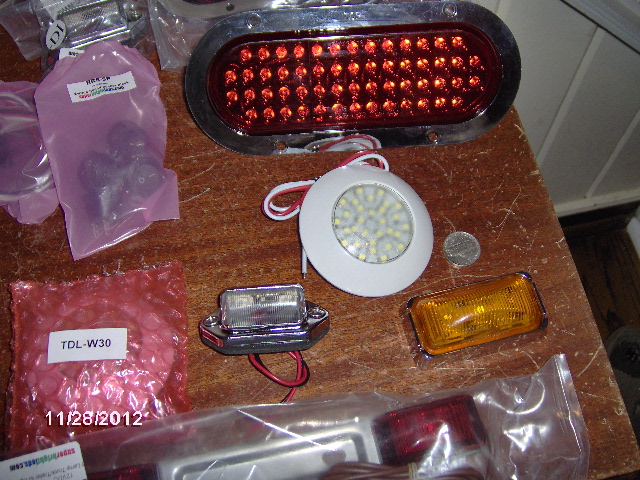
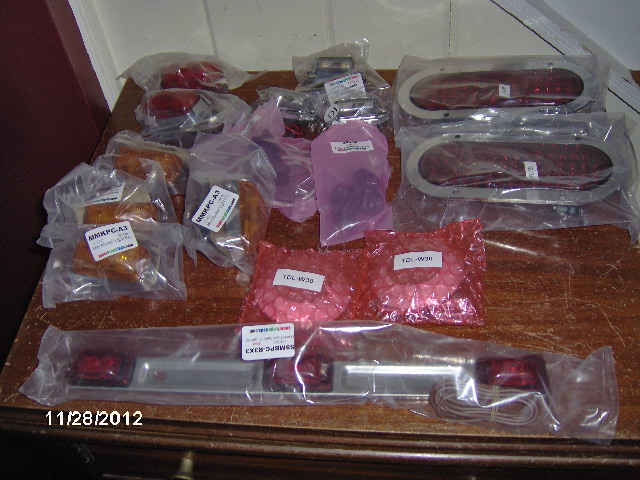
The LED lights came in as scheduled. I was a bit reluctant to take them out of their plastic pouches to take pic's, lest I lose any screws or other small bits contained therein, but I could not resist getting a closer look.
Image
Image

I didn't want to go over the top budget wise on super high zoot fixtures, but did want to stick with all LED's and simple low profile choices. The coin in the 2nd pic is a nickel for size perspective. The dome lights (2 of round white disk shown) are only 3 inches in diameter. Testing on an 18v cordless tool battery suggests that one of these would probably be enough for most tasks inside the cabin, but I got two and plan to have one each up high on each side wall with a wall switch for each light on either side.

[Edit: I have since learned that it is a very bad idea to apply higher than rated voltage to an LED because it can result in drastically reduced life span and premature failure. I won't be using the 18v battery anymore.]

The small chrome hooded light comes in various colors (listed elsewhere as compartment lights); I bought one white for the license plate, and two amber for the porch lights (they look the same with a clear lens when not lit). I'm also considering getting one of these in red for under the cabinet at the foot of the bed, facing the rear, to act as a night vision light for the cabin; and two more white to use for reading/pillow lights (plus switches). Compared to other options they seem to be very reasonably priced.

The amber lens rectangular light with chrome bezel is the front marker light. There are two of these and two red for the rear corners of the trailer, plus two more amber that I will mount under the floor behind the frame rails near the doors. The later will be connected to the porch light switches (one for each side) and will act as foot lights when the porch lights are on.

I ordered the bar style galley hatch light today, now that they are back in stock. I think this will work well because it can be aimed 180 deg, which I hope means it will be easy to set up for optimal effect and forgiving of placement given the hatch angle when lifted.

The tail lights with separate 90 deg plug/pigtail fit in less than 1-1/2 inch depth recess, which will work fine in the galley hatch with a slight raised area to establish a flat mounting ring on the curved hatch surface. The people at superbrightleds.com were very helpful, pulling the items out of inventory to check the stack up of heights for me before ordering.

The 3-bar light (still in package) is the std. type found everywhere and is required for trailers over 80 inches in overall width. My cabin is only 64 wide, but with 10 inch wide fenders, that I may have to space out a tad, I will be at least 84 inches wide overall.

Okay. So the plan for Wednesday got interrupted by our washer machine going ka-put and me having to troubleshoot. No bueno. Going to lose another day and dinero to a service call.

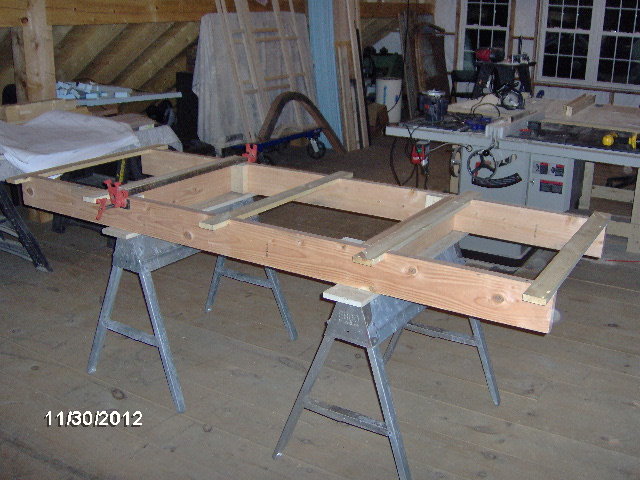
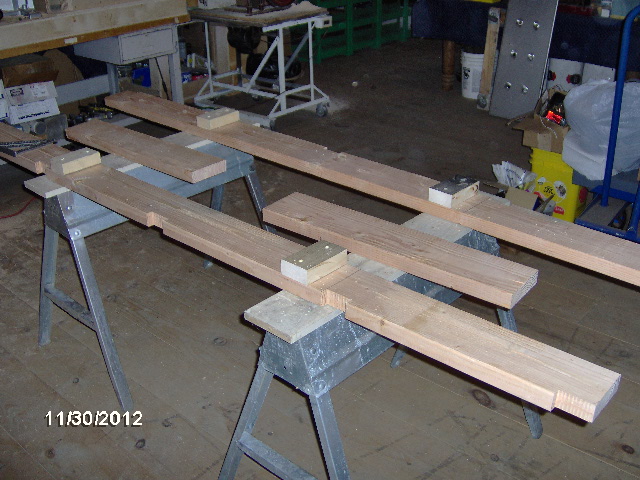
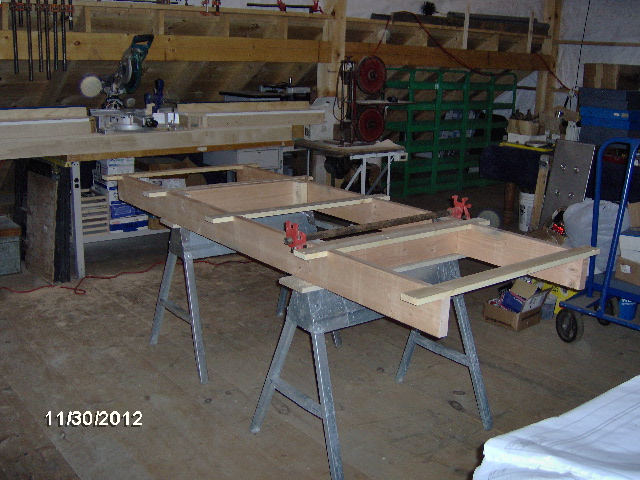
This evening I swung by the ho-de-po and got a couple of 2x6 x 10's (and a few bundles of firing strips for Karl). The plan is to build a cradle to support the floor assembly on either saw horses, up off of the loft floor, or on casters during the cabin construction. I hadn't modeled this, so was "winging" it a bit. Imagine a ladder frame with two main stringers, a couple of xmbrs for blocking and several slats spanning across to spread out the support.

Once at Mecca and unloaded, I visited with Karl for a bit. He wanted to keep the stairway hatch closed to keep the wood stove heat downstairs, both for Simon overnight, and so that it holds some heat into tomorrow. The loft, being vented, would just shed this heat as waste. Anyway, after a very short time Karl was complaining how cold it was (about 35) and suggested that I hang a plastic sheet booth and place a heater inside (ding, ding, ding...light bulb going off). Said that he would never notice the difference in the electric bill, as it is so varied with all of the fab and equipment use, even though I offered to chip in if he notices a big change in power bill. Not sure if plastic sheet would be enough to make a difference.

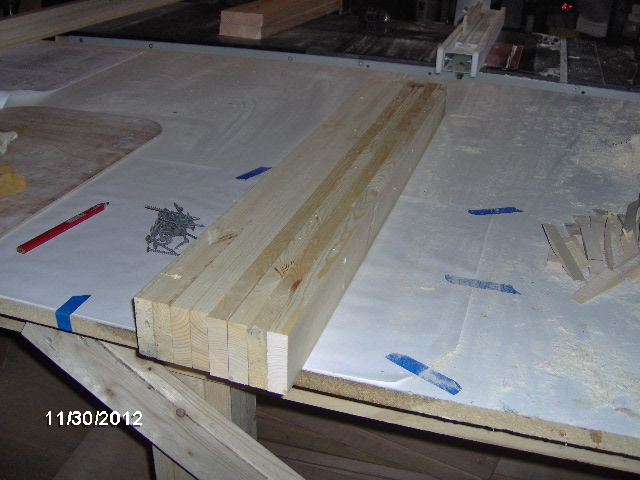
Anyway, after showing him the lights, he beat feet back downstairs to stoke the stove while I started in pulling the kerfing jig apart to salvage the 1x6 pine boards. Ran them through the table saw to rip off the beveled edge.
Image

Then ripped them in half and cross cut them in the miter saw to make a stack of slats.
Image
Some of these will pick up the middle xmbrs embedded in the floor so that I can screw the cradle to the floor as if it were the trailer frame. Thus the cabin won't get shoved off accidentally, and the cradle can be used later as a rigging device to tip and lower the cabin down through the hatch in the loft floor.

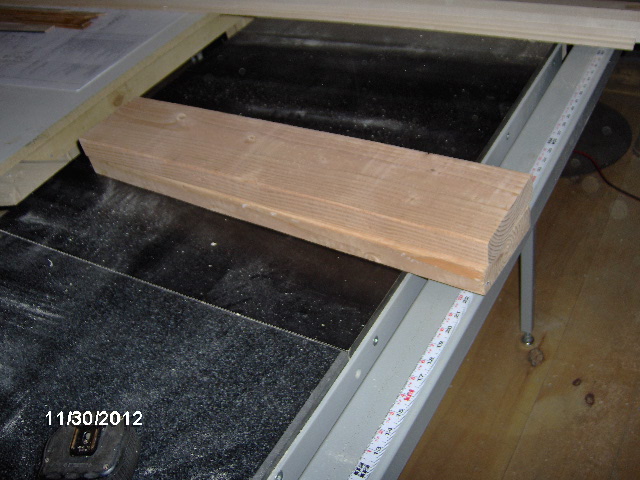
Then I turned my attention to the 2x6's. In hindsight I should have left them a bit longer, and maybe gone a bit wider, but I was trying to get by with the material at hand. Another key issue is to hold the cradle back from the edges so that it will not interfere with wrapping the canvas under the floor by a good 6 inches or so. Karl came and went a few times giving me a hand here and there, before succumbing to the cold and excusing himself back to the warmth of his couch.

Cut 28 inches off of each 10 footer to act as blocking between the two stringers.
Image

Then I cut the remaining sticks to the same length (one was 120-3/4 inches to start, and the other was 120-1/4...great QC work by the mill).

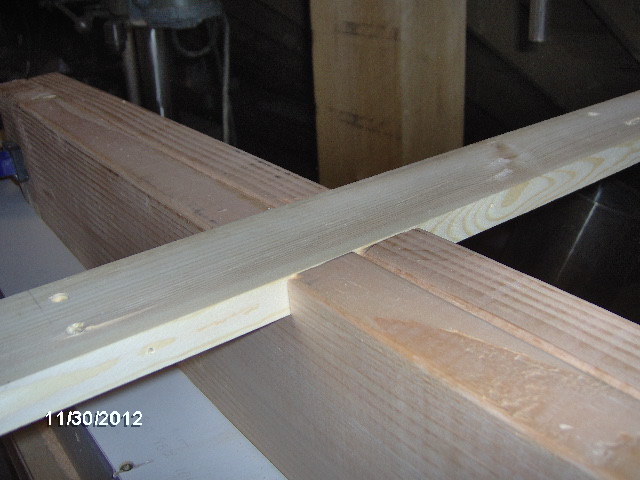
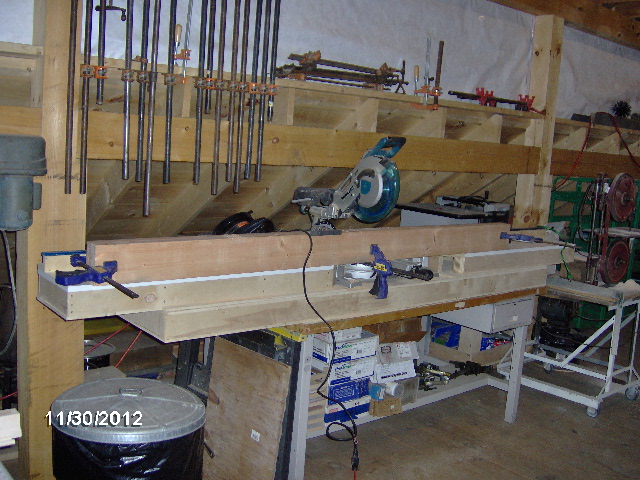
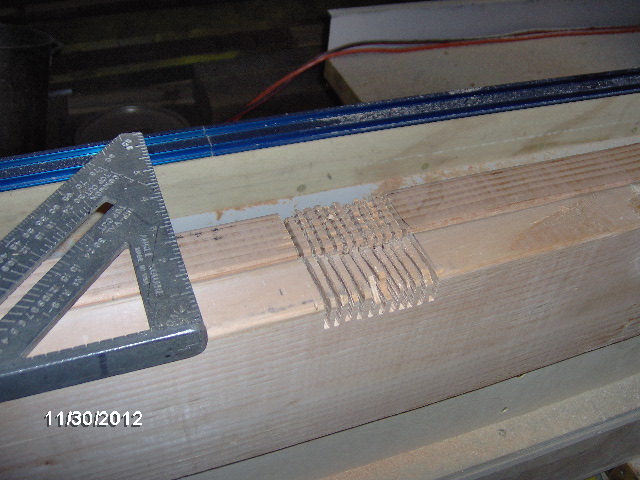
Next I sandwiched the two stringers together and laid out the notches for the slats, using the miter saw table as a work bench, only.
Image

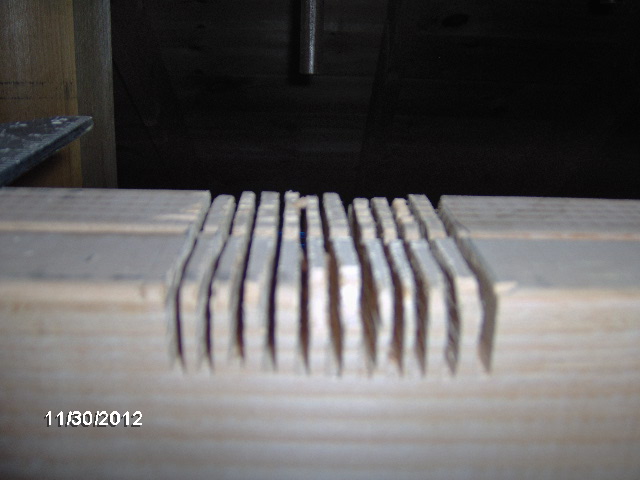
Used a quick square to guide the small panel saw (set to the thickness of the 1x slats) to kerf cut the notches.
Image
Image

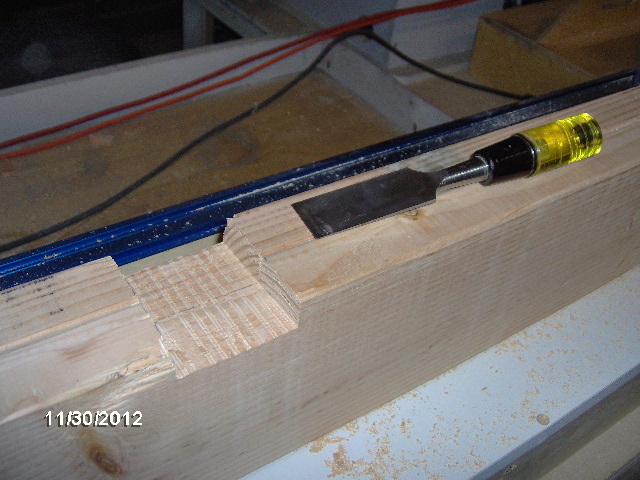
Then I used the metal button on the butt end of my chisel to knock out the kerfs, and then the chisel to just roughly knock down any gross high stuff.
Image

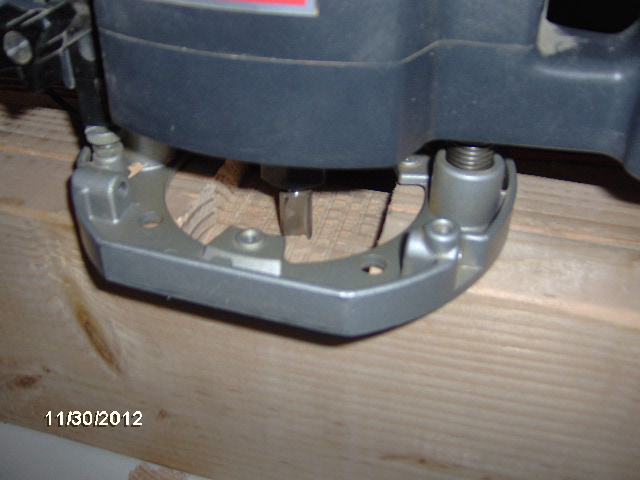
Next I set up the router and just sort of freehanded the notches to clean off the bottom to a uniform depth, knocking off the high spots that the rough chisel work did not get.
Image

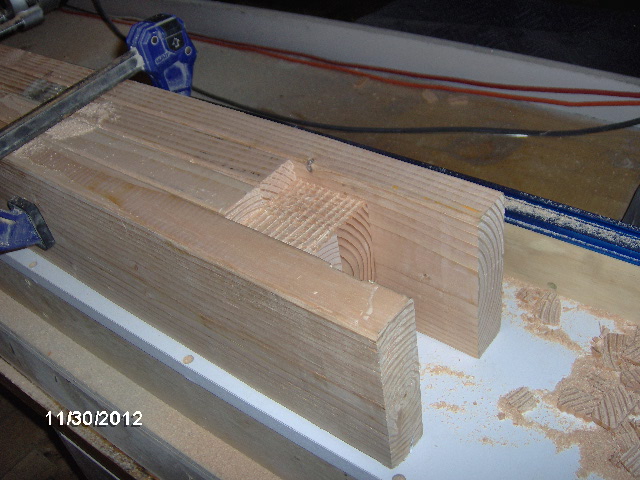
On the end notches I had to get creative so that the router would have something to ride on, so I just clamped the two blocking pieces along side to act as supports.
Image

Checking the fit of the slats.
Image

Next I cut and screwed some corner blocking on to the stringers where the xmbr blocking will go, rather than only relying on screws into the end grain.
Image

And here is the whole cradle frame mocked up in a dry fit before running out of deck screws and calling it a night.
Image
Image

Tomorrow I have some morning errands to do in prep for Yvette's birthday, have to drop laundry off (no time to sit and do it myself), hardware store for more screws, then back at it to complete the cradle and haul the walls and floor up into the loft.

Keeping on keeping on.
Last edited by KCStudly on Wed Jan 23, 2013 4:44 pm, edited 1 time in total.
KC
My Build: The Poet Creek Express Hybrid Foamie

Poet Creek Or Bust
Engineering the TLAR way - "That Looks About Right"
TnTTT ORIGINAL 200A LANTERN CLUB = "The 200A Gang"
Green Lantern Corpsmen
User avatar
KCStudly
Donating Member
 
Posts: 9640
Images: 8169
Joined: Mon Feb 06, 2012 10:18 pm
Location: Southeastern CT, USA
Top

Re: The Poet Creek Express - Foamie Hybrid

Postby Wobbly Wheels » Sat Dec 01, 2012 3:19 pm

Those lights look good - it's amazing how fast all that little stuff adds up, eh ?
That said, those prices are still better than I can get them for here.

The heated tent idea works well - I do that when I have to do glass repairs in the winter. If there's any wind, you're better off with an IR heater...but if there's wind in the loft at Mecca, keeping your glue-up warm is the least of the problems, right ?
:lol:
User avatar
Wobbly Wheels
Donating Member
 
Posts: 1080
Joined: Tue Mar 15, 2011 9:51 am
Top

Re: The Poet Creek Express - Foamie Hybrid

Postby RandyG » Sat Dec 01, 2012 4:25 pm

Try the emergency heat blankets to trap in the heat.
http://www.amazon.com/Reflective-Emerge ... B000FNQ7A4
Randy
Aircraft fabricator, novice carpenter, electrical apprentice, audio engineer dropout.
Build thread - http://www.tnttt.com/viewtopic.php?f=50&t=54126
User avatar
RandyG
500 Club
 
Posts: 695
Images: 115
Joined: Thu May 10, 2012 6:52 pm
Top

Re: The Poet Creek Express - Foamie Hybrid

Postby Wolffarmer » Sat Dec 01, 2012 7:22 pm

LEDs are nice but how are they to read with? The ones I have seen leave me..... cold. Even a florescent is better which I have in mine. Or a Coleman lantern, specially when some heat would be nice. I have a cup hook in the top of mine to hang a lantern and yes I keep the windows open when it is burning. Have to or the heat will dive a person out. Lantern is turn off when I go to bed.

Randy
"these guys must be afraid of the dark"
User avatar
Wolffarmer
Donating Member
 
Posts: 4612
Images: 309
Joined: Wed May 02, 2007 1:32 pm
Location: Idaho Rupert
Top

Re: The Poet Creek Express - Foamie Hybrid

Postby KCStudly » Sat Dec 01, 2012 10:50 pm

WW, don't I know it! Fortunately I had a full box of the screws I needed out in the garage, so no need to stop at the hdwr store today. The pricing on the lights seemed to be as good or better than anywhere else I found, and they have a good selection for one-stop-shopping. Win, win.

RandyG, thanks for the suggestion. I'm sure someone will find that useful. However, at only 52 x 84 inches I would not be looking forward to trying to tape 30 or 40 of those together, and I don't know that the efficiency gained (if any) over standard 3 mil plastic sheeting would justify the added effort and cost. I'm slowly coming to the conclusion that I will more or less have to drape off the whole end of the loft, including at least the out feed/assembly table, if not the saw table, too. That means covering up both side walls up to the ceiling joists, and across the joists, if not the gable end wall, too (cutout and taped off around the windows).

It's not that it is breezy in the loft, per se, it is just not sealed at the eaves (and there are two sets of them), or at the ridge, nor is it insulated (although the vertical walls do have tyvek wrap), so there is no way to trap heat at present. When a good wind blows outside you can hear the tyvek crinkle when it moves!

Randy (Wolffarmer), I'm not sure about the LED's for reading, or even if the hooded light would be appropriate for that, but I will test first. I don't necessarily plan on reading in bed (I usually do that in "the library" or while lounging on the couch), but that seems to be what everyone calls the courtesy night lights, so...

Re: the lantern as an inside light/heat source. Do you notice any fume smells, especially when you shut it off? I realize that they are not the same as candles, oil lamps, or kero lanterns where the fuel continues to evaporate after shutting down, but the wife and I are both a little sensitive to bold aromas and irritants.

Okay, after running a bunch of errands this morning it was out to Mecca with my box of 2-1/2 inch coated deck screws in hand. I used some of Ben's pipe clamps to pull the stringers and xmbrs together, and some quick clamps to pull the xmbrs into the corner blocking, then screwed it off. Checked for square and decided to let in some more slats, on the diagonal, into the under side.
Image
Image

Then I flipped it back over right side up and screwed off the top slats.
Image
Image

Looks like it's time to clean the sawdust off of the camera lens again!

Then I laid out the bolt pattern for the four bolts, the ones that are in the middle of the floor, onto the
slats that straddle the center of the cradle and drilled those off.

Next I had a field day in the shop, putting away the random tools that I had left out, and sweeping up the accumulation of sawdust (I had been falling behind a bit in my cleanup efforts this week).
Image
Pretty good box full.

Next I brought the door assemblies up, then got Kris and Karl to help me bring the walls, floor, and remaining sheet of 5 mm ply up. Could not have maneuvered the stairs w/o their help, and the floor is a little awkward and heavy for just one person.
Image
In this pic the walls and doors are behind the sheet of ply.

I was reminded of just how incredibly light the wall assemblies are, at least at this point with no coverings. Like a feather.

Next I got the cradle into position over the floor hatch (although turned 90 deg), made sure I had plenty of space all around, and toe screwed it into the boards on top of the sawhorses.
Image

Next I got Karl's help again to set the floor up on the cradle bottom side up so that I can finish filling the staple indentations and make sure the seams are sealed up tight (maybe lay a few coats of the mixture on, if you guys think it will be compatible with the Bondo polyester filler, otherwise maybe a dilution of TB2.
Image

Tomorrow is a day off to spend with the wife on her B-Day. The weather is suppose to warm up starting tomorrow and into the beginning of the week, so that is a good thing. I can maybe get the bottom of the floor done, which will allow me to get started on the wall pockets (assuming the router guide template arrives...thought it might have been here today, but no).

Nice dinner out this evening with Chris and Karl; they treated for Vette's B-day. Cocktails, Seafood Shepherds Pie with a subtle Gorgonzola cream sauce, steamed broccoli, asparagus and sun dried tomato risotto, a glass of Riesling, and shared chocolate mousse on a raft of fluffy chocolate cake. Nice.
KC
My Build: The Poet Creek Express Hybrid Foamie

Poet Creek Or Bust
Engineering the TLAR way - "That Looks About Right"
TnTTT ORIGINAL 200A LANTERN CLUB = "The 200A Gang"
Green Lantern Corpsmen
User avatar
KCStudly
Donating Member
 
Posts: 9640
Images: 8169
Joined: Mon Feb 06, 2012 10:18 pm
Location: Southeastern CT, USA
Top

Re: The Poet Creek Express - Foamie Hybrid

Postby Wolffarmer » Sun Dec 02, 2012 3:44 am

KC, I have found that a well adjusted Coleman Lantern running Coleman Fuel makes very little odor. Until the fount starts to run out. On shut down I do get a wiff of fuel but I do not find it objectionable. Of course my nose is probably not the best. I have several Kerosene lanterns. A Petromax clone, a Tilly a new current production Coleman a 200A and a 220E I converted to Kero. The 220E is the only problem child of the bunch, Need to pull the generator and clean it out and see if it flies right. The Petro and new Coleman Kerosenes are great. I notice little odor until the fount starts to run out. But I feel there is a bit more than CF. I do not plan on using the Kerosenes in the TD. Out door only when camping. I don't mind them in the house. The Tilley I got is a different beast. It just plain needs room to work and is not a happy camper. It is actually a radiant heater that has the accessory lantern head on it. Does put out a nice directed light.

In my TD I have found that a 242 or a 200A puts out plenty of heat and light for reading inside when it is cold. Warm weather I read outside. My TD is made so I have a seat in there to read before bed time. Then I make it into a bed. I never could read in bed.

Randy
"these guys must be afraid of the dark"
User avatar
Wolffarmer
Donating Member
 
Posts: 4612
Images: 309
Joined: Wed May 02, 2007 1:32 pm
Location: Idaho Rupert
Top

Re: The Poet Creek Express - Foamie Hybrid

Postby bonnie » Sun Dec 02, 2012 7:58 am

Things seem to be moving along, KC. Really enjoy watching.
Remember, the turtle won. :)
User avatar
bonnie
Donating Member
 
Posts: 1390
Images: 107
Joined: Sun Jul 24, 2011 4:14 pm
Location: Roxana, IL
Top

PreviousNext

Return to Foamies

Who is online

Users browsing this forum: No registered users and 4 guests