Kamp King last pics, journal is complete.

...ask your questions in the appropriate forums BUT document your build here...preferably in a single thread...dates for updates, are appreciated....

Re: Kamp King closed in!

Postby doug hodder » Sun Mar 24, 2013 6:49 pm

Thank you all for the positive feedback and compliments! If my projects provide inspiration, that's great and thank you. I really enjoy the building process and trying to come up with something a little different each time. There are so many great trailers full of ideas out there that I doubt I'll ever get to build all the stuff I'd like to. In the mean time...it's one at a time. It is hard to let them go however. Doug
doug hodder
*Snoop Dougie Doug
 
Posts: 12625
Images: 562
Joined: Tue Dec 14, 2004 11:20 pm

Re: Kamp King closed in!

Postby aggie79 » Mon Apr 01, 2013 4:39 pm

Fantastic as usual Doug!

Some time, if you get a chance, could you fill us in a little more about the door frame, please - metal gauge, dimensions, etc.? I recall seeing you made the door and screen door hinge on the Nomad. Are you using this same method?

Thank you for your creativity and time,
Tom
Tom (& Linda)
For build info on our former Silver Beatle teardrop:
Build Thread

93503
User avatar
aggie79
Super Duper Lifetime Member
 
Posts: 5405
Images: 686
Joined: Tue Aug 07, 2007 5:42 pm
Location: Watauga, Texas

Re: Kamp King closed in!

Postby doug hodder » Wed Apr 03, 2013 3:37 pm

This door is being built the same way. However, this time...it's got a thicker jamb so that I don't have to relieve the back side of the screen to fit. I'll get some dimensions on it. Doug
doug hodder
*Snoop Dougie Doug
 
Posts: 12625
Images: 562
Joined: Tue Dec 14, 2004 11:20 pm
Top

Re: Kamp King closed in!

Postby Ron Dickey » Wed Apr 03, 2013 8:54 pm

doug hodder wrote:This door is being built the same way. However, this time...it's got a thicker jamb so that I don't have to relieve the back side of the screen to fit. I'll get some dimensions on it. Doug

I am doing the same on my new build too. it will give the hinges a better set and the lock will be even stronger.

Look good doug
What colors are you putting into this one? the front of the Cross bow inside I am thinking of putting in fabric on the wall instead of wood, but with my luck it will have something fly trough it on one of my travelings.

:thumbsup: :applause:
Ron Dickey
173882......173887
Inside almost done--Trolly top has opening windows & roof.doors need assembling--pictured above waley windows..galley 1/3 done
Cross Bow in Build Journals....http://www.tnttt.com/viewtopic.php?f=50&t=54108
User avatar
Ron Dickey
Silver Donating Member
 
Posts: 3109
Images: 787
Joined: Tue Apr 20, 2004 5:56 pm
Location: Central Coast, CA
Top

Re: Kamp King closed in!

Postby jeporter25 » Thu Apr 04, 2013 10:21 am

Great build Doug, Your attention to detail and finish quality really set it apart. In a world of Ikea furniture and disposable junk made half way around the world It's good to see that there are still some real craftspeople around. My hat's off to you.
jeporter25
Teardrop Master
 
Posts: 102
Joined: Sun May 20, 2012 6:41 pm
Top

Re: Kamp King closed in!

Postby doug hodder » Sun Apr 07, 2013 5:52 pm

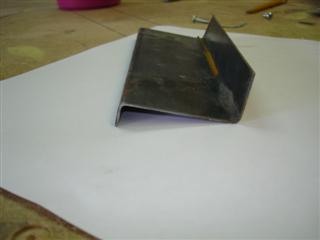
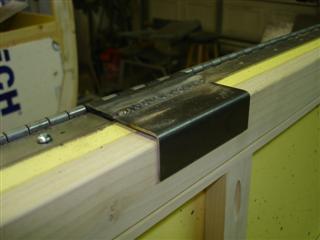
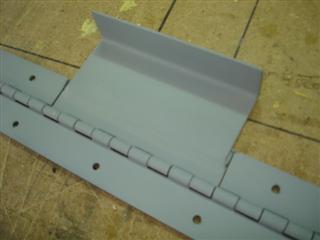
For those of you interested in the door frame construction, here's the info. I get 16ga. sheet metal bent into a Z shape, I buy 3 6' pieces. The drop will be used to alter the hinge for the screen. It has a 1" outer flange, 2.25" deep inside, and 1/2" inner lip. How deep you make it depends on just how much door you want to put into it. The latch I'm using takes a minimum of 1.25" thickness, my screen door 3/4", tears wouldn't need to be so thick as the typical latch/ handles can be put into just about any thickness. You have to include thickness of the outer door, screen door, and enough room to squish the bulb weather seal. The Nomad required me to do some routing on the screen door to make it fit, so on this one I went deeper. On a standy, the advantage of the 1/2" inner lip is that it keeps water from rolling in from under the door due to excessive road splash. I just miter the corners and weld it up to fit the opening. Large flange to the outside, small inner flange on the inside, just keep it square.

Image

I then take the outer door and mate it to the inner door. Both doors are made on the table in a jig I make up so they are identical in size. Cut 1 side of the hinge on an odd number of knuckles so that you have 3 flaps that are independent of 1 side of the hinge. I cut up some of the door jamb drop and weld it to the hinge flap so that it captures the screen. To attach the screen, I use some small screws through the door, not just a wood screw to hold it in place.

Image

Once I figured out that my eye glass prescription had changed and the progressive lenses weren't working to weld...I put on the lined bi-focals and my welds came out cleaner. At any rate...I grind them smooth and hit them with a shot of bondo so they really look nice.

Image

Full length hinge:

Image

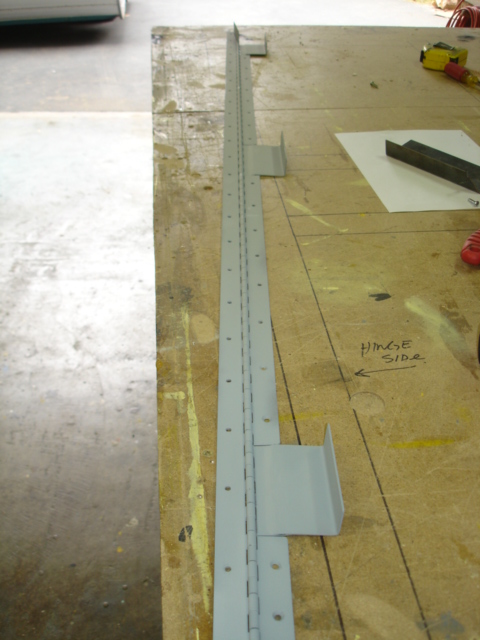
The outer door will be skinned in aluminum, then centered in the jamb, allowing some space for weatherstripping, then I attach the hinge to the jamb with a series of screws. I only do a couple first to make sure it's going to work before I blow a ton of holes in the jamb. I trim out the door with 1.5" x 1/8" aluminum strap and allow it to overhang the opening with enough overhang to take a small bulb seal for weatherstripping. Once fit up...then mark the jamb for the latch and deadbolt. Once marked, I drill them out and work them with a metal blade in the scroll saw and a file, kind of a pain. No pics...I'm not there yet.

Stuff to watch out for...remember which side is up and inside on the doors. The screen door needs to be built so that when you mate the 2 doors together, that the latch fits completely in the screen door opening with the slider on it. Typically, you will need to relieve some material on the screen vertical to allow for the latch. Also...I've found it's a good idea on a scratch built screen door to beef up the bottom and top of the slider in case you try to shut the outer door when the slider door is shut. I found out the hard way. I use poplar for the screen and outer door construction. It works easily, takes paint/ screws great and is less prone to warping. I tend to make my doors beefy as they get used a lot and I've seen tons of older trailers with "floppy" doors. The same process can be done in aluminum, but I'm not set up to do the aluminum welding anymore. I'd imagine that the same process could be done with any thickness door combination, but this is what I'm doing.

Hope this is what you wanted. Doug
doug hodder
*Snoop Dougie Doug
 
Posts: 12625
Images: 562
Joined: Tue Dec 14, 2004 11:20 pm
Top

Re: Kamp King closed in!

Postby aggie79 » Sun Apr 07, 2013 6:01 pm

Thank you very much Doug. Very nice design and detailed description and pictures. I've placed this in my design file.
Tom (& Linda)
For build info on our former Silver Beatle teardrop:
Build Thread

93503
User avatar
aggie79
Super Duper Lifetime Member
 
Posts: 5405
Images: 686
Joined: Tue Aug 07, 2007 5:42 pm
Location: Watauga, Texas
Top

Re: Kamp King closed in!

Postby doug hodder » Sun Apr 07, 2013 6:03 pm

This weekend, I got the rest of the wiring run, got it all insulated except the very top of the roof, started on putting the sub skin on it, and got the screen and outer door hinged and mated up. I also managed to put a big scratch in a drawer front...rats! Doug

Image

Image
doug hodder
*Snoop Dougie Doug
 
Posts: 12625
Images: 562
Joined: Tue Dec 14, 2004 11:20 pm
Top

Re: Kamp King door info + update 4/7

Postby Oldragbaggers » Sun Apr 07, 2013 6:51 pm

Wow!! I really love the shape of this trailer. Magnificent job, Doug.
Life is sooooo good.........
Sail...camp....bike...repeat
Becky

Build Journal http://www.tnttt.com/viewtopic.php?f=50&t=45917
Visit our blog at http://www.oldragbaggers.com
Image Image
User avatar
Oldragbaggers
Gold Donating Member
 
Posts: 1842
Images: 331
Joined: Mon Aug 01, 2011 9:22 pm
Location: Essex, MD
Top

Re: Kamp King door info + update 4/7

Postby Jdw2717 » Sun Apr 07, 2013 8:11 pm

Every time I see this build it makes me want to try and build one that size. Maybe some day, but until then I guess I will just follow and admire yours. Keep the pictures coming.
"Twenty years form now you will be more disappointed by the things that you didn't do than by the ones you did. So throw off the bowlines... Explore. Dream. Discover" Mark Twain

John & Tatanya
User avatar
Jdw2717
Teardrop Master
 
Posts: 180
Images: 34
Joined: Tue Feb 14, 2012 8:34 pm
Location: Knoxville, TN
Top

Re: Kamp King door info + update 4/7

Postby S. Heisley » Sun Apr 07, 2013 8:43 pm

I think that this is going to be the best trailer that Doug has built to date!
(I noticed that you also made a step for in front of the door....Nice looking.) :thumbsup:
User avatar
S. Heisley
Super Lifetime Member
 
Posts: 8866
Images: 495
Joined: Mon Sep 17, 2007 10:02 am
Location: No. California
Top

Re: Kamp King door info + update 4/7

Postby doug hodder » Sun Apr 07, 2013 8:58 pm

Thanks Sharon, I don't think of it as being the best, it's just different...The step is just for the shop and while building. I got tired of making the step up, especially when carrying stuff so that I wouldn't bang a wall. I have an actual bolt on retractable step that slides under the body. However, since it was bent and I had to do a bunch of work on it, if it doesn't work out...I'll "doll" up this step and use it till I get a replacement. Doug
doug hodder
*Snoop Dougie Doug
 
Posts: 12625
Images: 562
Joined: Tue Dec 14, 2004 11:20 pm
Top

Re: Kamp King door info + update 4/7

Postby doug hodder » Sat Apr 20, 2013 10:36 pm

I got a fair amount of work done today. Striped and installed the overhead doors, made all the 12V electrical connections at the fuse box and tidied up the wiring, installed the backsplash, did the final attachment of the counter tops, made the final connections on the plumbing, stained and sprayed the screen door and did some preliminary fit up on the doors. I also got the name badging/logo cut in vinyl so it's ready to install once I get the paint on it.

It's all skinned with the luan, with the exception of the roof and that won't happen till I lower the trailer, there is no room to do that work as it sits. I'm not going to do that until I get the aluminum skin on the sides and the front and get it painted, ( 3 colors on the sides). That way I won't have to deal with any "blow back" on the spraying since it's going to be so low on the ground once I lower it. I'll shoot the roof material first then install it once the trailer is lowered. I kinda changed my plan of attack on using some of the original aluminum siding in an attempt to shorten the build time. Besides, the panels weren't going to be tall enough for what I wanted. I probably won't get the aluminum for the siding till after the Dam. I decided I needed a break since I haven't taken off a weekend since November...so I'm going camping!!!

This last week, I also managed to get all the curtain panels made, themed fabric with a black flange and a gray top for the rod. Doug

Image

Image
doug hodder
*Snoop Dougie Doug
 
Posts: 12625
Images: 562
Joined: Tue Dec 14, 2004 11:20 pm
Top

Re: Kamp King update 4/20

Postby KCStudly » Sat Apr 20, 2013 10:45 pm

The theme works throughout. Very nice quality, it can not be said enough. We first time builders are living in the shadows of true masters. :applause:
KC
My Build: The Poet Creek Express Hybrid Foamie

Poet Creek Or Bust
Engineering the TLAR way - "That Looks About Right"
TnTTT ORIGINAL 200A LANTERN CLUB = "The 200A Gang"
Green Lantern Corpsmen
User avatar
KCStudly
Donating Member
 
Posts: 9640
Images: 8169
Joined: Mon Feb 06, 2012 10:18 pm
Location: Southeastern CT, USA
Top

Re: Kamp King update 4/20

Postby nevadatear » Sun Apr 21, 2013 10:33 am

Wow de wow wow! :thumbsup:
Debbie (with Randy looking over my shoulder)
Our build thread: http://www.tnttt.com/viewtopic.php?t=41295&highlight=monstero
2009 Homebuilt woody, Kenskill inspired 5 wide
ImageImage
User avatar
nevadatear
Silver Donating Member
 
Posts: 2381
Images: 171
Joined: Mon Nov 10, 2008 2:37 pm
Location: No. Nevada
Top

PreviousNext

Return to Build Journals

Who is online

Users browsing this forum: No registered users and 18 guests