The Poet Creek Express - Foamie Hybrid

Canvas covered foamies (Thrifty Alternatives...)

Moderator: eaglesdare

Re: The Poet Creek Express - Foamie Hybrid

Postby Wolffarmer » Mon Mar 17, 2014 2:54 pm

I camped next to the Atma last Sep. None of its beauty rubbed off on to the Toroweap. :cry:

Randy
"these guys must be afraid of the dark"
User avatar
Wolffarmer
Donating Member
 
Posts: 4612
Images: 309
Joined: Wed May 02, 2007 1:32 pm
Location: Idaho Rupert

Re: The Poet Creek Express - Foamie Hybrid

Postby KCStudly » Mon Mar 17, 2014 3:10 pm

Yeah, maybe, but you have a lot less pucker factor bombing thru the scrub! :thumbsup: :lol:
KC
My Build: The Poet Creek Express Hybrid Foamie

Poet Creek Or Bust
Engineering the TLAR way - "That Looks About Right"
TnTTT ORIGINAL 200A LANTERN CLUB = "The 200A Gang"
Green Lantern Corpsmen
User avatar
KCStudly
Donating Member
 
Posts: 9640
Images: 8169
Joined: Mon Feb 06, 2012 10:18 pm
Location: Southeastern CT, USA

Re: The Poet Creek Express - Foamie Hybrid

Postby Wolffarmer » Mon Mar 17, 2014 3:13 pm

Scrub? Me drive through scrub?

I will not admit to anything. There is no video, it did not happen. Much.

:D
"these guys must be afraid of the dark"
User avatar
Wolffarmer
Donating Member
 
Posts: 4612
Images: 309
Joined: Wed May 02, 2007 1:32 pm
Location: Idaho Rupert
Top

Re: The Poet Creek Express - Foamie Hybrid

Postby be_a_jayhawk » Mon Mar 17, 2014 7:54 pm

KCStudly wrote:Actually, I probably am. It's just impossible to keep the jumble of builds all separated in my head. Sometimes I have a very hard time, what with all of the spring activity going on right now, and everybody posting. But that is a good thing. :thumbsup:

I'm sure you haven't been following it because there hasn't been much posted, but the taxes are almost paid so maybe I can get back at it soon.
User avatar
be_a_jayhawk
Teardrop Master
 
Posts: 214
Images: 2
Joined: Wed Jun 19, 2013 6:32 pm
Top

Re: The Poet Creek Express - Foamie Hybrid

Postby KCStudly » Thu Mar 20, 2014 8:54 pm

The day job and OT are wearing me out. Today was no different, except it was very spring like out. So after spending my day doing a confined space entry for a mixer PM I forced myself to go to Mecca and do something, no matter how unambitious.

I started by doing a stain comparison on a scrap of the Red Grandis cleat stock, "natural" on one end and the red chestnut on the other. Not sure it was a valid test since the pigments in what is left of my tub of red chestnut have settled out and clumped into a grainy paste like substance; wouldn't go into solution anymore, so I will have to pick up another quart.

I unscrewed the outer galley shelf cleats from the bulkhead and did a little more sanding to get those ready for stain. They won't ever match the maple, and they don't take the dark stain as well as the Okoume does, so I gave some thought to painting them with the gloss black trim color. This would have the added advantage of being an easier finish to apply, just one or two no fuss coats. Still undecided.

Next I cleaned and oiled the blade on my skil saw. Then I used the extruded rip fence and the skil saw to rip the edges of the galley upper shelves to final depth (front to back dimension); avoiding using the terrible table saw. Had to tweak one of them slightly with the Surform rasp to get the final fit just so, with a little bit of float. The second one went better and fit perfectly on the first try.

My friend Dave has been busy feeding me links to some nice heavy table saws (thanks Dave!) and I sent a request to view one of the lower priced local ones; another Powermatic 66 tilting arbor. Looks like it needs a good cleanup, which is probably why it is listed at a low price and hasn't sold yet.

So that is the plan going into this weekend: shop for a decent saw and keep going with stain and poly.

I've been spending some time over on capnTelescope's CNC build thread offering suggestions. He's been working on a very unique hatch hinge arrangement and attempting a rather ambitious gutter around his hatch opening. Worth a look if you have not been following his stuff.
Last edited by KCStudly on Sat Apr 05, 2014 9:07 pm, edited 2 times in total.
KC
My Build: The Poet Creek Express Hybrid Foamie

Poet Creek Or Bust
Engineering the TLAR way - "That Looks About Right"
TnTTT ORIGINAL 200A LANTERN CLUB = "The 200A Gang"
Green Lantern Corpsmen
User avatar
KCStudly
Donating Member
 
Posts: 9640
Images: 8169
Joined: Mon Feb 06, 2012 10:18 pm
Location: Southeastern CT, USA
Top

Re: The Poet Creek Express - Foamie Hybrid

Postby KCStudly » Fri Mar 21, 2014 10:07 pm

Here’s a pic I took last night of the ripping set up for the galley shelf panels.
Image

Today was another long grueling day at work, but I managed to force myself to swing by Ho-De-Po for some more stain and put in about 1-1/2 hrs at Mecca.

The galley shelf cleats took the fresh stain much better. First pic is w/o flash, second is with.
Image
Image

I finally got back around to the front cabinet floor and the key catcher panel. In the course of fitting these into the ledgers multiple times, I decided to trim a skim cut off of the length (width of cabin), so I touched up the stain on the cut edge. The cabinet floor had that blotch that needed another coat of poly, and I thought the key catcher needed another coat on one side, too, but when I looked to see which side it was I couldn’t tell the difference; so that piece is done other than just touching up the trimmed edge with the hobby brush.

Worked the cabinet floor over with 220 grit, then 320, then wiped it down and laid the last (?... hopefully!) coat of poly.
Image

Doesn’t seem like much, but it is something.

Tomorrow I have a couple of errands in the morning, and I hope to hook up with the saw guy. Karl won’t be around, so if I get the saw, I am on my own moving it. The rest of Saturday will hopefully be final assembly on the front cabinet and riblets.

Sunday is a full day at work rearranging a piping loop on the petrolatum system (not looking forward to that), so maybe I will take a piece of the Red Grandis in to rip some more cleat stock on the saw there after I get done for the day.

…and the weather is going backwards again.
KC
My Build: The Poet Creek Express Hybrid Foamie

Poet Creek Or Bust
Engineering the TLAR way - "That Looks About Right"
TnTTT ORIGINAL 200A LANTERN CLUB = "The 200A Gang"
Green Lantern Corpsmen
User avatar
KCStudly
Donating Member
 
Posts: 9640
Images: 8169
Joined: Mon Feb 06, 2012 10:18 pm
Location: Southeastern CT, USA
Top

Re: The Poet Creek Express - Foamie Hybrid

Postby KCStudly » Sun Mar 23, 2014 10:03 pm

Spent all day Saturday running errands, using the Charcoal Briquette to go get a Powermatic 66 Uni saw (2hp, 3ph motor), getting it unloaded (Karl’s fork truck), and going over it. It’s a good old cast iron top, closed base, tilting arbor 10 inch saw. (All that and I didn’t take any pictures. :? )

It’s a bit of a clunker and needs 3 phase power (less popular with home owner hobbyists) so I got a great deal. Needs a little TLC, but I have that. Needs new belts, but the ones that are on it should work until I get new ones.

The boss for the pinion gear on the rip fence clamp casting (the fine adjust on the rip fence) was broken, so the seller removed it and included the fence and casting from another, newer, saw. Unfortunately the location was very dimly lit and I didn’t check the swapped fence very closely; the pinion gear is frozen in the casting (soaked it with WD-40… we’ll see), the pinion gear teeth are stripped, and the extruded aluminum portion of the newer fence (along with the rod that actuates the far side clamp) is an inch too short. The round guide rails for the fence are held away from the edges of the table by concave washers and one is missing, but all of the special bolts are there and I can fab a new washer easily. I spent a fair bit of time cleaning the top and rails, and disassembling the fence to learn what was what.

When I got home I did some research and found that the extruded portion of the fences are available NOS, if you can figure out which is the correct one. Also, lots of people have upgraded, so there are a lot of ‘take offs’ for sale, as well. I considered contacting the seller again and seeing if we could swap back just the fence and far end clamp, but that seemed just as difficult, and an hour drive one way.

I worked all day today (Sunday) at my day job with Larry (my lantern picker buddy at work) and he is pretty sure that he has the correct fence with extended rails (from a saw that he upgraded), and is willing to offer them up, so I am hopeful that it is the correct length fence. Apparently there are 27 inch deep tables (which seem to be common) and 28 inch tables (like mine). He believes that the washers on his were significantly thicker, so we are hopeful that his fence is the correct length for my saw with the thinner washers; perhaps a transition point in the designs year wise, or the extended rail option was made universal(?).

Anyway, we were both too beat from 9 hrs on ladders to go look at it after work, so he will bring it in during the week for me to check out. Deal.
KC
My Build: The Poet Creek Express Hybrid Foamie

Poet Creek Or Bust
Engineering the TLAR way - "That Looks About Right"
TnTTT ORIGINAL 200A LANTERN CLUB = "The 200A Gang"
Green Lantern Corpsmen
User avatar
KCStudly
Donating Member
 
Posts: 9640
Images: 8169
Joined: Mon Feb 06, 2012 10:18 pm
Location: Southeastern CT, USA
Top

Re: The Poet Creek Express - Foamie Hybrid

Postby Wolffarmer » Sun Mar 23, 2014 10:54 pm

Sounds like that saw could be a real nice one after you get it all sorted out. I have a 3 hp single phase 220v saw that just eats up wood like no tomorrow. Beats the pants off the SawSmith. I have not even put a saw blade on the SS since I got the cabinet saw. It is now mostly a band saw, disk sander, drill press and lathe.

Randy
"these guys must be afraid of the dark"
User avatar
Wolffarmer
Donating Member
 
Posts: 4612
Images: 309
Joined: Wed May 02, 2007 1:32 pm
Location: Idaho Rupert
Top

Re: The Poet Creek Express - Foamie Hybrid

Postby Mary C » Wed Mar 26, 2014 10:55 am

KC, I have been following since computer down and have watched your progress and might I say, great work, fabulous as always and some day I want to see it in person. You have worked so wonderfully and so artfully.

I think I just decided I will get a Delta saw when I get rich, win the lottery etc. .

It is looking great!!!! :applause: :beer: :wine: :ok:

Mary C.
User avatar
Mary C
1000 Club
1000 Club
 
Posts: 1776
Images: 473
Joined: Mon Oct 15, 2012 6:29 pm
Location: Waco, Georgia
Top

Re: The Poet Creek Express - Foamie Hybrid

Postby KCStudly » Wed Mar 26, 2014 2:51 pm

Nice to hear from you, Mary. Glad you are back online.

Like I said, the saw is a good old clunker (I gave $200 for it, which I will split with Karl) so no lottery winnings were needed. The equivalent saw new, with all of the accessories intact would be in the $2000+ range. Oooh, wouldn't that be nice! :shock:

I'm headed that way now, so I will be sure to get some pics. :thumbsup:
KC
My Build: The Poet Creek Express Hybrid Foamie

Poet Creek Or Bust
Engineering the TLAR way - "That Looks About Right"
TnTTT ORIGINAL 200A LANTERN CLUB = "The 200A Gang"
Green Lantern Corpsmen
User avatar
KCStudly
Donating Member
 
Posts: 9640
Images: 8169
Joined: Mon Feb 06, 2012 10:18 pm
Location: Southeastern CT, USA
Top

Re: The Poet Creek Express - Foamie Hybrid

Postby KCStudly » Wed Mar 26, 2014 11:22 pm

Here it is, the Powermatic Model 66 Unisaw. It’s one of the early “vintage” units with 3 drive belts.
Image

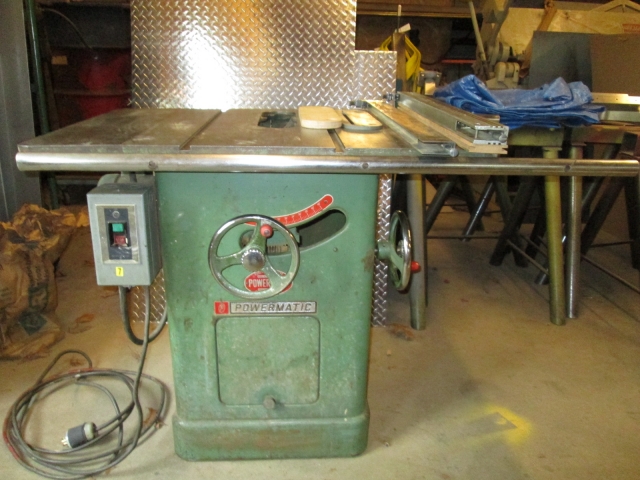
Heavy cast iron top.
Image

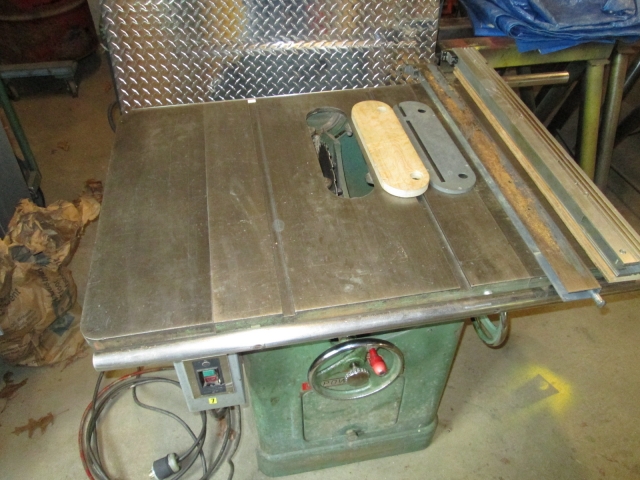
The top needs to be realigned slightly for the die cast OEM insert to fit properly, and the insert may need to be sanded a tad to fit the recess; must have come off of another saw. The plywood insert started out as a rectangular chunk that I grabbed to toe the saw to the front of the UT on the trip home. It just happened to be the perfect width and about the correct length so I rounded the ends over on the band saw and drilled some finger holes with a Forstner bit as a start on a zero clearance insert.
Image

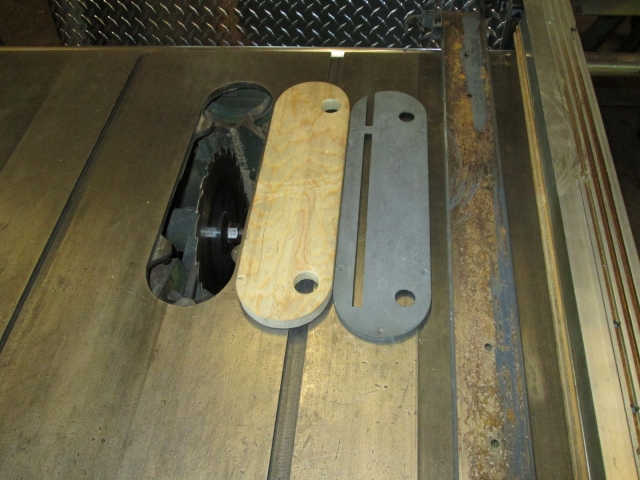
In the above pic you can also see the steel fence that Larry provided (speckled with sap and saw dust that was under the sacrificial facing), and the extruded aluminum fence (sitting on top of the T&G oak hardwood floor slat that was the crude sacrificial face on Larry’s fence).

The fence back clamps.
Image

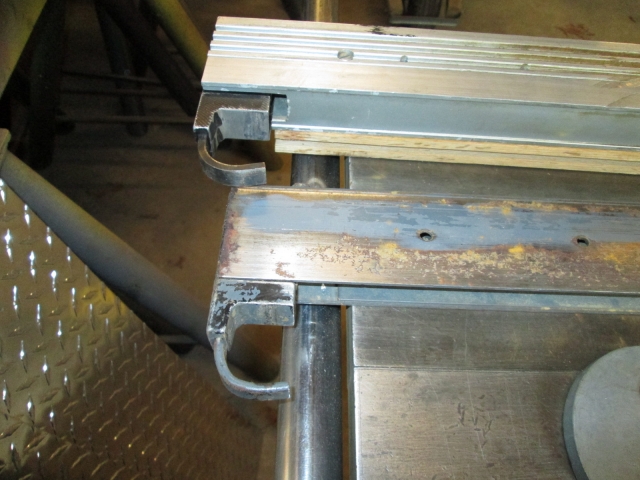
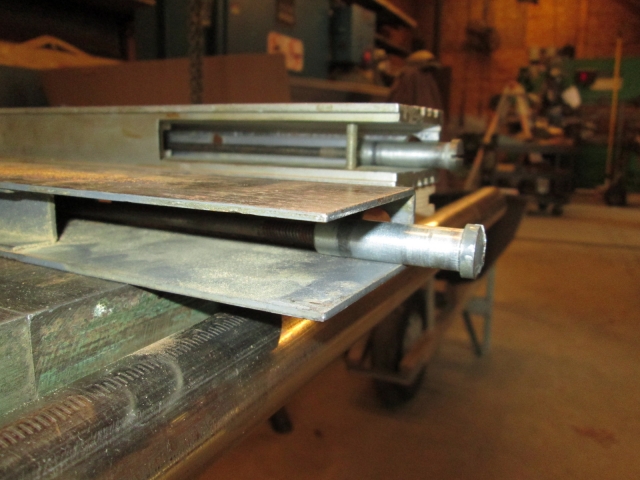
This is the end of the fences where the front cam clamp castings attach. We took them apart to investigate options for making them longer; 28 inch table, 27 inch fences. You can see the special female bolts that pull the clamp rods when the cam lock is engaged.
Image

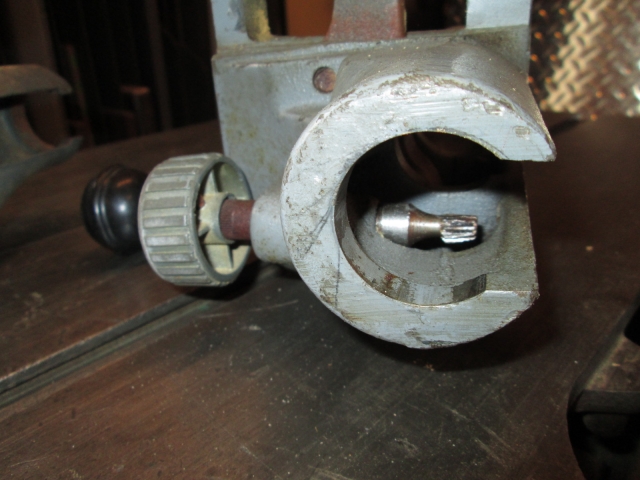
I didn’t get a good overall pic of the fence latch casting, but here you can see the one that the seller included. The rusty shaft with the aluminum knob has a small pinion that you are supposed to be able to push in to engage the gear rack on the underside of the front fence guide rail, allowing it to fine adjust the fence. The shaft is frozen in the casting and the pinion is wiped out.
Image

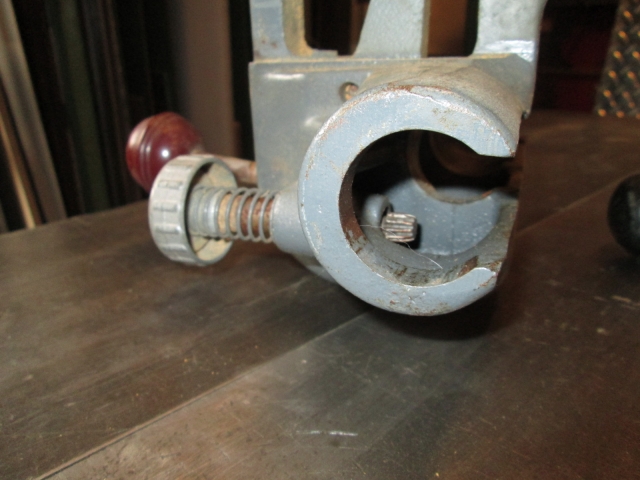
Here is the one that Larry gifted. The pinion shaft turns freely and it has a lightweight spring that disengages the pinion from the rack when you let go of the knob. Also, the pinion is in great condition. Not visible, it also has a small spring to move the locking bar off of the rail when the cam lever is freed. The other one is missing this spring and, not surprisingly, the locking bar is worn down from dragging on the fence to the point where it no longer clamps tight. Plus the red knob is cooler than the black one.
Image

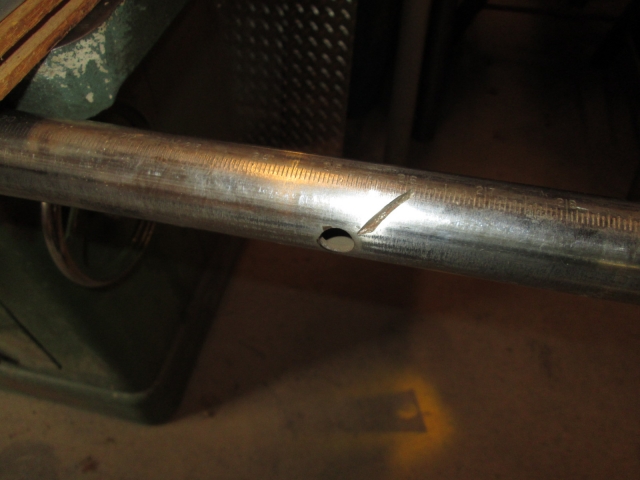
Not unlike the fender on The Charcoal Briquette, someone used the table saw as a saw horse and ran a skil saw into the front fence guide rail.
Image

Nestled in with some other stuff on this table you can see the longer guide rails that Larry provided. These will allow me to make a table extension to allow ripping much larger sheets.
Image

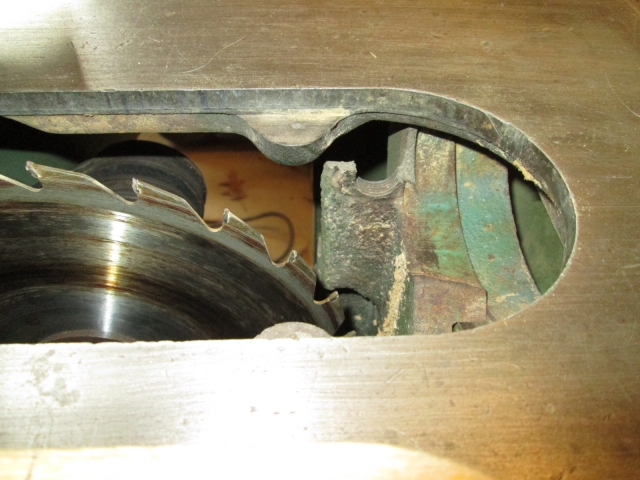
The blade is junk and here you can see the threaded hole that is broken out of the main carriage cradle casting. I think this may have been the mount for the riving knife on the earlier saws, whereas the later saws mount the splitter from the rear with the guard and just clip into something else on the cradle. We plan to attach a vertical splitter to the zero clearance insert and are keeping our eyes open for the guard parts. I have seen the cradle castings for sale, but they do not have this feature (must be from newer 2 belt saws?).
Image

We did plug it in the other night (using Karl’s 3 phase convertor), ran it up, and she runs good and quiet. We could hear a little electrical hum out of the switch box; not sure if that is anything. I did some digging around on the net and fed some links to Karl. He has already ordered new belts and worked out a deal with a seller for a vintage miter gage.

So that’s the latest on the saw.

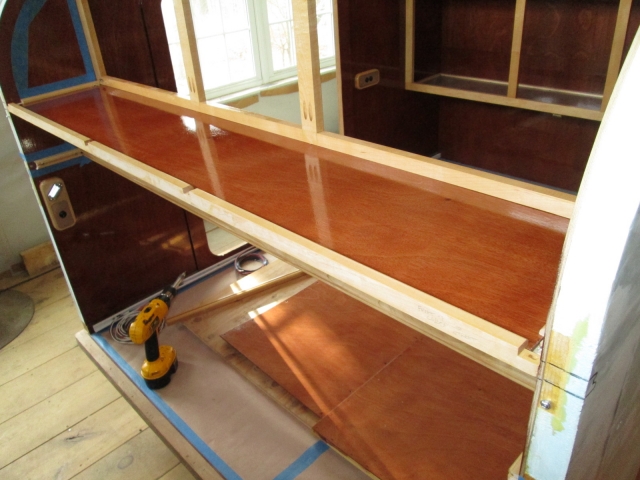
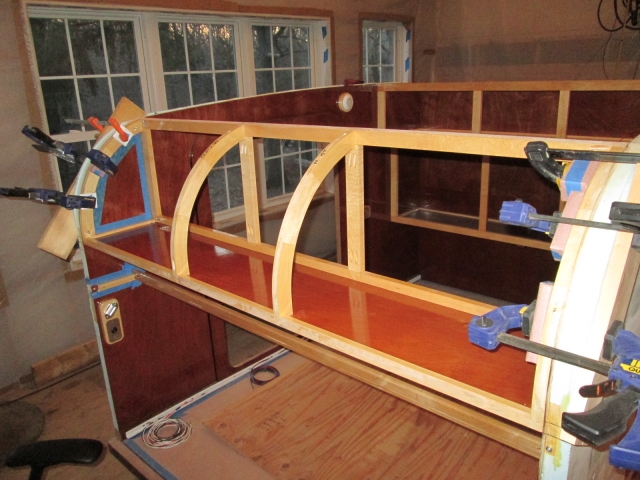
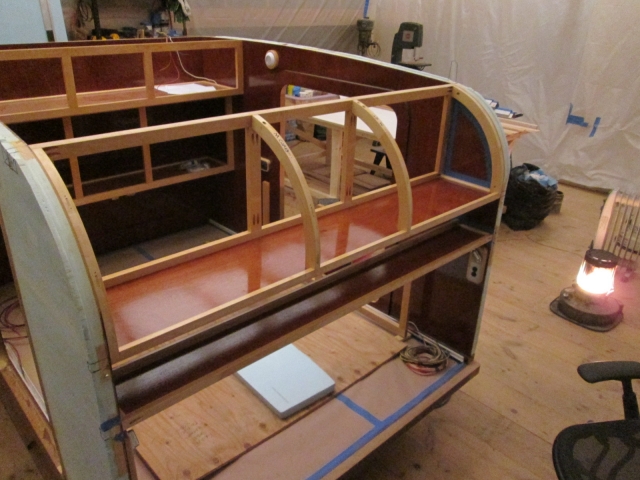
Tonight I made some great progress on the camper build, with a small milestone achieved; the front cabinet, riblets and key catcher shelf are finally installed.

Here the front cabinet floor and ledger have been permanently installed.
Image
Image

As with the other cabinets, I drove a couple of screws up thru the panel and into the face frame to pin the panel into the groove and prevent the face frame from flexing away from the panel.
Image

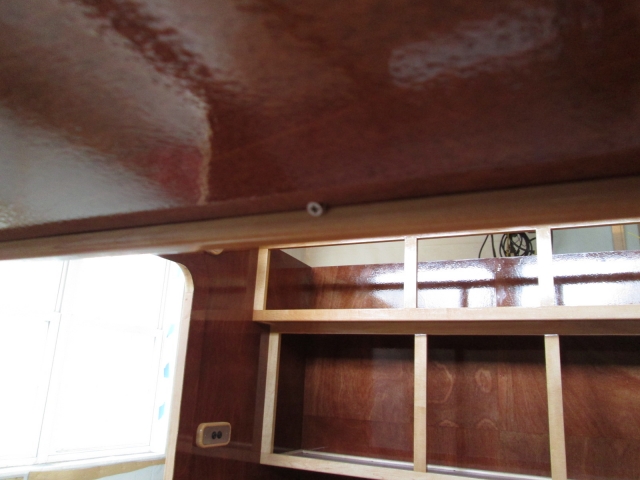
Here you can just see how the screws line up between the pocket screws into the face frame stiles.
Image
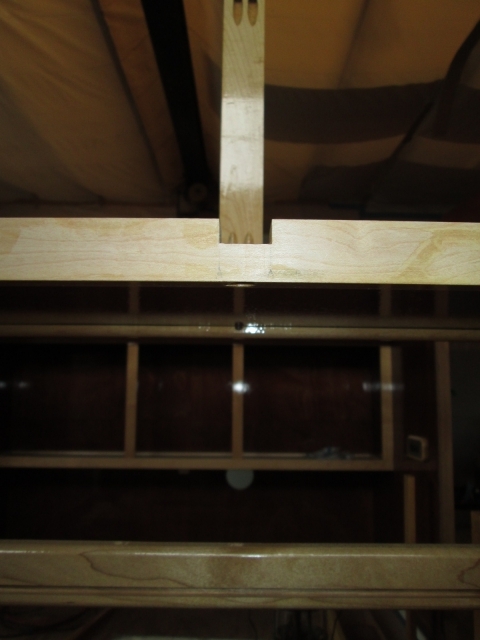
The dark dot to the left of the flash glare is the screw head (not a great pic).

Next is a mini tutorial on using a putty stick to fill screw holes. I have found that wood filler does not take stain well at all. So I have been using the 
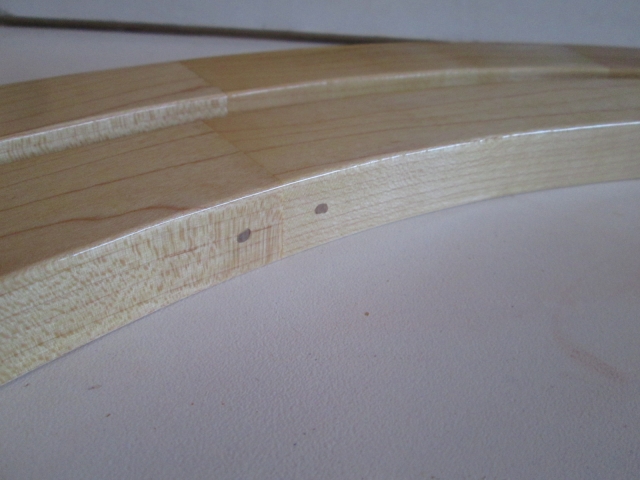
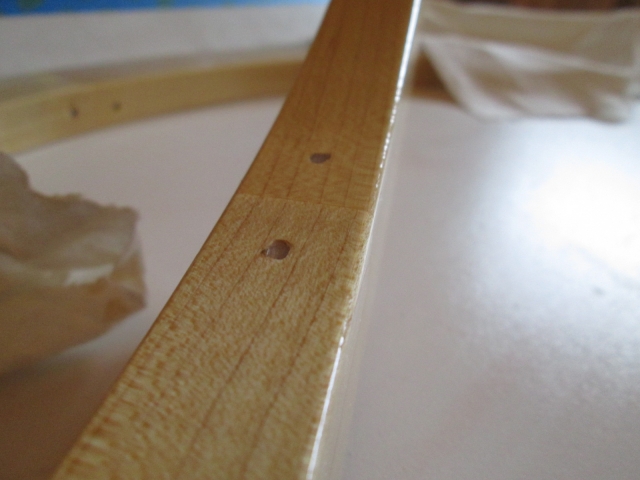
Minwax colored putty sticks to fill some staple holes and whatnots. The putty is waxy and will not take finish, so I waited to apply it after all finishing is done. I haven’t had to fill any of the maple yet, and I wasn’t sure how well the lightest shade would match, but I needed something to fill the holes in the riblets left by the screws that I used with the spring clamps when I glued up the riblet blanks.
Image

The color match could have been better, but it is better than a dark hole, and I have to keep reminding myself that it is the inside of a cupboard.
Image

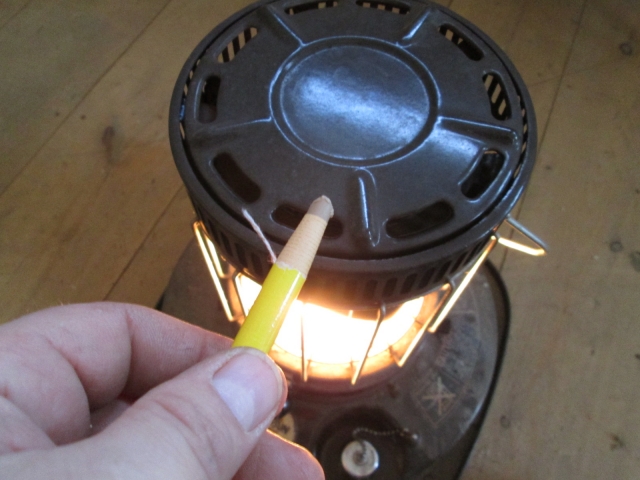
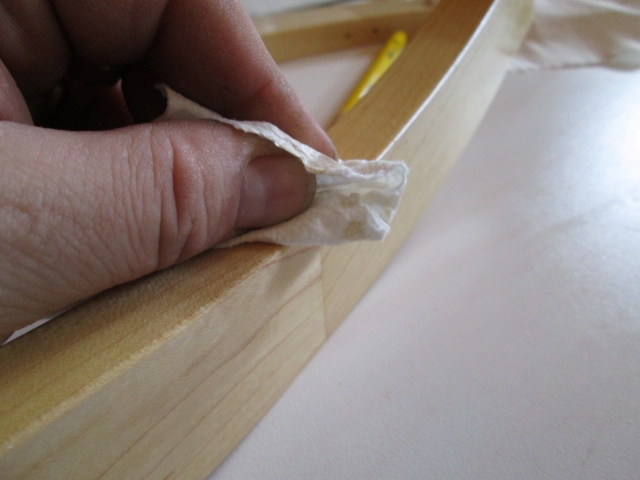
Here are some extra details on how I did it. First, the heat was still coming up in the loft so the putty stick was hard. So I ended up holding the tip of the pencil over the heater enough to soften the end.
Image

After doing a couple I found that if I rolled it back and forth between my fingertips I could form a sharp point that made it easier to get some of the putty down in the holes.
Image

Over fill the holes and press down hard with your finger to make sure that the putty is going into the hole and not just bridging over.

Next I buffed the area with a clean soft cloth (or paper shop towel) until all of the smeared wax was gone and the shine of the poly returned.
Image

This leaves the putty in the holes slightly recessed, but I’m good with that.
Image

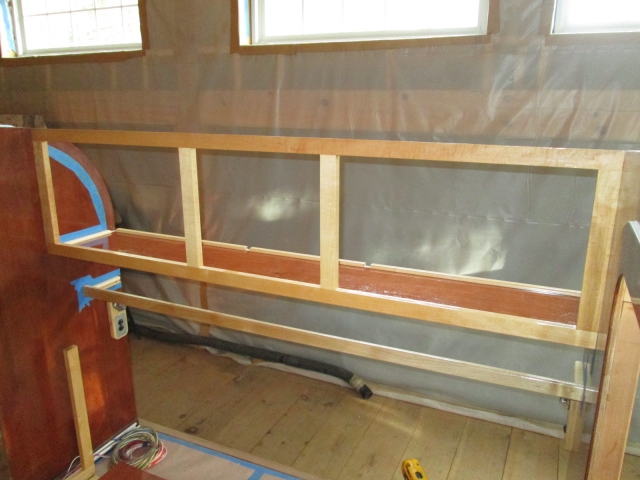
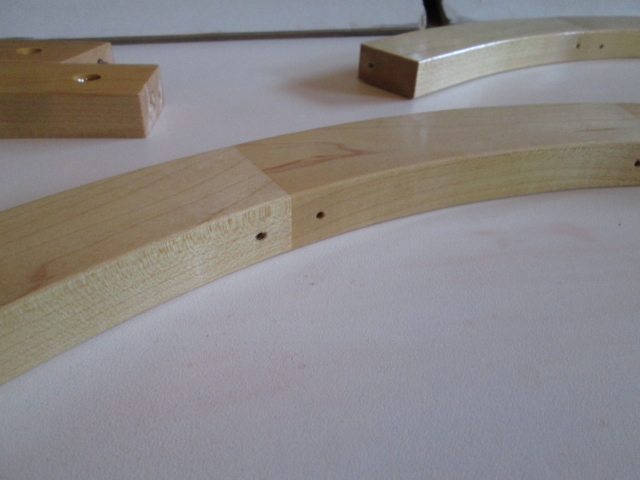
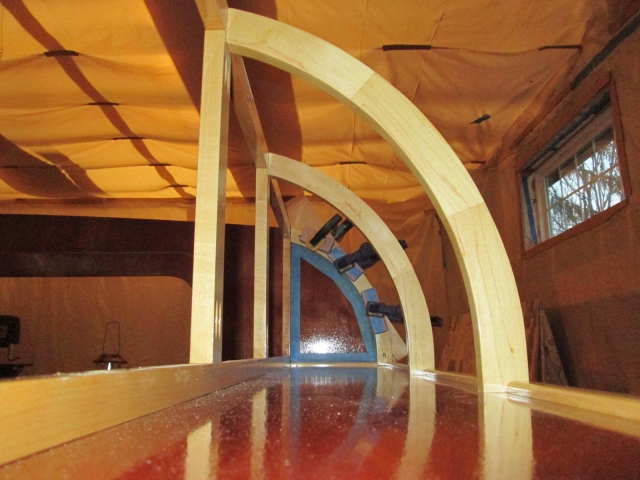
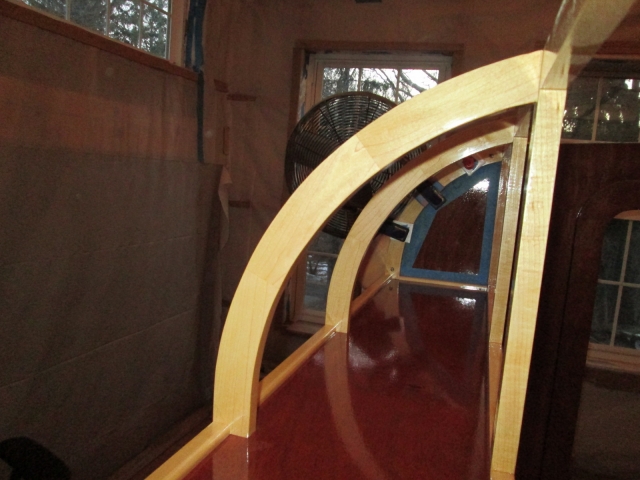
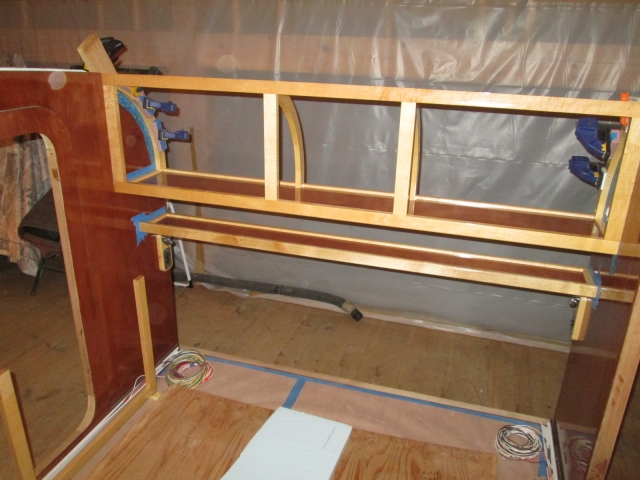
So now, after scuffing some excess poly off of the raw glue areas, the riblets were ready to install. Here is the street side riblet glued, screwed, and clamped (with a backer board to protect the foam and rosin paper wrapped blocks to protect the wood finish).
Image
Image

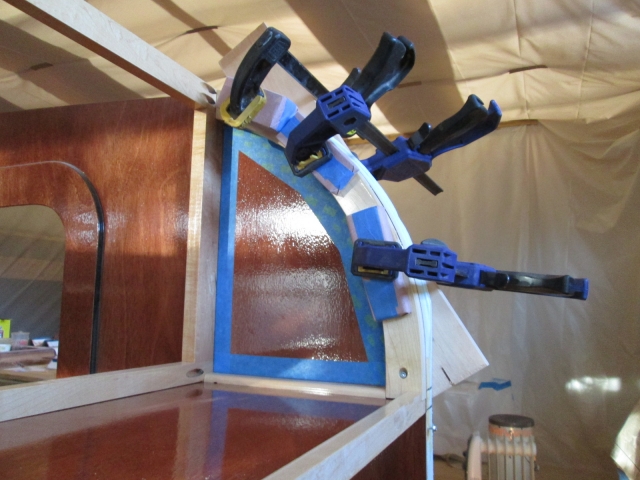
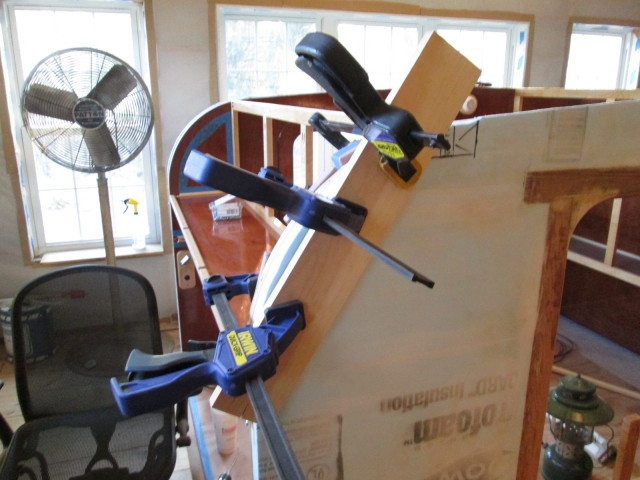
Curb side was done the same, and the middle ones were just glued and screwed at their ends.
Image
Image
Image

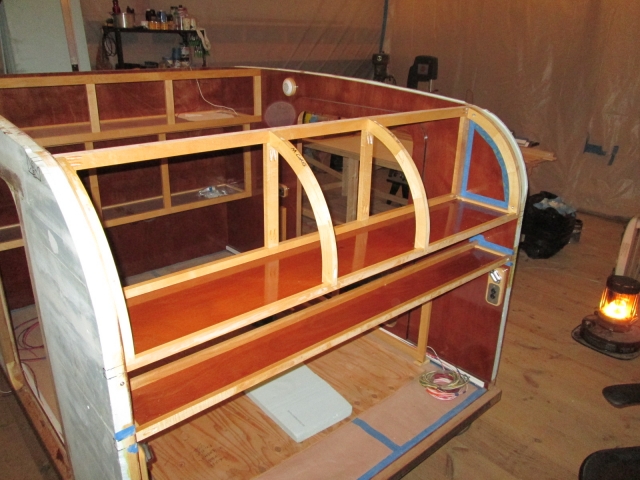
Finally, I installed the key catcher shelf panel and ledger, pinning the panel to the face rail and just gluing, and screwing the ledger into the side walls (all of the panels are allowed to float in the grooves except for where they are pinned; no glue joints to pop).
Image

Milestone achieved.
Image
Image
Image
KC
My Build: The Poet Creek Express Hybrid Foamie

Poet Creek Or Bust
Engineering the TLAR way - "That Looks About Right"
TnTTT ORIGINAL 200A LANTERN CLUB = "The 200A Gang"
Green Lantern Corpsmen
User avatar
KCStudly
Donating Member
 
Posts: 9640
Images: 8169
Joined: Mon Feb 06, 2012 10:18 pm
Location: Southeastern CT, USA
Top

Re: The Poet Creek Express - Foamie Hybrid

Postby Wolffarmer » Wed Mar 26, 2014 11:34 pm

Here Is the miter gauge I would like

Osborn

But it costs. :cry: :cry: :? Randy
"these guys must be afraid of the dark"
User avatar
Wolffarmer
Donating Member
 
Posts: 4612
Images: 309
Joined: Wed May 02, 2007 1:32 pm
Location: Idaho Rupert
Top

Re: The Poet Creek Express - Foamie Hybrid

Postby KCStudly » Wed Mar 26, 2014 11:47 pm

Over the last couple days I have been looking and learning about table saws. I have already found a few things that I may have been doing wrong, and that I now know how to do better. Surprisingly, there are many things that I was doing right; must just be logical or stuff I learned from watching Norm. I have also learned that there is a dizzying array of aftermarket accessories that can double or triple the buy in cost (at any level of entry). Buy a $200 saw and put a $200 fence on it? Or buy a $2000 saw and put a $2000 fence on it! Ay caramba!

I think this clunker can get a good tune up, piece together a functioning fence, clean up a vintage miter, and make a few accessories to improve safety and usage.

Karl is already struggling with urges to do a full restoration and throw a Bessemer fence at it (tool hound fever).
KC
My Build: The Poet Creek Express Hybrid Foamie

Poet Creek Or Bust
Engineering the TLAR way - "That Looks About Right"
TnTTT ORIGINAL 200A LANTERN CLUB = "The 200A Gang"
Green Lantern Corpsmen
User avatar
KCStudly
Donating Member
 
Posts: 9640
Images: 8169
Joined: Mon Feb 06, 2012 10:18 pm
Location: Southeastern CT, USA
Top

Re: The Poet Creek Express - Foamie Hybrid

Postby GPW » Thu Mar 27, 2014 4:52 am

Good deal on the saw !!! :thumbsup: 8)
Woodwork (cabinets ) beautiful as per your usual .. :beer:
There’s no place like Foam !
User avatar
GPW
Gold Donating Member
 
Posts: 14920
Images: 546
Joined: Thu Feb 09, 2006 7:58 pm
Location: New Orleans
Top

Re: The Poet Creek Express - Foamie Hybrid

Postby KCStudly » Thu Mar 27, 2014 6:44 am

Thanks, GPW. It felt good to make forward progress again; seems like it has been a while. :thumbsup:
KC
My Build: The Poet Creek Express Hybrid Foamie

Poet Creek Or Bust
Engineering the TLAR way - "That Looks About Right"
TnTTT ORIGINAL 200A LANTERN CLUB = "The 200A Gang"
Green Lantern Corpsmen
User avatar
KCStudly
Donating Member
 
Posts: 9640
Images: 8169
Joined: Mon Feb 06, 2012 10:18 pm
Location: Southeastern CT, USA
Top

PreviousNext

Return to Foamies

Who is online

Users browsing this forum: No registered users and 8 guests