Standy sidewalls

Anything to do with mechanical, construction etc

Standy sidewalls

Postby StPatron » Wed Mar 17, 2010 12:43 pm

I'm planning a standy build, lighter the better.

What do you recommend for sidewall material and thickness (non-insulated) for:
1. Aluminum or Filon clad
2. Painted
User avatar
StPatron
Donating Member
 
Posts: 748
Images: 297
Joined: Tue Dec 15, 2009 8:38 pm
Location: OK

Postby NightCap » Wed Mar 17, 2010 12:55 pm

I was planning on using 3/4 inch plywood for mine and cutting out pieces to make a lighter weight frame.

Image

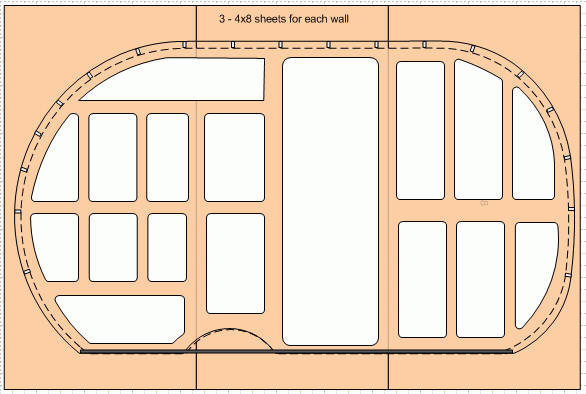
And using the cutouts as shelves etc.
Image
#1 - 100% Done #2 - 100% Done Thinking about #3
User avatar
NightCap
1000 Club
1000 Club
 
Posts: 1131
Images: 259
Joined: Sun Jul 02, 2006 9:28 pm
Location: Iowa, Dayton

Postby synaps3 » Wed Mar 17, 2010 1:37 pm

Lightest way to do a painted wall: http://tnttt.com/viewto ... c&start=66

^ 1x3's sandwiched between 1/8" luaun, with insulation in the gaps. You can't really build lighter than that on a standie, or the structure will become flimsy. This method is also lighter, more sturdy, and cheaper than using plywood cutouts (even if it takes much longer).

The lightest way to do the same with an aluminum or filon shell is to replace the outer pieces of luaun with the direct filon or aluminum.


:)
-- Dave

Build log: here
User avatar
synaps3
The 300 Club
 
Posts: 433
Images: 254
Joined: Sun Nov 08, 2009 1:09 am
Location: Marietta, GA
Top

Postby StPatron » Wed Mar 17, 2010 9:20 pm

Thanks guys for your replies, appreciate it.

Dave: I hadn't looked at your build thread lately, you're really moving along! Congrats.
User avatar
StPatron
Donating Member
 
Posts: 748
Images: 297
Joined: Tue Dec 15, 2009 8:38 pm
Location: OK
Top

Postby afreegreek » Wed Mar 17, 2010 11:24 pm

I made a trailer using aluminum T (as studs) let into doubled 3/4" ply frames top and bottom. was fast and easy.. if you'd be interested in doing something like that I will draw you a sketch..
afreegreek
500 Club
 
Posts: 723
Images: 0
Joined: Mon Jan 25, 2010 8:35 pm
Top

Postby Juneaudave » Wed Mar 17, 2010 11:27 pm

afreegreek wrote:I made a trailer using aluminum T (as studs) let into doubled 3/4" ply frames top and bottom. was fast and easy.. if you'd be interested in doing something like that I will draw you a sketch..


I'd like to see a sketch if you have time... :thinking:
User avatar
Juneaudave
Super Duper Lifetime Member
 
Posts: 3237
Images: 380
Joined: Sun Jul 03, 2005 12:11 pm
Location: Juneau, Alaska
Top

Postby john » Thu Mar 18, 2010 10:47 am

I have built the side-walls both ways.

One with 3/4" ply with holes cut out and filled with insulation. This turned out being much stronger than I needed. Unnecessarily so. It was also more expensive and heavier than I expected.

Image
Image


On my second build, I choose a different method. I prefer it.
I used 1/2" ply that I ripped to make 1/2"x (whatever width I needed) strips to create a void between the interior and exterior skins. A single sheet of ply will make a lot of these strips at 1 1/2" wide which is what I used mostly. I found thicker ones worked better as I rounded curves and places where I wasn't sure where screws would be needed (behind the fenders). This method was lighter, cheaper (than solid wood strips), still used plywood for strength where needed, and finally, gave me the exact 1/2" void for the 1/2" insulation I planned to use.

Image
Image
Image


Just my experience...

Edit: I was just reminded of the OP's no insulation qualification when my post comment popped up after submitting. I got side tracked by the other comments.

Without insulation I would go with a quality 1/2" ply. It may seem floppy at first, but once the rigid box is complete and internal closets and shelving are mounted inside the floppyness disappears.
Build I -- Scenic ---
http://www.flickr.com/photos/8121727@N04/
Goto the Tear Build file

Build II -- Scenic II ---
viewtopic.php?t=29603

Build III -- Scenic Solo---
viewtopic.php?f=50&t=50324

Travel Blog----Now without Political Commentary
http://polifrogblog.blogspot.com/2009/0 ... -2009.html

The Constitution was ratified, not an interpretation thereof...

Penomeli ikibobo
john
User avatar
john
500 Club
 
Posts: 663
Images: 261
Joined: Tue Oct 05, 2004 6:26 pm
Location: eden nc
Top

Postby StPatron » Thu Mar 18, 2010 12:18 pm

greek: I'd like to see the plans. The amt. of aluminum material needed for my plan would probably be prohibitively expensive but I'm always interested in learning.

John: I really like that idea! I'm glad you missed the no-insulation caveat at first read. :)

Seems I read a build thread of yours long ago, but didn't recall your technique. Gone to read again. Thanks so much.
User avatar
StPatron
Donating Member
 
Posts: 748
Images: 297
Joined: Tue Dec 15, 2009 8:38 pm
Location: OK
Top

Postby afreegreek » Fri Mar 19, 2010 11:21 pm

ok, here's the best I could draw it.. basically I pre assembled the floor (3/4" ply with 3-1/2" wide buildup) and the top plate (2 pieces of 3/4" ply 3-1/2" wide) with brads, clamped the whole thing together and routed out the faces with a jig to let the 'T' in, then pulled it apart and used the 'let in' as a guide to position another jig to cut the slot in the floor and the lower piece of the top plate, then glued everything up.

I used a jig to cut the section out of the aluminum with a 1/2" flush trim bit in the router. this was basically a block of wood with a kerf in it for the shank of the 'T' to fit in clamped 3/4" inch from the end of the 'T'.

for assembly I bedded the aluminum in PL Premium and angle drilled the ply for 1-1/2" #10's in through the pre countersunk holes and set them. once I had everything together and plumb/square, I used a pocket guide to drill pocket holes in to the floor and through the 'T's. for these I used 2" #10's.

** right!.. just to be clear, I did not predrill the the aluminum for the pocket screw. the drill for the pocket hole guide did that once everything was set plumb and locked into place..
Image
afreegreek
500 Club
 
Posts: 723
Images: 0
Joined: Mon Jan 25, 2010 8:35 pm
Top

Postby bdosborn » Sat Mar 20, 2010 6:49 pm

Here'show I built the walls to our standy. They came out pretty light and very strong.

First I built a frame out of 1x2's on the floor so I knew it would fit to the trailer frame:

Image

Then I glued and stapled 1/4" plywood to the outside. I traced the frame onto the plywood from the underside so I knew where to staple:

Image

Then I insulated it and glued on the 1/8" interior skin. I used a vacuum bag to make sure it the skin went on flat and made good contact with the frame.

Image

Cut out the openings with a laminate trimmer/router and apply finish to the inside:

Image

Vacuum bagged it again to apply the filon exterior skin and you're done.

Image

There are a lot of options for the exterior. Filon has gotten *very* expensive, I doubt I would use it now.

Bruce
2009 6.5'X11' TTT - Boxcar
All it takes is a speck of faith and a few kilowatts of sweat and grace.
Image
Boxcar Build
aVANger Build
User avatar
bdosborn
Donating Member
 
Posts: 5596
Images: 806
Joined: Wed May 05, 2004 11:10 pm
Location: CO, Littleton
Top

Postby StPatron » Sat Mar 20, 2010 11:03 pm

Thanks for the tips, Bruce. I just finished studying your "Boxcar" build thread again, very impressive! Your cabinetry work is outstanding, nicer than anything in my house. Based on your recommendation I'm scratching the Filon idea.
User avatar
StPatron
Donating Member
 
Posts: 748
Images: 297
Joined: Tue Dec 15, 2009 8:38 pm
Location: OK
Top

Postby bdosborn » Sun Mar 21, 2010 12:05 am

Thanks for the compliment! Don't get me wrong,I love Filon. It doesn't get hot in the sun like aluminum and its easy to clean. Its just that it went from $1.25/SF when I built the Teardrop to $4.50/SF by the time I bought the Filon for the roof of the Boxcar. :o

Bruce
2009 6.5'X11' TTT - Boxcar
All it takes is a speck of faith and a few kilowatts of sweat and grace.
Image
Boxcar Build
aVANger Build
User avatar
bdosborn
Donating Member
 
Posts: 5596
Images: 806
Joined: Wed May 05, 2004 11:10 pm
Location: CO, Littleton
Top

Postby afreegreek » Sun Mar 21, 2010 12:33 am

just look at the price at the time you're ready to go. building materials are a commodity and the price rises and falls due to demand. the "building boom" is bust so lots of stuff is going to be cheaper than it was a few years ago.
afreegreek
500 Club
 
Posts: 723
Images: 0
Joined: Mon Jan 25, 2010 8:35 pm
Top

Postby RAYVILLIAN » Sun Mar 21, 2010 2:04 pm

Gary
The lightest standy build I've seen was Steve Wolverton's Puffin. He used 1/4" plywood in both the walls and roof with very little to no framing. Just the door frame and shelves and a center rib on the roof for about 3 to 4 foot between the front and back shelf. He did fiberglass the outside which added strength though. If I remember right Puffin weighed between 700 and 800 lbs and I know that Steve pulled it with a Subaru outback with no problem.

Unfortunately the pics from the build thread are lost which is a shame. there are a few left in his gallery though.

http://tnttt.com/album_ ... ser_id=404

One of them plainly shows the lack of framing in the wall over the bed.

Image

Gary

Ps here is the link to the build thread. It's interesting reading but without the pics you have to use your imagination.

http://tnttt.com/viewto ... ght=puffin
Where ever we raise the hatch is home.
Darn blank states keep getting further away and we keep traveling slower ain't never gona get this map full.
111961Image
User avatar
RAYVILLIAN
Lifetime member
 
Posts: 1434
Images: 109
Joined: Thu Aug 05, 2004 9:33 pm
Location: Rayville MO
Top

Postby StPatron » Sun Mar 21, 2010 10:30 pm

Many thanks for the info. and links, Gary. I remember following the Puffin build back in my lurker days, sure wish I'd saved the photos, the one you posted really helps. The plan now is to construct some small mock-ups before making my final decision. I've already made one using John's recommendation and was impressed with the strength and ease of assembly. Plus, it provides the option of a nice interior paneling.

From what I'm understanding, wall construction methods/materials are the same whether one is building a standard teardrop or a standy. Previously, I assumed I'd need to beef it up a bit. A 1/4" wall standy w/fiberglass sure answers that question. :lol:
User avatar
StPatron
Donating Member
 
Posts: 748
Images: 297
Joined: Tue Dec 15, 2009 8:38 pm
Location: OK
Top

Next

Return to Teardrop Construction Tips & Techniques

Who is online

Users browsing this forum: No registered users and 3 guests