The Urabus Scuttlebutt from PA *Update 10/11/2011 PAGE 23*

...ask your questions in the appropriate forums BUT document your build here...preferably in a single thread...dates for updates, are appreciated....

Postby absolutsnwbrdr » Sun Apr 25, 2010 1:26 pm

Conestoga wrote:My main concern was not water getting in, but tension on the vinyl.. you're counting on those snaps and the health of the fabric to
keep it taut. It's going to give and stretch a little.
Cutting a hole introduces complexity to the way the weave lays...
Fabric will flog itself to death given the slightest chance.
So, for the sake of my admiration of this build,
whatever you did with the vent in the top,
make sure the fabric is super taut on all sides,
including the edges around the vent, because
once it starts getting whipped at 65mph... wheeeee


Sorry you've missed some of the party here! Its been fun, and its only going to get better!

I've had it down the highway a couple times, before the fan was installed, and the vinyl didnt seem to move around at all. I think the curve of the front probably creates enough pressure to just hold it there.

Now that I have the hole cut in the vinyl, and the fan installed it may be a different story. I was thinking that after I get the fan cover in place, I would use a snap on each corner of the fan to hold the cover down to the framing.

Also, when I cut the hole in the vinyl around the fan, I made sure to round off the corners so any stress might be dissipated on the cut radius instead of a squared corner cut.


down under tech wrote:Hey Zach: You have a nice RIG there. I like your curtains your mom made up for you. Aren't moms GREAT? I am using LEDs in my TD, also. I am using the ones that go into the regular 12V fixtures. They have 84 LEDs in a radial pattern so they will light up in all directions. All will be LEDs except galley light is florescent. All of my road lights are LEDs as well. It would take me some time to get used to the vinyl top. But, I don't have to sleep in it, you do and that is what matters. Your TD looks very nice.
You used your imagination to come up with a very unique TD. I bet you don't see to many like yours. Now get out there and CAMP !!! ;)


Thanks! Ya gotta love Moms! The LED pods that I have in the ceiling dont put out a lot of light but it'd be enough to play a game of cards. Also, the white "ceiling" doesnt absorb the light, so its probably a bit brighter than having a wood ceiling.

I've never slept in a teardrop before, only tents. So the fabric above my head wont be a new concept to me. Now its just a heavier fabric, and my tent has hard sides that don't need set up :D


Ageless wrote:In ref. of the vinyl cover for the fan. If you can find a sealing system like is used on zip-lok bags; problem solved.


You might be on to something.... I don't know of anything that may mimic industrial sized zip lock. Off to Google!
Zach
Coming Soon...
Image Image
User avatar
absolutsnwbrdr
Donating Member
 
Posts: 2657
Images: 412
Joined: Mon Jan 25, 2010 6:10 pm
Location: Hanover, PA

Postby absolutsnwbrdr » Sun Apr 25, 2010 1:44 pm

Since this will be joining the Scuttlebutt in any adventures that it takes, heres our new cast iron: Large skillet, and mountain-pie maker. Also got an 8qt dutch oven, but it was too large to season on our grill, so it didnt make it into the picture.

Image
Zach
Coming Soon...
Image Image
User avatar
absolutsnwbrdr
Donating Member
 
Posts: 2657
Images: 412
Joined: Mon Jan 25, 2010 6:10 pm
Location: Hanover, PA

Postby absolutsnwbrdr » Mon May 03, 2010 8:20 am

Progress has slowed down quite a bit. Got a tongue/battery box from Lowes the other day, and secured it to the frame using 4 u-bolts. After they were tight, I sealed the holes with silicone caulk, and built an elevated (3/4") wooden tray for the bottom of the box. This way if some water would happen to get inside the box, whatever I have in there wouldnt be immediately submerged.

Image

I'm also in the process of making my exterior lights. I'll try to take some pictures tonight of those, as they are a bit different from anything I've seen on other campers. :D
Zach
Coming Soon...
Image Image
User avatar
absolutsnwbrdr
Donating Member
 
Posts: 2657
Images: 412
Joined: Mon Jan 25, 2010 6:10 pm
Location: Hanover, PA
Top

Postby absolutsnwbrdr » Sun May 09, 2010 7:26 pm

Got the tongue box figured out and finished today.... divided it in half - battery will eventually go on the right, while the charger, wireless unit for lights, and the 8 terminal fuse block is on the left. For now, the charger just goes to "power posts" on the right half, and everthing is powered from there.

Image

Image

Then there is a shelf that sits over top of the charger, wireless unit, and fuse block. This will be for extension cords and such.

Image
Zach
Coming Soon...
Image Image
User avatar
absolutsnwbrdr
Donating Member
 
Posts: 2657
Images: 412
Joined: Mon Jan 25, 2010 6:10 pm
Location: Hanover, PA
Top

Postby absolutsnwbrdr » Sun May 09, 2010 7:52 pm

As promised the other day, here are my not-so-normal "porch lights"

8)

Image

Image

Image

Its a wooden disc with waterproof LED pods on the back side facing the trailer. One green and one blue LED pod for each side. They are turned on and off with the wireless remote.
Zach
Coming Soon...
Image Image
User avatar
absolutsnwbrdr
Donating Member
 
Posts: 2657
Images: 412
Joined: Mon Jan 25, 2010 6:10 pm
Location: Hanover, PA
Top

Postby Rlowell » Sun May 09, 2010 8:24 pm

:applause: :applause: Way cool with the porch lights Zach. They look great with your over-all design. Keep up the innovative ideas and you are making the rest of us step out of our comfort zones. Way to go! :roll: :lol:
Rod
Plan your work...work your plan...at least that's the plan. Oh, just do it anyway!
gallery/image_page.php?album_id=1425&image_id=76342
User avatar
Rlowell
2000 Club
2000 Club
 
Posts: 2004
Images: 42
Joined: Wed May 23, 2007 12:39 pm
Location: Orlando, Fl.
Top

Postby parnold » Sun May 09, 2010 8:28 pm

I likey, I likey!

:thumbsup:
User avatar
parnold
Donating Member
 
Posts: 2344
Images: 302
Joined: Mon Feb 08, 2010 4:49 pm
Location: Northwest New Jersey
Top

Postby absolutsnwbrdr » Mon May 10, 2010 8:23 am

Thanks guys! Glad you like them! I can't wait to see what it looks like sitting in the woods!

Now I just have to figure out the fan-waterproofing situation before Thursday @ 2:00pm (my departure time for TEARSTOCK!!!) Now that my company has chosen to give me a summer vacation, I have the time!

I think I'm on to something, but we'll see. Hopefully the end of the day today will yield results. :twisted:
Zach
Coming Soon...
Image Image
User avatar
absolutsnwbrdr
Donating Member
 
Posts: 2657
Images: 412
Joined: Mon Jan 25, 2010 6:10 pm
Location: Hanover, PA
Top

Postby S. Heisley » Mon May 10, 2010 9:45 am

Those are really clever and nice looking lights! :thumbsup:
User avatar
S. Heisley
Super Lifetime Member
 
Posts: 8774
Images: 495
Joined: Mon Sep 17, 2007 10:02 am
Location: No. California
Top

Postby Ageless » Mon May 10, 2010 9:54 am

Neat lights!

One concern with the tongue box; you've covered the charger which produces heat while charging. I doubt enuf to start a fire, but enuf to cause it to fail early if not vented.
Strangers on this road we are on; we are not two, we are one - Raymond Douglas Davies
User avatar
Ageless
Platinum Donating Member
 
Posts: 1603
Images: 8
Joined: Tue Aug 04, 2009 8:34 am
Location: Pt. Orchard, WA
Top

Postby absolutsnwbrdr » Mon May 10, 2010 10:09 am

Thanks for the comments!

Ageless - I was wondering about the heat myself, so the "shelf" that I mention isn't screwed down... its just a piece of wood that rests on supports. This way, once I get to wherever I'll be charging the battery, I can just lift out the extension cord and piece of wood. I'll certainly keep and eye on it! Thanks!
Zach
Coming Soon...
Image Image
User avatar
absolutsnwbrdr
Donating Member
 
Posts: 2657
Images: 412
Joined: Mon Jan 25, 2010 6:10 pm
Location: Hanover, PA
Top

Nice!!!

Postby Chuckles2153 » Mon May 10, 2010 3:48 pm

Hey Zach,
I just finished looking thru your build and like the removable top :applause: and the graphics :thumbsup: very,very nice job.
Chuck
Chuckles2153
Teardrop Master
 
Posts: 154
Images: 74
Joined: Wed Mar 24, 2010 2:00 pm
Location: Franklin. Indiana
Top

Postby grizz » Mon May 10, 2010 4:05 pm

Was going to ask last night, what the close up on the lights look like ?

Did you take regular lights and add a small "roof" to them, to create the mushroom effect ?

Anyway, it looks great.
Greetings from England.

Rian.


Hoping to get it all done in time.
User avatar
grizz
1000 Club
1000 Club
 
Posts: 1210
Images: 29
Joined: Mon Sep 21, 2009 2:37 pm
Location: Rochester, Kent, UK
Top

Postby absolutsnwbrdr » Mon May 10, 2010 6:26 pm

grizz wrote:Was going to ask last night, what the close up on the lights look like ?

Did you take regular lights and add a small "roof" to them, to create the mushroom effect ?

Anyway, it looks great.


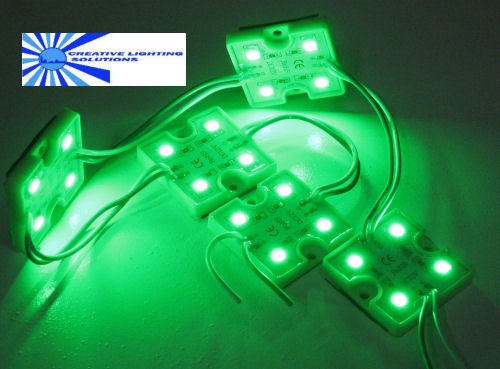
Wish I would have taken pictures while I was making them. It's just a round piece of plywood, with wood blocks glued to the backs of them. Then it was a matter of drilling holes for wires, and painting them. The LED pods are glued to the discs so that they project light onto the trailer. They are 1-1/2" from the side of the trailer.

These are the pods:

Image
Zach
Coming Soon...
Image Image
User avatar
absolutsnwbrdr
Donating Member
 
Posts: 2657
Images: 412
Joined: Mon Jan 25, 2010 6:10 pm
Location: Hanover, PA
Top

Postby rainjer » Mon May 10, 2010 8:03 pm

I have the same box on my trailer.

Image

Can I make a couple suggestions?

1) With all your electrical in there, I would actually drill a couple drain holes in the bottom in the low spots.

2) You may want to add a couple draw latches like I did. I found the lid wanted to lift even with the lock thru the holes.

3) If you are putting your battery in the box, you may want to add a vent on the back side of the box to vent gassed. I just used a 2" round soffit vent I found at Lowes.

4) You may want to mount you charger and fuses on the side wall or the divider so thing don't get stacked on them.


This is just an opinion.

Jeremy
User avatar
rainjer
King Koleman
 
Posts: 2092
Images: 11
Joined: Mon Feb 27, 2006 11:38 pm
Location: Everett, WA
Top

PreviousNext

Return to Build Journals

Who is online

Users browsing this forum: No registered users and 4 guests