The Poet Creek Express - Foamie Hybrid

Canvas covered foamies (Thrifty Alternatives...)

Moderator: eaglesdare

Re: The Poet Creek Express - Bare Bones 3D

Postby GPW » Fri Apr 27, 2012 10:03 am

How about an all conduit frame .. purlin door frames and everything , with foam/FG over that ... admittedly , only for the welding Masters... But that wouldn’t go anywhere (Strong) :o ... even a steel mesh floor with a high density foam overlay , and a nice rug perhaps ... No wood at all !!! :thinking:
There’s no place like Foam !
User avatar
GPW
Gold Donating Member
 
Posts: 14912
Images: 546
Joined: Thu Feb 09, 2006 7:58 pm
Location: New Orleans

Re: The Poet Creek Express - Bare Bones 3D

Postby linuxmanxxx » Fri Apr 27, 2012 10:18 am

Yeah if there is anywhere here that could build an all metal frame from galvenized conduit is this thread for sure.
User avatar
linuxmanxxx
500 Club
 
Posts: 798
Images: 10
Joined: Fri Sep 10, 2010 1:50 am
Location: Abilene TX

Re: The Poet Creek Express - Bare Bones 3D

Postby parnold » Fri Apr 27, 2012 10:32 am

Just a quick reminder that welding galvanized metal creates very hazardous fumes.

Now back to our regularly scheduled program.
User avatar
parnold
Donating Member
 
Posts: 2344
Images: 302
Joined: Mon Feb 08, 2010 4:49 pm
Location: Northwest New Jersey
Top

Re: The Poet Creek Express - Bare Bones 3D

Postby KCStudly » Fri Apr 27, 2012 10:37 am

2 x 3 Aluminum angle roller formed the hard way with same straight stock headering off the hinge and bottom seal ends has distinct possibility. I could screw the wooden lower seal sill (wood because it will have multiple angles and be radiused on the lower edge and ends). Use flat head stainless steel screws from the ply side and nylon locking nuts on the inside.

Hmm, :thinking: :thinking: :thinking:.

Doubt the wife would have any trouble lifting that, even w/o hydro struts.
KC
My Build: The Poet Creek Express Hybrid Foamie

Poet Creek Or Bust
Engineering the TLAR way - "That Looks About Right"
TnTTT ORIGINAL 200A LANTERN CLUB = "The 200A Gang"
Green Lantern Corpsmen
User avatar
KCStudly
Donating Member
 
Posts: 9613
Images: 8169
Joined: Mon Feb 06, 2012 10:18 pm
Location: Southeastern CT, USA
Top

Re: The Poet Creek Express - Shock It To Me

Postby KCStudly » Sun Apr 29, 2012 12:36 am

Thursday, the brown truck cometh.
Image

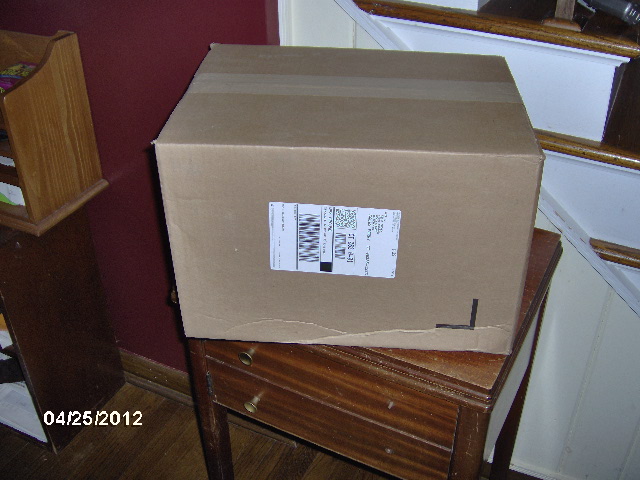
And I was not shocked to see...
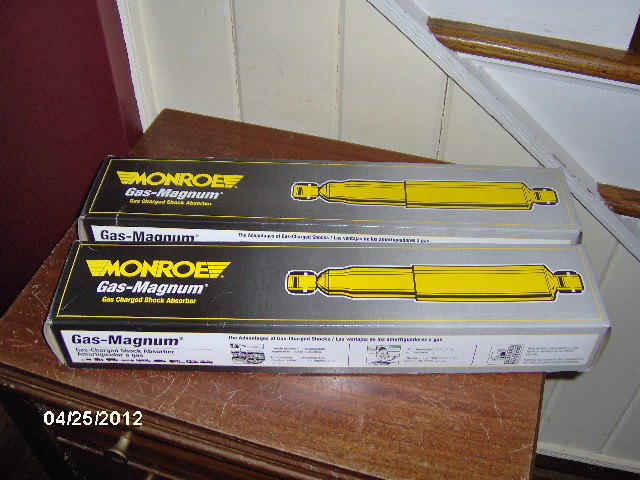
Image

Shocks.
Image

With one shock mounting stud and associated hardware per.
Image
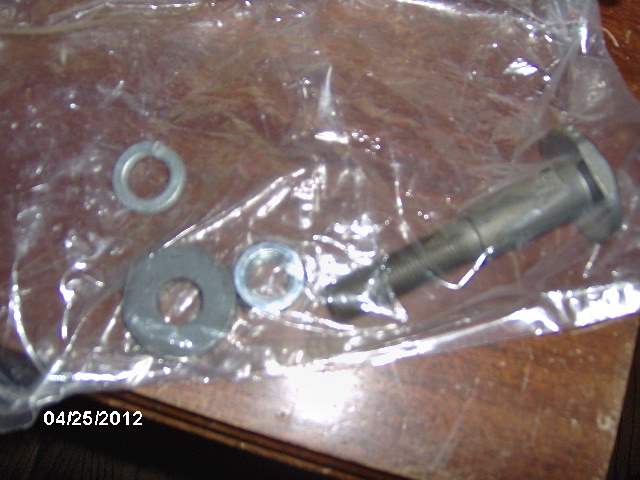
Once I pulled open the ends of the cartons they weren't going to close back up well, and I didn't want to loose anything so I left the hardware in the bags for now.

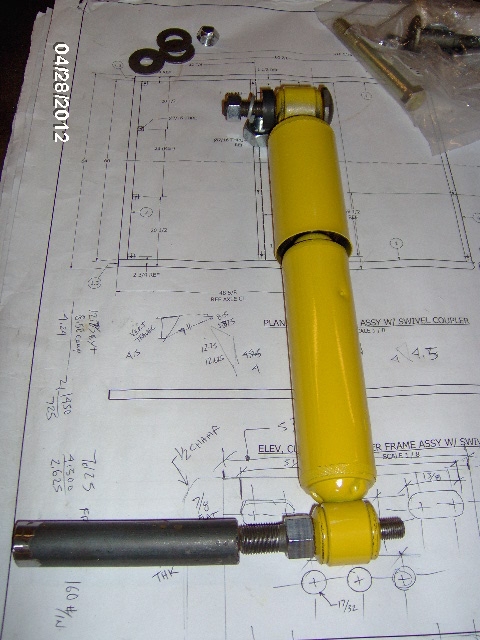
Friday: The shock mounting stud on top is the one that came with the shocks. It is a round head shoulder bolt with a pair of wrench flats on the sides of the head and a thick washer that fits over the threaded portion but not the shaft portion, thus setting the compression stack height of the shock bushing.
Image
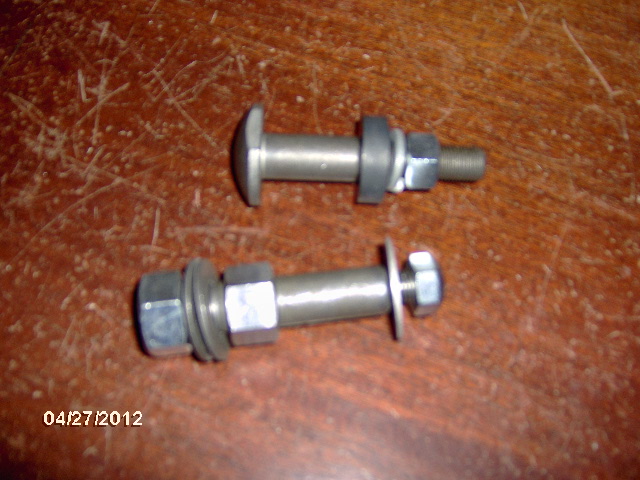
The one on the bottom is one that I picked out of a box of odd shock mounting studs that they had behind the counter at my local auto parts store. I picked it because it was unplated (easier to weld on it if I decide to), it has a heavy 5/8-18UNF thread on the mount end with hex shoulder, and it still had a bar code with part number label on it. The later allowed the parts guy to identify it as being obsolete, but he was able to find old stock at another store that would not cost me any shipping to bring in. The other likely candidates in the box were also singles but were either plated, odd configurations (or both) and/or did not have part info. Wanting to keep things moving along, and since it was closing time at the store, I bought the one he had (add $4.75 to the tally), and asked that they confirm the inventory at the other store (in NJ) and I would check with them today (Saturday). If push came to shove I could work off of the one I had in hand, even making a duplicate if I had to, but that turned out to be unnecessary since when I called today to check they had found it in stock and were having it sent up. Should be here by Wednesday, latest. Store is right on my path home from work.

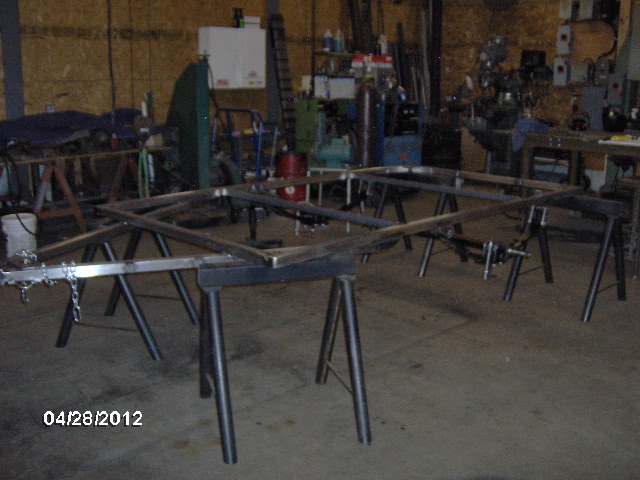
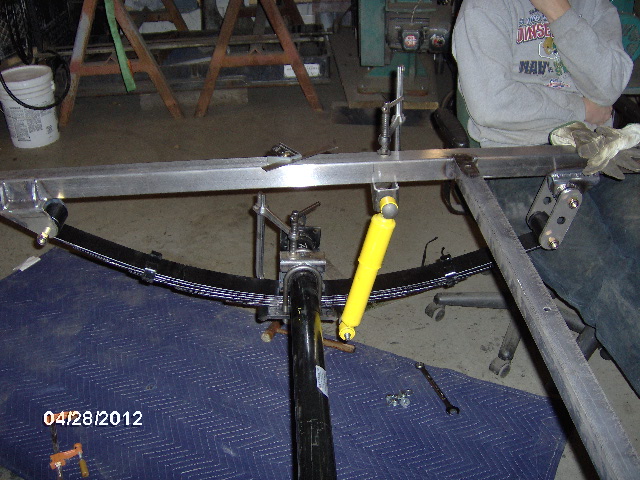
Saturday: I had thought that we would be working on the Rover this weekend, even tho Rover Mike was not going to be there, but it turns out that his Rover 4x4 fab expert was also not going to be there, so Yippee!!! I got to do trailer fab. While I was noodling and fussing with some long hand math trying to figure out the shock travel vs. spring travel, Karl swung the frame over, I helped him lay it right side up on the saw horses, and we mocked the springs, axle and U-Bolt plates back into place.
Image

While I had the camera out, I took a shot at some equipment that Karl had picked up from a welding shop that was updating their equipment. This is a rotary positioning table.
Image
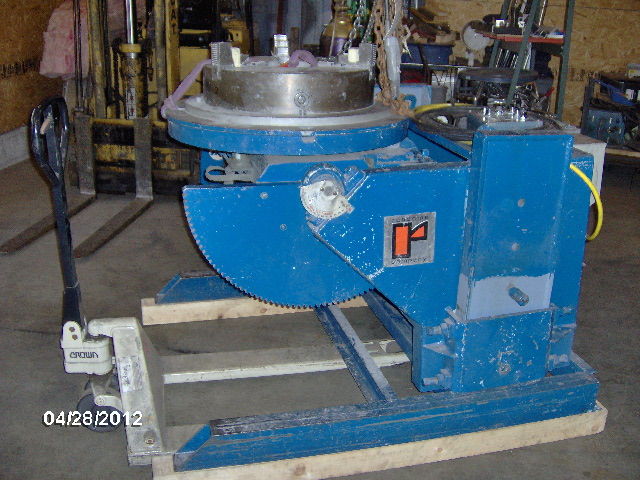
Note the pallet jack in front for scale. It weighs 2900 lbs and the three jaw chuck looked to have at least an 18 inch capacity. The load handling capability is a ridiculous 56k lbs. He bought it way under value and has already flipped it to cover the cost of this new/used TIG welder set up. I want to say it has 350A capacity, pulse arc, cooler, pedal, leads, torch, and a really well made wheeled cart.
Image
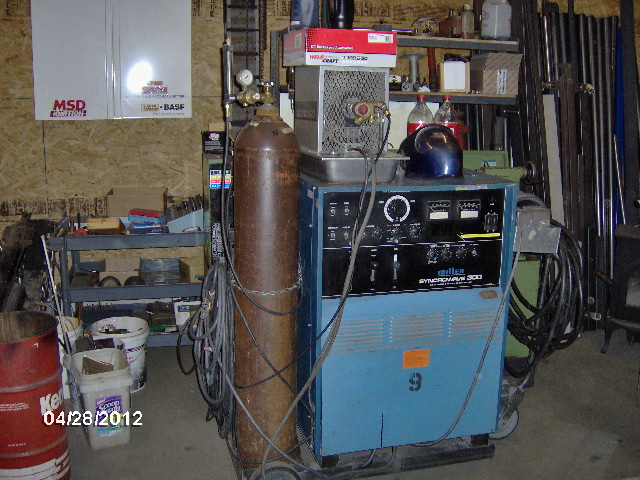
Welds really nice, too. A real workhorse.

Based on some measurements and my calculations the springs will compress about 4-1/2 inches at their rated load capacity, and the shock has 4-1/4 inches of travel, so the shock would need to be laid over at an angle of just over 2 inches difference from top eye to bottom eye to match that travel (i.e. if the shock is in the same axis as the spring it is a 1:1 ratio, but with the shock laid over slightly, upper eye behind lower eye, say, relative to the vertical motion, then the travel is scaled by approximately the ratio of the adjacent side of the triangle to the hypotenuse. A little long hand Pythagorean formula and square root math and I figured that the upper eye would need to be located about 2-1/16 inch or more behind the lower eye. I had an idea of how I thought I could mount the shock studs, so I did a little mock up to see how that might look.
Image
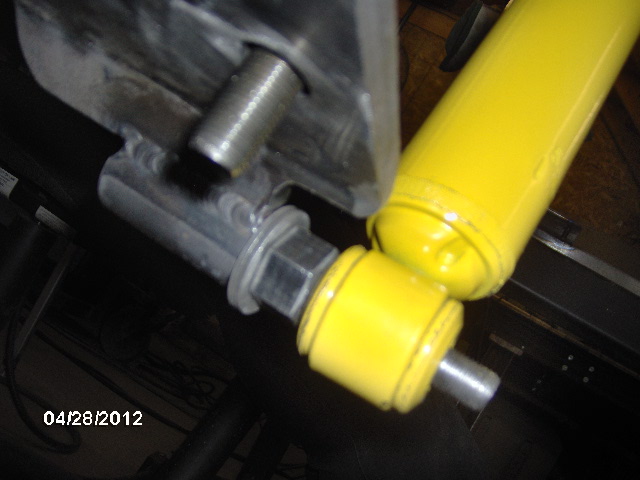
The piece next the lower stud is 1 inch round bar.

I wanted to keep the upper mount as close to the frame rail as practical to avoid cantilevered loads and twist on the rail, since I had no plan for a dedicated shock mounting xmbr. I taped a hex nut onto the shock body with electrical tape to act as a 3/8 inch thick spacer and lightly clamped the shock body to the spring in the approximate final location. The clamp had rubber pads on the jaws to further guard against squashing the shock body.
Image
Image
Image

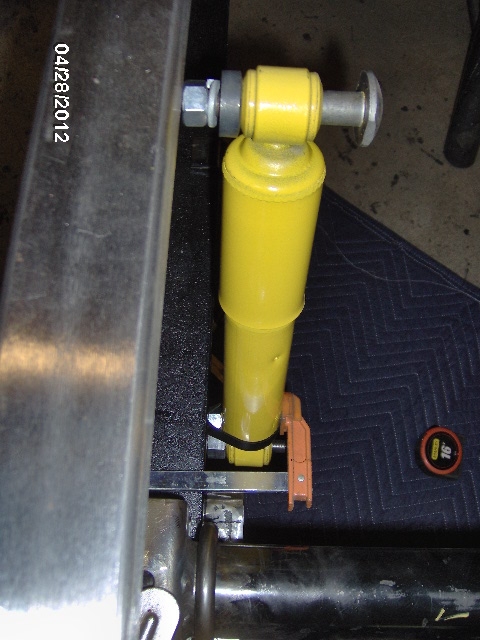
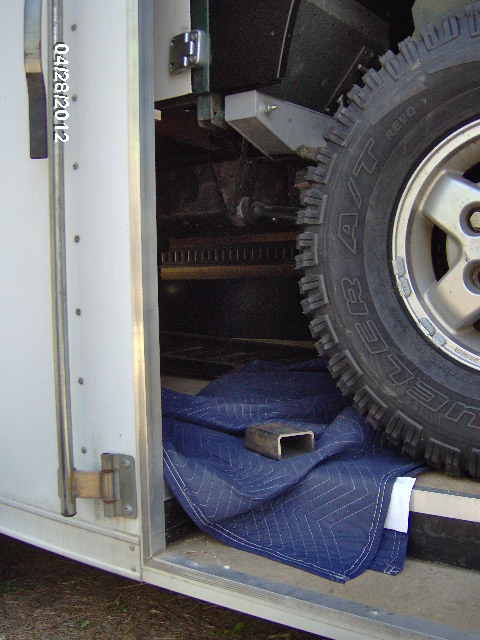
After a bunch of measuring using a framing square I decided that I could get the desired clearance with the spring by setting the upper shock mount face 1-1/8 inch in from the inside of the frame and notching the inside rear corner of the U-Bolt plates slightly to clear the lower shock eyes. The 2x3 x 3/16 wall rectangular tube left over from the little front swivel sleeve xmbr would work perfectly for the upper mounts and I knew exactly where that piece was... sitting inside the driver's side seat riser of the Land Rover... in Mike's cargo trailer... behind the shop.

I can't squeeze thru there, certainly not with those extra storage bins mounted above the trailer fenders.
Image
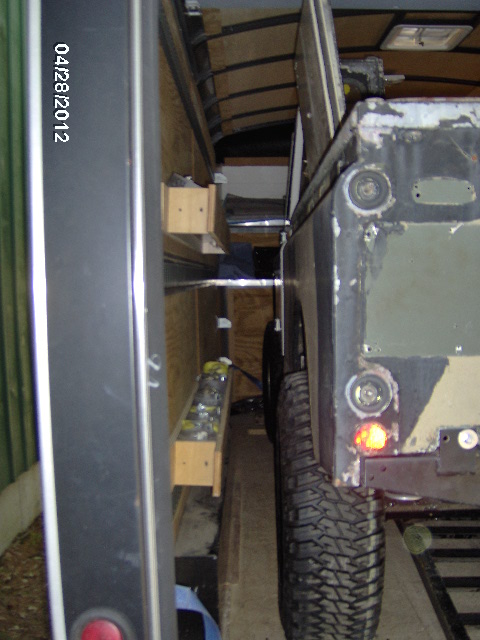
And I couldn't climb thru the bed because the super thin light weight roof cap was flipped upside down and was lying on its drip rails on the bed rails.

Now I've been able to get into some pretty tight spaces and awkward positions while working on submarines, so this shouldn't be that hard. I laid a moving blanket down under the truck from the curb side access door, squeezed between the front tire and door jamb, and climbed in under the truck. When I got to the driver's side I had to prop my elbow up on the trailer's inner fender in order to make the turn to stand up. Nothing to it, piece was right where I thought it was.
Image

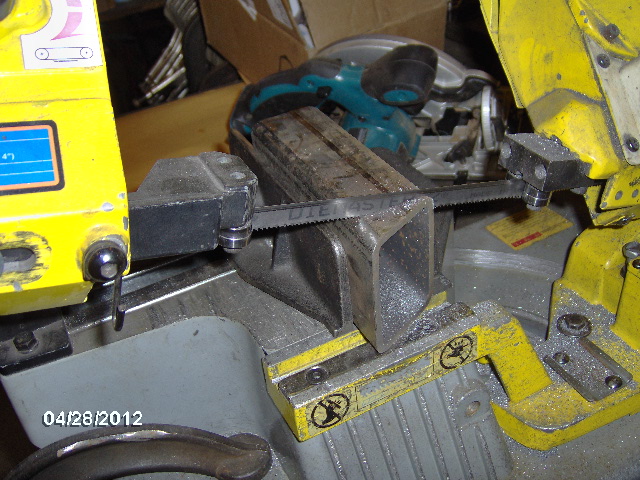
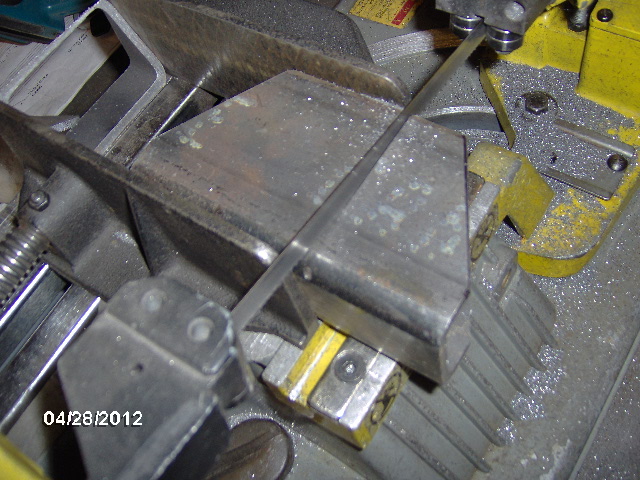
The piece was short enough that I would have to miter each end before parting them off, or I wouldn't have enough to hold them in the saw, so I first had to square the end off from where I had cut the little front swivel sleeve xmbr.
Image

Then after a little layout, I cut the first miter, holding back 3/4 inch from each of the final edges.
Image

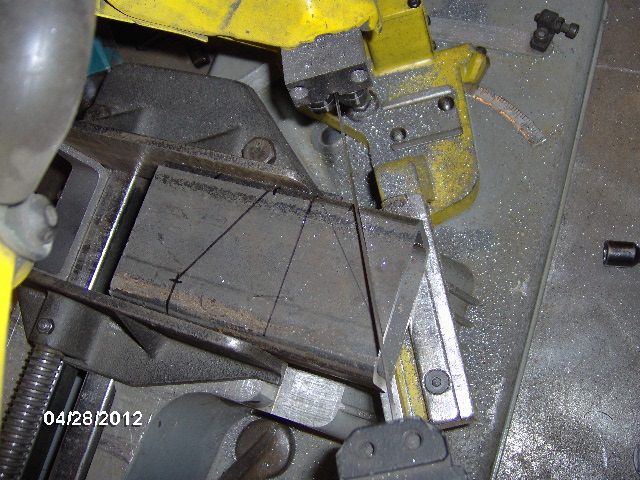
Then miter the other side.
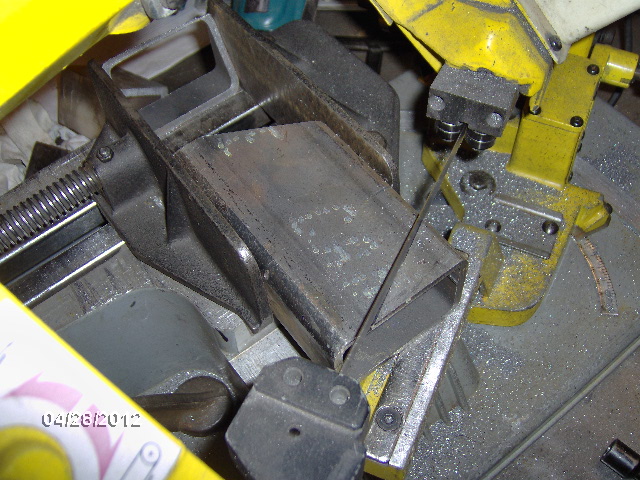
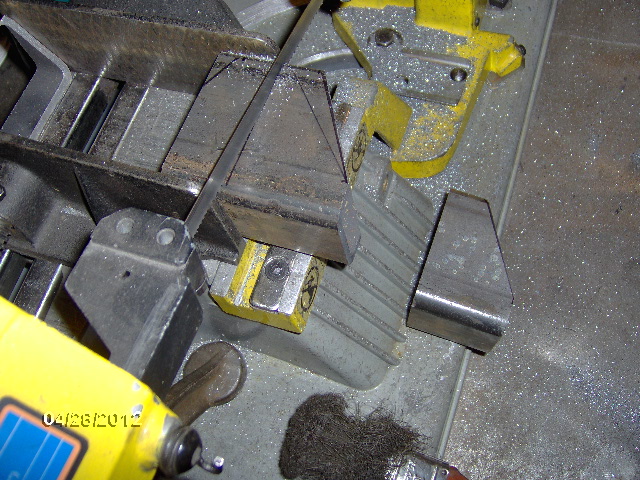
Image

Then part them off.
Image
Image

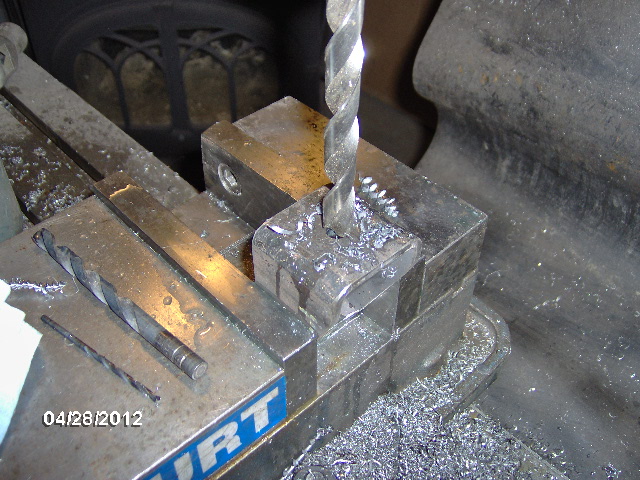
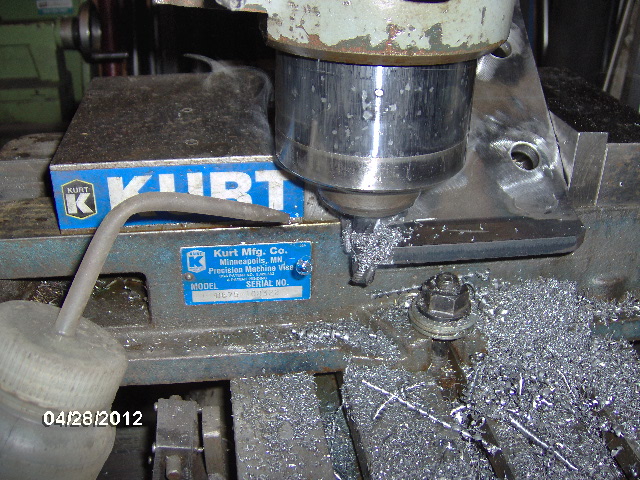
A little more layout work and some drilling in the milling machine.
Image

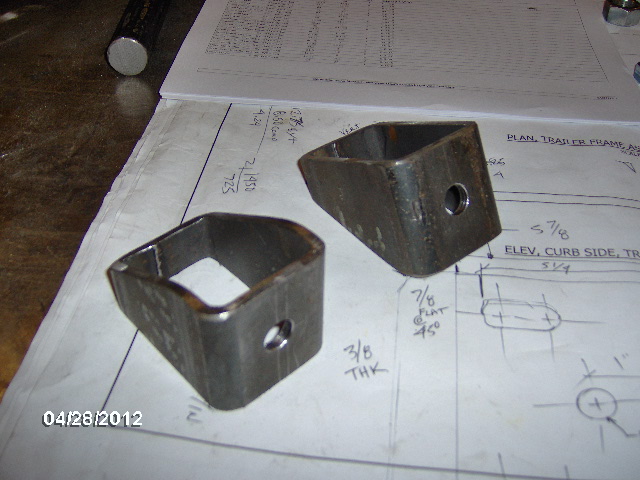
Deburr the holes, chamfer the edges and roll the corners a tad on the sander and here you have two upper shock mount brackets.
Image

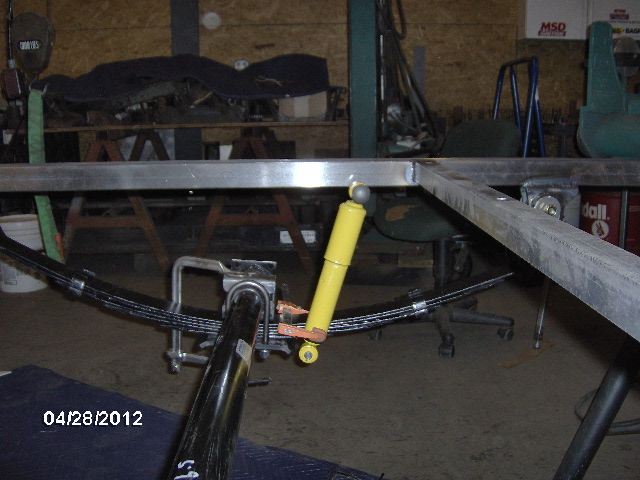
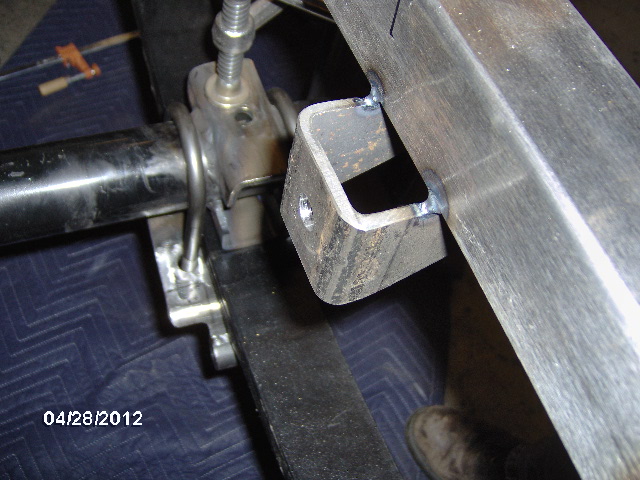
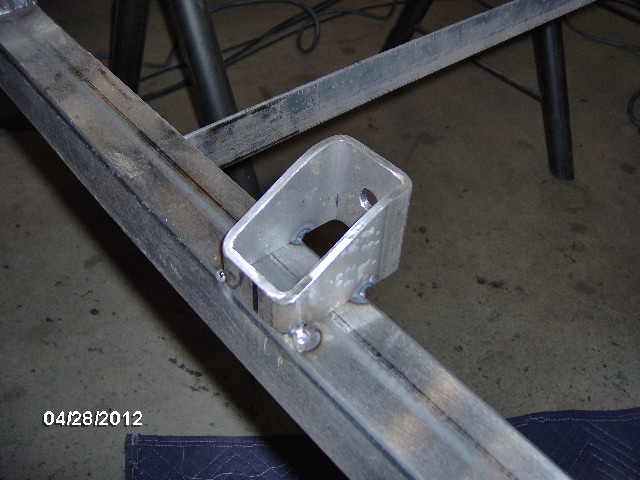
And here is one of the upper mount brackets mocked into place.
Image
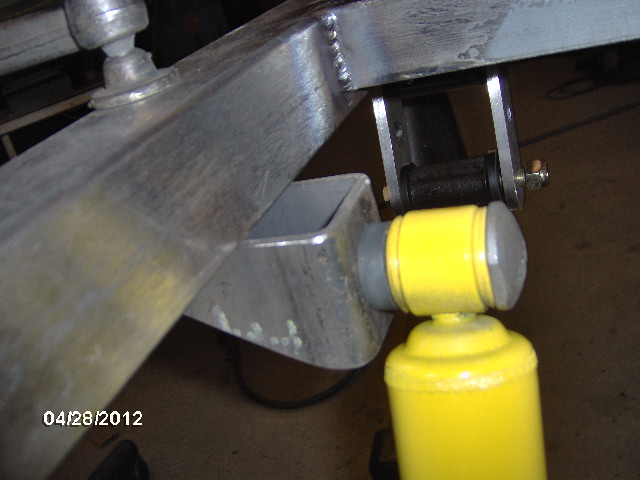
By using the 2x3 rectangular tube, I could get the 1-1/8 inboard spacing while still tying back to the outside face of the frame rail.

I will probably trim some of the excess threads off of the shock mounting stud before final assembly. I'm going to leave the bracket open like this, rather than box it in and make a place for junk to settle on top.
Image
Image

Karl didn't have a 5/8-18UNF tap (guy's got NO tools...geez :R :lol: ) so I popped out for a spot of lunch and ran down to work
Image
to borrow one, plus the 37/64 inch pilot drill (that I sharpened on the Drill Doctor).

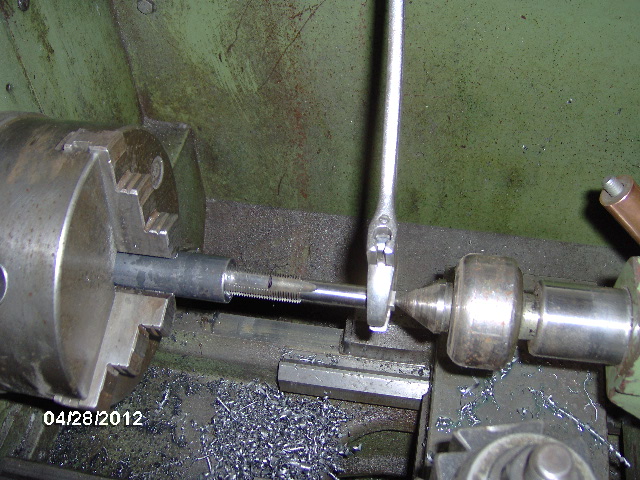
Drilling out the 1 inch round bar for the lower shock stud.
Image

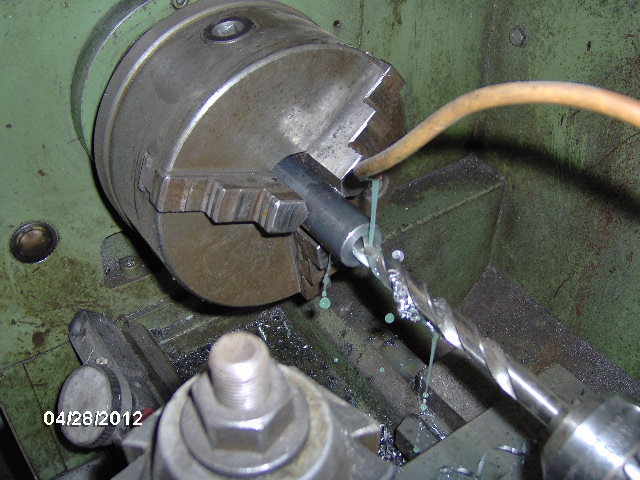
Here I am hand tapping in the lathe, but I am using the live center in the tail stock centered in the shaft end of the tap to keep it perfectly aligned while starting.
Image

Meanwhile, Karl was setting up the U-Bolt plates to notch them in the mill (I would have just nipped them with the cut off wheel, but this would make a nice radius in the corner.
Image
Image

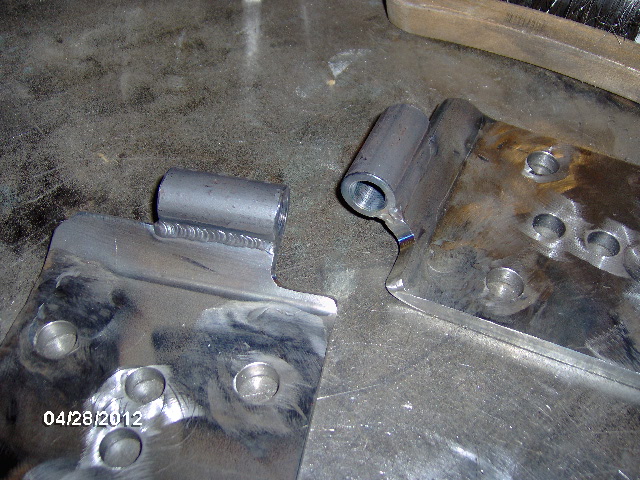
Wash, rinse, repeat, part the lower mount in the saw, touch everything up on the sander (no pics), and shim them up on the bench for a little fit check.
Image
The thin flat washers are just there to make up for where the thread runs out under the hex portion; split lock washers and blue thread locking compound will be used at final assembly.

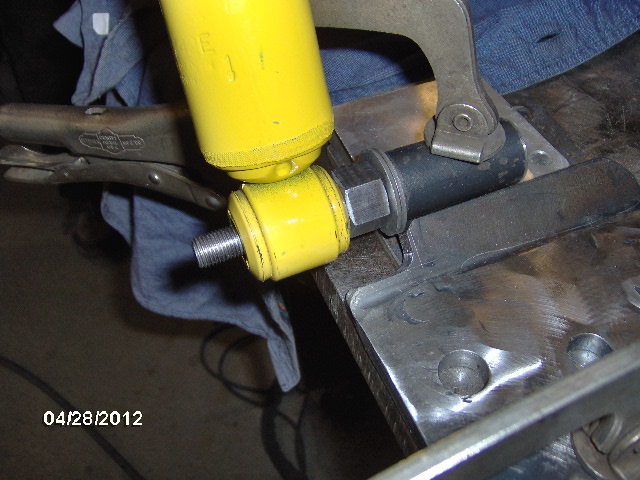
Use the new TIG welder for the first time, chase the threads again after welding, and you get custom threaded lower shock mount U-Bolt plates.
Image

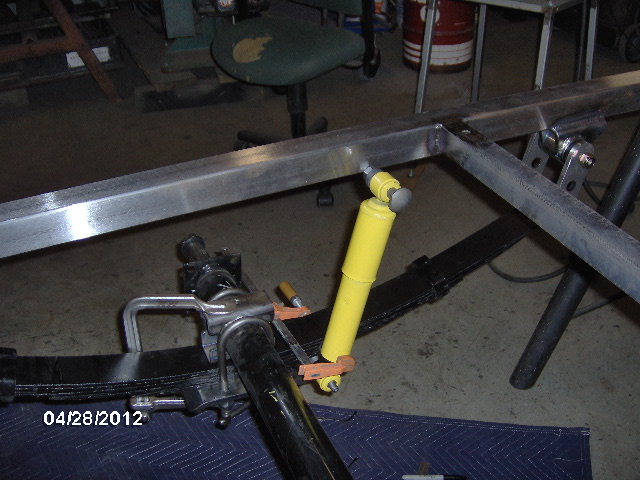
Now I could fit the U-Bolt plate in place, positively locating the lower shock eye and decide where along the frame rail to put the upper mount bracket.
Image

Much noodling and discussion followed about whether to allow the shocks to limit axle droop while hedging against bottoming out on compression, or having a limited amount of remaining travel under full capacity loads. With the axle as it was with no hubs and no wheels/tires I could pull it down a bit further, perhaps 3/8 - 1/2 inch. Karl reasoned that this would be the least concerning action, the relatively light axle assembly dropping away while under extension dampening (I agreed). On the other hand, it would be nice if the shock were only compressed about 1/4 to 1/3 of its travel by the empty weight of the camper at ride height leaving more travel in store for compression (as it was now I figured it would be in the middle of the range when the dry/empty weight was applied). In the end we reasoned that the calculations that I had made matched the expected axle travel as closely as I could figure without knowing the final dry and loaded weights precisely, and that, although my guesstimated final all up max travel weight would put the shock to within 1 inch of full compression, there will be plenty of room remaining between the bottom of the frame and the upper axle perches to fit a suitable bump stop. All else fails, if it doesn't work out right I can remove and rework the U-bolt plates, raising or lowering the lower mount as necessary to suit these shocks better, or for longer shocks. Day light's wasting and this thing needs to get straightened and go to paint.

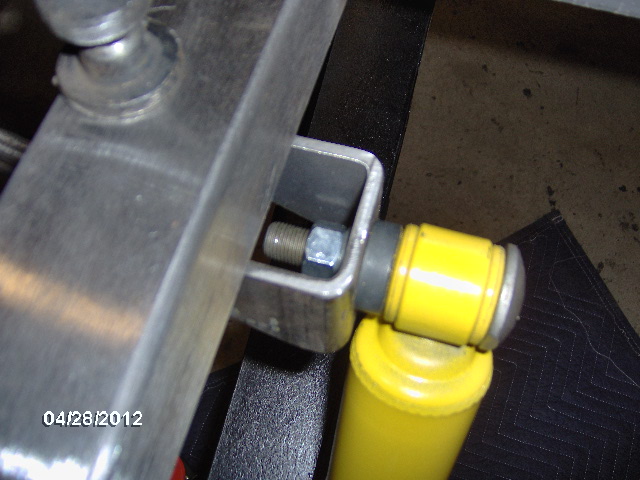
Here's a misleading camera angle from underneath not showing the shock clearance at the U-Bolt plate notch well at all.
Image

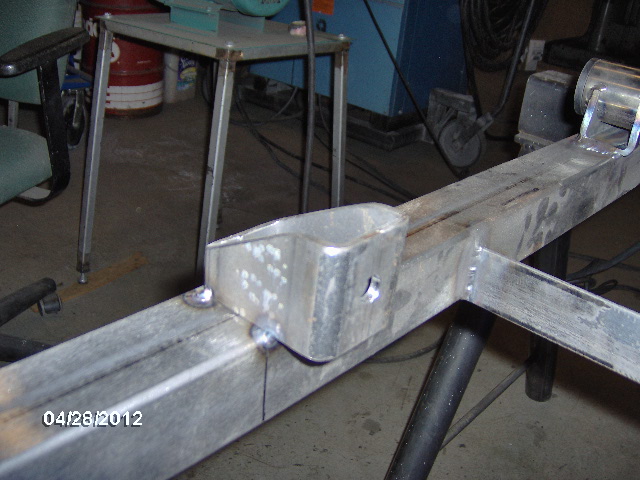
And here's the curb side upper mount in the foreground tacked in place with the lower mount/U-Bolt plate notch beyond.
Image

And another view of the tacks from underneath (Karl seemed anxious to play with his new welder, so I encouraged him to weld this up).
Image
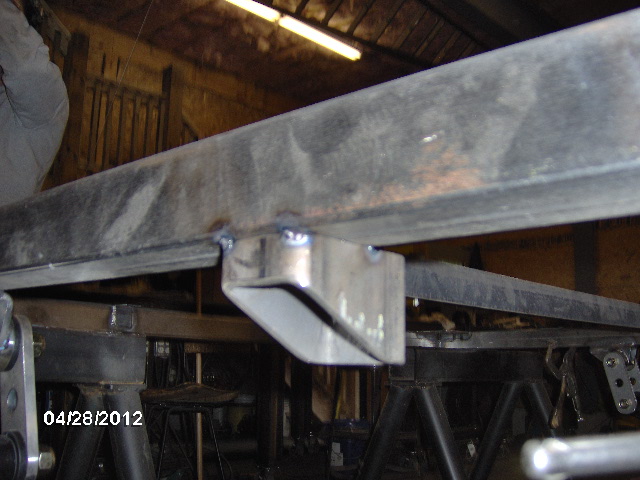
You can also see how the 3 inch bracket ties into the outside wall of the frame.

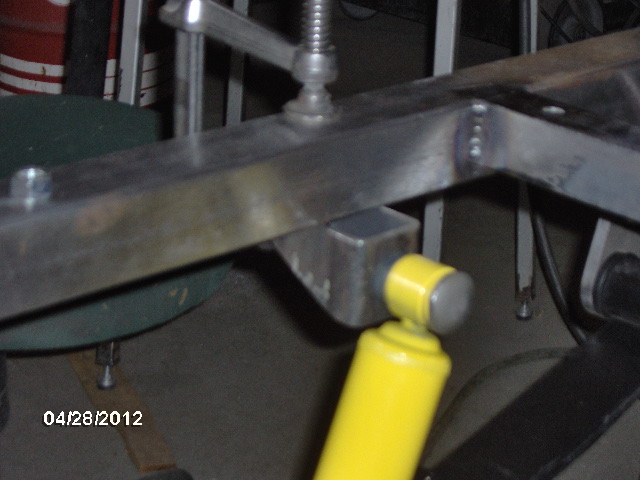
And another pic of the same thing after we stripped the leaf springs and axle back off, and flipped the frame back over for welding.
Image

And the other side.
Image

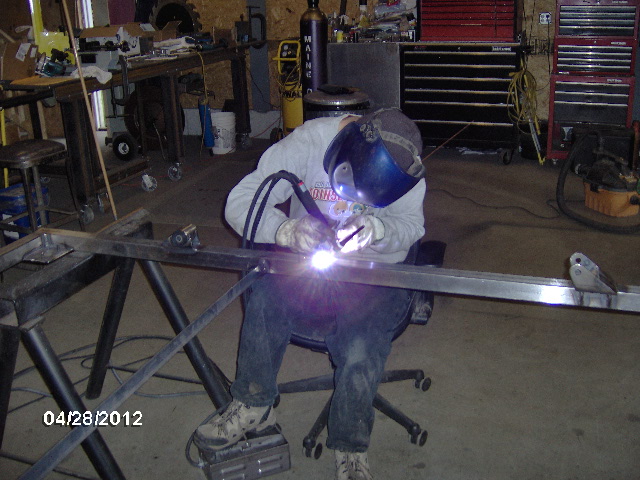
And Karl using his new toy...um, I mean tool.
Image

I guess I didn't get any pics after they were welded, but will do tomorrow. Also in store for tomorrow, now that all of the welding is really complete, will be welding up the little vent holes I drilled (I know, I contradicted myself :? ), removing the mocked up swivel coupler pintle shaft, and prepping for paint (descaling, a little degreasing, and masking).

All for tonight.
Last edited by KCStudly on Sat Apr 13, 2013 1:55 pm, edited 1 time in total.
KC
My Build: The Poet Creek Express Hybrid Foamie

Poet Creek Or Bust
Engineering the TLAR way - "That Looks About Right"
TnTTT ORIGINAL 200A LANTERN CLUB = "The 200A Gang"
Green Lantern Corpsmen
User avatar
KCStudly
Donating Member
 
Posts: 9613
Images: 8169
Joined: Mon Feb 06, 2012 10:18 pm
Location: Southeastern CT, USA
Top

Re: The Poet Creek Express - Bump Bump

Postby KCStudly » Mon Apr 30, 2012 4:00 am

First I want to reiterate how important it is to treat your friends how you would like to be treated yourself. Don't look a gift horse in the mouth. Do unto others, etc. etc.

Today was a big day, and yet, like Paul Arnold said,
parnold wrote:I feel like every post I start out by saying I didn't get as much accomplished as I wanted to.


I lied. Well, I didn't really lie; I was mistaken. There was some more welding on the frame today. But honest, that is the last of it. Anything more will not be building, it will be part of that 1% "not ever done" factor. Honest. You have my word on that. I personally guarantee it. (There is no check in the mail, and your mileage will not vary. Get over it.)

After yesterday's design on the fly shock mount effort, and while posting yesterday's efforts, it occurred to me that even tho I had calculated the static spring load vs. spring rate (lbs/in) vs. shock travel, the spring is still designed to see displacement at the max rated load. So the spring will still compress more than the static value when loaded to the maximum load rating. Hmm. So If I am loaded close to the maximum spring rating (I hope I am under, but...) then I may not have allowed enough over travel in the shocks. Maybe I need to 'eat crow' on a previous post in a different thread about letting the shocks be the limiting element on extension(?) in preference to having reserve travel on compression. My head is spinning.

Never claimed to be an expert, only claimed to have self confidence and an analytical mind. Anyway, I decided that I would add the bump stops now, getting all of the welding done before paint, rather than wait until the end, figuring out true total dry and travel weights, and true ride heights. Need to get to paint and start building the cabin. To quote John Wayne, "Daylight's wasting". If we are hitting the bump stops (which I doubt) then I can always go to longer spring shackles, find a longer shock of similar load rating, or, as a last resort, redo the hard point mounting.

Slept in a little this morning (check the time stamp on my previous post, tho I don't think that covers DST), but once up and running I stopped at the "dumb modern" auto parts store on my way to Fab Mecca. Asked the attendant (have a hard time calling him a "Parts Guy") for some 'generic' bump stops. He first took me to the aisle where I was, quite frankly, surprised to see that they had coil spring spacer inserts, ala circle track racer tuning tools (although I suspect the market is for those guys who sit way down in the seat looking between their hat brims, the steering wheel and dash board). Then he went off into the stacks to "see". While he was doing that I decided to look around the store and see if they had any Energy Suspension (http://energysuspension.com) parts in the 4x4 section. Sure enough they had some poly bump stops (pic further below). Once the guy came back empty handed I showed him what I wanted to buy. If I only knew what make, model and year I wanted, I'm sure he would have been able to 'help' me.

Got to Mecca and mocked the suspension back up, except this time I left the shackles out and put some big electrical tie wraps around the shock to keep it fully compressed. Then we clamped the spring a little until the shock eye aligned to the lower mount.
Image
Image
Image
Image

Then I measured the bump stop clearance between the bottom of the frame rail and the upper spring perch on the axle (another good excuse for that "happy" accident).
Image
Image
About 3-1/2 inches.

Here are the bump stops.
Image

They are polyurethane, which is relatively firm compared to what you might expect from good old fashioned rubber. Karl was skeptical that they would give much, but when I spouted off some load estimates (up to 740 pounds per side times a dynamic factor of, hmm, 6 or 10 times during a hard hit?) he put one in the mill to see if he could compress it. Here it is free.
Image

And compressed about 3/8 inch, which was all we could comfortably get.
Image

The steps are there as a reference so that you can trim them if you need to. Their free length is about 2-1/16 inch. We decided to shoot for about 1/2 inch of compression on the bump stop when the shock is bottomed, so 3-1/2 inch gap minus 2 inch bump plus 1/2 inch equals a 2 inch spacer. Nice and easy.

There was a piece of 2x2x1/8 inch wall box tube in the rack with a pleasing miter angle already on one end (not sure at this point if it was my drop or something from the Rover project) so we set the saw at that angle and cut off a couple of pieces 2-1/4 long on the short side.
Image
Image

A little layout to find the center and into the mill for drilling.
Image
Note that the piece is clamped flush with the edge of the vise. That way I only have to do the layout on one piece and I can just align the second piece with the edge of the vise and it is good to go.

Image

Some time with the deburring tool and the Bader (actually I hit them on the Bader before doing the layout and drilling, so that the flash from the saw would not cut me or hinder clamping) and tadah, two bump stop spacers are born.
Image

Back at the frame it seemed as tho we had 3/4 inch interference instead of the planned 1/2 inch. Well there is a little lip in the mold line on the mounting face of the bump, and we rounded off that 16th of an inch in height, so 3/4 inch it is. If necessary I can trim one step off of the bumps, but for now we are calling it margin.

We eased up on the clamp holding the spring and positioned the bump/spacer assembly toward the back of the axle spring perch (knowing that the leaf spring will flatten and stretch out some when it has gotten to this point in real life).
Image

And here we squeezed it down a little using the clamp, but not too much because it was about all the clamp wanted to do without getting too aggressive.
Image

Here I have stripped the axle and springs back off in prep for welding.
Image

And here you can see the 1/2 inch offset matching the spring offset.
Image

Welded.
Image
(Ain't coming off.)

Same here.
Image

And now that I was truly, fully and completely done welding, I did a little more welding to close up the vent holes.
91513915149151591516
Sanded those smooth, too (no pic).

Things started moving faster here because Karl moves a little faster than I do and he was helping in a big way, so the pics are a bit spotty (but I think you will get the gist of things just fine). Here you just might be able to make out that Karl has cut a few tack welds off of the big bench top plate and has lifted the front edge of it onto some 4x4 blocks using the hoist (the other hoist...he has like 5 or 6 of them, one or two per barn beam).
Image

A better close up.
Image

I was the ground crew guiding Karl in the fork truck so there is no pic of the actual move, but here is the table frame after removing the plate.
Image

And here is the plate lowered down to the sawhorse level.
Image
Note the orientation to the shop. This will allow us to keep the trailer frame dangling from the hoist sideways while sliding it along the plate table using the hoist trolley. The bench table was too high and there would not have been enough head space to do this there.

Laying out the big knees (8x8 x 1 inch thk angles) and strategically tack welding them to the plate.
Image

Note the blocking and hydraulic ram.
Image

Portable hydraulic power pack.
Image

Another shot of the press set up.
Image
Karl stood down at the end with the hydraulic controls where he could sight along the frame and judge how much we were bending things, while I repositioned and checked progress with a 4 ft straight edge. After bumping along at each weldment and progressively improving we get a relatively straight frame, within about 1/16 inch.
Image

Compared to the other side before repeating, which was at least 1/4 inch out over its length.
Image

Once complete I cut the tacks off of the knees and ground everything back smooth again.
Image

Then we put the plate back up on the bench frame and gave the shop a nice sweep clean. Seemed like a lot of work, but it wasn't really that bad (Karl was right) and like he said, "it needed doing".

Didn't get the frame all the way prepped for paint, but I was happy to get the bump stops in there. I will get the cabin materials ordered early this week and on Wednesday I will get the frame ready for paint.

Don't look at the time of this post. I fell asleep with the net pad in my lap and woke back up in time to post this before another little nap and going to work.
Last edited by KCStudly on Tue Dec 25, 2012 10:40 pm, edited 2 times in total.
KC
My Build: The Poet Creek Express Hybrid Foamie

Poet Creek Or Bust
Engineering the TLAR way - "That Looks About Right"
TnTTT ORIGINAL 200A LANTERN CLUB = "The 200A Gang"
Green Lantern Corpsmen
User avatar
KCStudly
Donating Member
 
Posts: 9613
Images: 8169
Joined: Mon Feb 06, 2012 10:18 pm
Location: Southeastern CT, USA
Top

Re: The Poet Creek Express - The Bump Stops Here

Postby linuxmanxxx » Mon Apr 30, 2012 9:30 pm

Dang stud are you building a foamie or just perfecting the ultimate trailer?
User avatar
linuxmanxxx
500 Club
 
Posts: 798
Images: 10
Joined: Fri Sep 10, 2010 1:50 am
Location: Abilene TX
Top

Re: The Poet Creek Express - The Bump Stops Here

Postby KCStudly » Tue May 01, 2012 7:15 am

linuxmanxxx wrote:Dang stud are you building a foamie or just perfecting the ultimate trailer?


That has yet to be seen. :worship:

In the grand scheme of things, I hope that the end result comes out nicely, but I'm not building an "Atma" or "Silver Beatle". Those are nice campers. :thumbsup:

Linux, I certainly do appreciate the encouraging words. It's nice to know that people appreciate the effort I am putting in. :)
Last edited by KCStudly on Tue May 01, 2012 10:06 pm, edited 1 time in total.
KC
My Build: The Poet Creek Express Hybrid Foamie

Poet Creek Or Bust
Engineering the TLAR way - "That Looks About Right"
TnTTT ORIGINAL 200A LANTERN CLUB = "The 200A Gang"
Green Lantern Corpsmen
User avatar
KCStudly
Donating Member
 
Posts: 9613
Images: 8169
Joined: Mon Feb 06, 2012 10:18 pm
Location: Southeastern CT, USA
Top

Re: The Poet Creek Express - The Bump Stops Here

Postby GPW » Tue May 01, 2012 11:14 am

I honestly believe everyone who has faithfully followed this thread should at least get some kind of “degree” or certificate in trailer engineering and fabrication ... I never learned so much about how little I knew about FAB, the Right way !!! ... that and all the COOL tools available ... WHOA !!! :o It’s “Educational” !!! :thinking:
KC , now that you wrote the book , next thing is “the Video “ .... 8)
There’s no place like Foam !
User avatar
GPW
Gold Donating Member
 
Posts: 14912
Images: 546
Joined: Thu Feb 09, 2006 7:58 pm
Location: New Orleans
Top

Re: The Poet Creek Express - The Bump Stops Here

Postby KCStudly » Tue May 01, 2012 2:56 pm

Thanks for the kind words of support, GPW. Looking forward to everyone's feedback is like a dangling carrot; it helps motivate the build! :thumbsup:

Taking a video wouldn't be out of the question, but I have never done U-Tube and am not sure how to go about posting one up. Better to stick with this format and let people enjoy it at their own pace, me thinks.

Need to get my lumber list completed so we can get the saw dust flying!
KC
My Build: The Poet Creek Express Hybrid Foamie

Poet Creek Or Bust
Engineering the TLAR way - "That Looks About Right"
TnTTT ORIGINAL 200A LANTERN CLUB = "The 200A Gang"
Green Lantern Corpsmen
User avatar
KCStudly
Donating Member
 
Posts: 9613
Images: 8169
Joined: Mon Feb 06, 2012 10:18 pm
Location: Southeastern CT, USA
Top

Re: The Poet Creek Express - The Grind Starts Here

Postby KCStudly » Fri May 04, 2012 11:15 am

Okay, so not really "The Grind" because I am doing it by hand, but the Bump and Grind reference was too tempting to pass up.

No pic's. Last night I finished up the material and cut lists for all of the foam, 5 mm plywood, and the timber frame. There are some parts left off, like the tongue box/gun locker insert frame, the hatch ribs and the hatch wall edge reinforcements. Also left off is the mill work for the cabinets, but all of the stringers and hidden frame work has been scheduled.

This, along with profile drawings of the three inner wall panels (the overall side wall profile was too big for his router table) all went out to Rover Mike and company to see what he can do for a wholesale price, and what if anything he will be willing to have his shop push through the saw in exchange for my work on his Rover project.

Then I went to Fab Mecca and scrubbed off the mill scale from the corner edges of the box tube, along the intermediate xmbr's and the body mounting tabs using course emery in prep for paint. More of the same this evening.

Karl and I also discussed the aluminum hatch frame option and he recommended water jet cutting flat aluminum ribs and welding on rolled flanges instead of attempting to roll aluminum angle shapes. The rolls equipment that he has access to does not have the proper die set to roll angle shapes consistently. The window of opportunity is short on this option, so I need to decide and get drawings together now if I want to go this way.
KC
My Build: The Poet Creek Express Hybrid Foamie

Poet Creek Or Bust
Engineering the TLAR way - "That Looks About Right"
TnTTT ORIGINAL 200A LANTERN CLUB = "The 200A Gang"
Green Lantern Corpsmen
User avatar
KCStudly
Donating Member
 
Posts: 9613
Images: 8169
Joined: Mon Feb 06, 2012 10:18 pm
Location: Southeastern CT, USA
Top

Re: The Poet Creek Express - The Grind Starts Here

Postby KCStudly » Fri May 04, 2012 9:28 pm

Here's something interesting. I made a copy of my hatch model and replaced the wooden ribs with an aluminum sub-frame structure.

Sorry, I didn't take the time to grab any images, but I will do my best to describe it. If this idea "takes off" I will post images later.

Here's the design. The vertical ribs are 11 gage (.090 thk) x 2 inches deep water jet cut to profile. The sub-frame header (up by the hatch hinge) is a 1x1x1/8 inch aluminum angle shape with the vertical-ish leg facing the rear edge of the roof, and the horizontal-ish leg flat to the under side of the hatch skin. The sub-frame sill is 2x2x1/8 angle capping the bottom edges of the ribs and facing the lower inside of the hatch inner skin. Each rib has a 1/8 thk x 2 wide flat aluminum flange formed to the outside arc of the rib making each rib 'L'-shaped along its arch. The outside face of the sill, rib flanges, and header are all flush to the arc of the profile of the hatch inner skin. There is a radius on the underside of the ribs rolling up to the lower edge of the header, mostly for aesthetics.

The skin ply would be fastened with flat head machine screws from the top with nuts under the rib flanges and along the sill and header. A double (2x2 nominal, 1.5 x 1.5 actual) spar would be secured to the header with wood screws from under the aluminum header, giving something for the hatch hinge to screw into and the canvas to secure to. The lower edge is a bit more complicated. A 1x4 (3/4 x 3-1/2 actual) ledger would be secure to the underside of the aluminum sill making a 1-1/2 inch wide ledge for the foam to run down to. Below this a milled piece of wood matching the angle of the bottom edge of the hatch to the rear face of the floor, with rounded corners matching the wall to roof joint roundover would screw to the wooden ledger blending everything in and providing a face for the lower hatch seal to attach to (with the seal mating to the rear face of the floor). The canvas would wrap under the inner skin up to the sides of the outer ribs, under the mold piece at the bottom up to the ledger, and around the front face of the hinge spars fastened to the spar and ledger with staples.

My thinking is that with the depth of the foam and stress panel construction (inner ply skin, 1-1/2 thk foam and outer canvas skin, that the relatively shallow 2 inch deep ribs would be plenty.

And now the interesting part. The aluminum sub-frame added 6 lbs to the overall hatch assembly weight, even after removing the original wooden ribs. This was a quick replacement of the wooden ribs with an aluminum substitute, and I could probably remove some more of the wood if I noodled around with it some more. However, the real savings would be eliminating the panel screws going into plywood edge grain, or having to miter, join, and profile cut a bunch of ribs.

I'm still undecided.
Last edited by KCStudly on Tue Mar 26, 2013 10:08 pm, edited 1 time in total.
KC
My Build: The Poet Creek Express Hybrid Foamie

Poet Creek Or Bust
Engineering the TLAR way - "That Looks About Right"
TnTTT ORIGINAL 200A LANTERN CLUB = "The 200A Gang"
Green Lantern Corpsmen
User avatar
KCStudly
Donating Member
 
Posts: 9613
Images: 8169
Joined: Mon Feb 06, 2012 10:18 pm
Location: Southeastern CT, USA
Top

Re: The Poet Creek Express - Frame Ready For Paint

Postby KCStudly » Sun May 06, 2012 9:35 pm

Another big milestone accomplished.

Got the trailer frame ready for paint. Finished scrubbing off the mill scale... by hand using emery cloth. The worst of it was on the intermediate angle shaped xmbrs, because these could not be run thru the Time Saver. The edges of the square tubes were the easiest. If I had it to do over and was not worried about time, I might have taken the xmbrs, cabin mounting clips, shock and bump stop mounts in to the sand blast cabinet at work and hit them with some grit before welding them in.

On the clips I thought of this before welding the tongue box ones on, but had not done so for the cabin clips. The jack mount plate and rear stabilizer plates had been blasted, and the suspension hanger parts were cold rolled stock so they only needed a light scuffing. However, the lower shock mount threaded bungs were hot rolled and needed a bit of a scrub (welded to the U-bolt plates... should have done those all the way around on the Bader before welding them on, instead of just where the welds were). On the shock and bump stop mounts I had hit the outsides on the Bader, but the insides were kind of tricky to sand after they had been welded on; I did the best I could w/o going too crazy :? (I know, I know, you all think I'm over the bend already). :R

Wiped everything down with paint thinner and masked the swivel bushings, stabilizer jack mounting stud threads, and shackle hanger bushing holes.

Here's a pic of the tongue. Note the cardboard sleeves used to mask the safety chains (they were the packaging that the new wiper blades I put on the Ford came in). Also, if you look close you can see the little chunks of angle iron acting as a "church" to hold the frame up off of the saw horses.
Image

I guess you can't really see it here, but the scale is off of the xmbrs.
Image
If you look back at some of the other pics you can see how much darker the xmbrs looked before.

And a few of the other pieces.
Image

After finishing up I cleaned out one of the taillight sockets on the Jeep and replaced the tail lamp. I think there was a little corrosion in there that had shorted across from the brake to running light terminal. The old bulb looked fine, but I put in the new one anyway. Then I pulled a wood staple out of one of the tires on the Jeep and put a plug in.

Then I caught the end of the Talladega race, and watched the drag racing from Atlanta. Nitro baby! Gotta love The Pop. :FNP :twisted: :? :D
KC
My Build: The Poet Creek Express Hybrid Foamie

Poet Creek Or Bust
Engineering the TLAR way - "That Looks About Right"
TnTTT ORIGINAL 200A LANTERN CLUB = "The 200A Gang"
Green Lantern Corpsmen
User avatar
KCStudly
Donating Member
 
Posts: 9613
Images: 8169
Joined: Mon Feb 06, 2012 10:18 pm
Location: Southeastern CT, USA
Top

Re: The Poet Creek Express - Frame Ready For Paint

Postby KCStudly » Mon May 07, 2012 10:07 pm

Water jet cutting the aluminum hatch ribs is not going to happen, at least not at the bargain basement price of "free", so I guess I have some more time to think about the hatch.

I could zip the aluminum rib profiles out on the small band saw at work; or do one, sand it nice and use it as a router template for the others.

One of the options I am considering for the reinforcing edges of the galley walls is to laminate thin slabs of wood over a jig. I could use the same jig to laminate hatch ribs; sounds like a lot of work and probably would result in the grain running the wrong way for strength, but the right way to take screws thru the inner skin ply.

Another option would be to use scraps of the 5 mm ply laminated on to the sides of built up mitered dimensional lumber, using the mitered core to screw into, but then I might as well just use the mitered ribs by themselves.

I must be over thinking this. I could break down and just add spar blocking in between plywood ribs, but that would add weight, and is not the look I want to achieve.

I'll figure it out eventually.
KC
My Build: The Poet Creek Express Hybrid Foamie

Poet Creek Or Bust
Engineering the TLAR way - "That Looks About Right"
TnTTT ORIGINAL 200A LANTERN CLUB = "The 200A Gang"
Green Lantern Corpsmen
User avatar
KCStudly
Donating Member
 
Posts: 9613
Images: 8169
Joined: Mon Feb 06, 2012 10:18 pm
Location: Southeastern CT, USA
Top

Re: The Poet Creek Express - Frame Ready For Paint

Postby wagondude » Tue May 08, 2012 9:35 am

If you laminated your ribs to the curve, you could then cut a couple of 1/8" ply ribs to glue on either side of the laminated curves to add strength. Should be more than enough for a foam hatch.

Bill
Bill

TnTTT ORIGIONAL 200A LANTERN CLUB
101137
User avatar
wagondude
1000 Club
1000 Club
 
Posts: 1535
Images: 35
Joined: Sun Jan 16, 2011 7:41 pm
Location: Land of the Jayhawks
Top

PreviousNext

Return to Foamies

Who is online

Users browsing this forum: No registered users and 27 guests