The Poet Creek Express - Foamie Hybrid

Canvas covered foamies (Thrifty Alternatives...)

Moderator: eaglesdare

Re: The Poet Creek Express - Foamie Hybrid

Postby parnold » Wed Jun 13, 2012 6:04 pm

KCStudly wrote:
$4100 on the budget and approaching my upper target of $5k fast.


Budget... what's a budget?

Just think, if this was a government budget, and it was set at 5K, you'd come in around 15K. :lol:

I missed both my budgets by 20%, well at least I'm hoping to keep it to 20% over on #2. Since I'm not done yet, I'm still not sure.

We're all anxious to see your assembly!
User avatar
parnold
Donating Member
 
Posts: 2344
Images: 302
Joined: Mon Feb 08, 2010 4:49 pm
Location: Northwest New Jersey

Re: The Poet Creek Express - Foamie Hybrid

Postby crumbruiser » Wed Jun 13, 2012 7:49 pm

:lol: :lol: My budget was $1500.00, I stopped adding up the bills at around $1800.00. :lol: :cry: :lol:
Frank
I am not weird, I am a Limited Edition.
Facebook http://www.facebook.com/profile.php?id=100000303236631
User avatar
crumbruiser
Teardrop Master
 
Posts: 267
Images: 255
Joined: Sun Jul 10, 2011 6:11 pm
Location: Central Ohio

Re: The Poet Creek Express - Foamie Hybrid

Postby GPW » Thu Jun 14, 2012 6:45 am

Still Far ahead of buying one , and this one is OBVIOUSLY better made ... ;)
There’s no place like Foam !
User avatar
GPW
Gold Donating Member
 
Posts: 14920
Images: 546
Joined: Thu Feb 09, 2006 7:58 pm
Location: New Orleans
Top

Re: The Poet Creek Express - Foamie Hybrid

Postby Oldragbaggers » Thu Jun 14, 2012 7:01 am

Those hatch ribs are a thing of beauty, KC. Beautiful work. If you're not a woodworker, you sure have me fooled. I have that step coming up soon and I'm a little nervous about it. If I do half as good as you, I'll be well pleased.
Life is sooooo good.........
Sail...camp....bike...repeat
Becky

Build Journal http://www.tnttt.com/viewtopic.php?f=50&t=45917
Visit our blog at http://www.oldragbaggers.com
Image Image
User avatar
Oldragbaggers
Gold Donating Member
 
Posts: 1842
Images: 331
Joined: Mon Aug 01, 2011 9:22 pm
Location: Essex, MD
Top

Re: The Poet Creek Express - Foamie Hybrid

Postby KCStudly » Thu Jun 14, 2012 3:25 pm

GPW, thank you for the support. It is always appreciated.

Becky, thank you for the kind words. I used wood glue (TB2) for the biscuit joints. They are probably going to be fine, but I am having second thoughts that maybe I should have used epoxy, or at least maybe stagger the joints from rib to rib. Am still considering laying some glass on the sides. My concern isn't so much for the overall hatch assembly strength because the composite nature of the inner skin and canvas separated by the curved foam should be plenty strong enough (if i do it right). I'm more concerned about the spring in the plywood during assembly; might break the ribs open like a hinge (I'm probably being over concerned about this). For this reason, I plan to pre-form, or train my plywood before attaching. Again, it's probably fine, but the glue joints on the trimmed off sections sure snapped easier than I would have liked.

Again, thank you both. I was starting to get discouraged by my lack of progress on the big picture, the cabin proper, and thought I was beginning to lose my cheering section. I suppose it’s both confidence and ego building to have the support and encouragement from fellow builders. Makes the wheels on the bus go round. :)

Last night I took the 1/2 ply and locker frame pieces up to Mecca. Did a little layout for some of the detail cuts and a glue up of the biscuit joint between the “cap” and “shed”. Sorry, pics are in the camera and I don’t have a way to download them here at work (after hours off the clock). Karl’s up on the roof replacing a catwalk railing so I’m hanging out here for a bit to let him get a little further along.

Tonight I hope to make the detail cuts on the tongue box floor and maybe some more work on the locker frame. Perhaps glue up the panel for the locker to tongue box bulkhead.

Karl and I are planning to go down to Rover Mike’s place and pick up the cut wood tomorrow evening after work. Wooooohoooo! Then look out, no more excuses, the cabin build will be on in earnest.
KC
My Build: The Poet Creek Express Hybrid Foamie

Poet Creek Or Bust
Engineering the TLAR way - "That Looks About Right"
TnTTT ORIGINAL 200A LANTERN CLUB = "The 200A Gang"
Green Lantern Corpsmen
User avatar
KCStudly
Donating Member
 
Posts: 9640
Images: 8169
Joined: Mon Feb 06, 2012 10:18 pm
Location: Southeastern CT, USA
Top

Re: The Poet Creek Express - Foamie Hybrid

Postby GPW » Thu Jun 14, 2012 7:27 pm

Lots of “Details “ in this devil ... Hang in there KC... It’s gonna’ be “Righteous" !!! :thumbsup: 8) :applause:
There’s no place like Foam !
User avatar
GPW
Gold Donating Member
 
Posts: 14920
Images: 546
Joined: Thu Feb 09, 2006 7:58 pm
Location: New Orleans
Top

Re: The Poet Creek Express - Foamie Hybrid

Postby KCStudly » Thu Jun 14, 2012 10:15 pm

parnold wrote:We're all anxious to see your assembly!


Thanks Paul. Wish I was as far along as you are. Your Slouchy is looking great. Thanks for watching and the support.

Thank you, too, Crumbruiser. I appreciate everyone who's watching along with me.

GPW, I'm in this for the long haul!

The wife just pointed out to me that there are only 16 weekend days (8 weeks) left before we need to hit the road (OMG). Pray for an intervention. Unfortunately my sister's boyfriend had a massive heart attack, induced coma, chilled him down, warmed him up slowly, pacemaker/defib, all that scary stuff. Not exactly what I had in mind for a schedule reprieve. Not sure yet what the deal is; hope he is doing ok and has a full recovery. Guess I need to call sis and see how she and he are doing. :oops:

And now some pic's from yesterday and tonight.
Here's a dry fit of the cap and shed (upside down) after cutting the biscuit slots on the ripped miter cut faces.
Image
The narrow piece is the top "cap" of the frame around the locker and gets buried in a cut out in the front wall. The wider piece is also part of the top of the locker and pitches down to "shed" any water away from the wall penetration.

Karl was on hand to snap some pic's of the glue up. Here I am filling slots with glue, painting glue onto the biscuits and stuffing them into the slots in the shed.
Image
Humid weather we're having.

Don't mind the glue mess; the whole thing will be covered with canvas later. Kept thinking, "Oh crap, I forgot to mask the faces adjacent to the joint", then, "no, it doesn't matter".

Notice the Styrofoam coffee cup in front. I put water in that to wet the chip brush to start, and to damp the rags that I use to clean excess glue.
In this next pic you can see how I have brushed the excess glue (that squeezed out of the biscuit slot) onto the face of the joint.

Notice that I laid the glue bottle on its side so that I don't have to work so hard to get more out when needed. Also, the clamps are all preset at the ready, and I have a bunch of "clamp cushions", or wafers cut from the extra wall rail slats on the corner of the bench (just visible in the previous pic).

Another.
Image

Here's a profile shot in the clamps.
Image

And an overall view.
Image

Out of sequence, tonight I pulled the clamps (some of the clamp cushions stuck a little but broke away okay).
Image

Another profile shot after glue.
Image

After a hard days work, Karl returned to Mecca to an "emergency" repair on one of his paver customer's skid steer buckets.
Image

Oops. Wore that one out.
Image

Karl was none too happy that they had let it get this far, nor that he would be working late to bail them out. Ca-ching!!! They didn't even hose the dirt off for him, cuss, cuss, ca-ching ca-ching. You know he is still doing a great job fixing it, and they will be only too happy to pay the bill. Karl does good work. When I left at about 8 pm the whole corner of this bucket was cut away, ground clean, and the rebuild was underway.

On to the tongue box floor. Laid out to plan and using my extruded aluminum guide fence to make nice straight cuts with the circular saw. The Freud Diablo 60 tooth carbide saw blade from Ho-De-Po is super thin and made super smooth cuts.
Image

The tongue box floor shape with plans. I love it when they come out just like the plan!
Image

The humidity is a little rough on the plans, they get soft.
Image

And a couple of money shots of the box floor mocked in place on the trailer.
Image
Image

I enjoy the picture documentation, but it sure does add time.

Hopefully tomorrow we will have some pic's of cedar and okoume. :twisted: 8)
KC
My Build: The Poet Creek Express Hybrid Foamie

Poet Creek Or Bust
Engineering the TLAR way - "That Looks About Right"
TnTTT ORIGINAL 200A LANTERN CLUB = "The 200A Gang"
Green Lantern Corpsmen
User avatar
KCStudly
Donating Member
 
Posts: 9640
Images: 8169
Joined: Mon Feb 06, 2012 10:18 pm
Location: Southeastern CT, USA
Top

Re: The Poet Creek Express - Foamie Hybrid

Postby KCStudly » Sat Jun 16, 2012 12:29 am

TGIF and a hard day at work, mostly because it was the end of a hard week. Build is on!

Karl finished the railing job at work and I made arrangements with him and Rover Mike to pick up the wood. Karl finished a bit before me and hauled a flight of aluminum stairs back to Mecca with him.

{Side bar - At work we use roll around aluminum stairs to access hopper tanks. The hopper tanks are big roll around affairs that hold about 3500-4500 lbs of paste. Occasionally the hoppers get a little out of control and crash into the aluminum ladder stairs. When they get bent or damaged, as with any ladder, they are no longer considered safe, and due to OSHA regulations can not be repaired or modified from the certified design, so we "destroy" them and replace. Well, this one had the lower stand part bent, but the flight of stairs and hand railing was perfectly intact, so when I had our scrap guy cut it up I just had him cut the base off of it and saved the stairs and railing for possible use on the next generation of punkin chunker. I know Dave's watching this so tomorrow I'll get a pic of the stair so he can consider it for incorporation into the Mad Hatra design. End side bar.}

Anyway, left work promptly at quitting time, went to Fab Mecca, helped Karl strap down some 6x8 sheets of steel to his trailer, going to be rolled (building a wood chip drying tumbler that runs off stationary diesel generator exhaust heat). Hauled sheets to roller. Fortunately we were dropping the whole trailer load, trailer and all. One exit further to Rover Mike's shop.

Now Mike's shop is located at his home on a small country lane. His wife was having a function with some 40 or 50 cars packed into the property and lining one side of the lane. Not to mention that there is a camp ground close by and it is father's day weekend, and every two seconds some guy hauling a 20 or 30 foot TT comes along. Mike was very considerate and had parked his backhoe fork lift machine with my skid of wood out behind the stone wall near the end of the driveway for us to load. We backed in across the driveway blocking a few people from leaving while we loaded up.
Image

Then we cleared the driveway by pulling across the lane far enough down to clear the parked cars and jumped out to strap down the booty, dodging campers and more traffic than you would expect for such a small road.
Image
Oh yeah, and a UPS truck.

That's a lot of wood. Piled on top of the original shipping pallet and cardboard outer wrap was a pile of at least 4 inches of 5 mm ply parts, the two uncut full sheets, the three 1/4 inch fiber board wall skin templates (3 templates because the wall was too big for Mike's router table, so I gave him outlines of the individual wall panels which are made to have the grain running vertical), and the absolutely beautiful, light weight, straight grain, knot free, uniform dimension, and cedar boards that were ripped from 2 x 10 select.
Image
Disregard the flashy rough edges of the templates. That's the result of running the router cutter flush with the table and nothing that a little kiss with a sanding block won't knock off. The edge of the templates under that little flash are pristine, smooth, and precisely align between the different template sections. Mike did good. Mike did very, very good. KC happy boy.

The cedar.
Image
Image
Impressions - It is cut precisely, square, uniform over it's length. The grain is long and straight. There is not one single knot. It is extremely light compared to pine, or even poplar. It smells lovely. I'm in love. There are a few big drops and some smaller stuff that I am sure I can find a purpose for. I could never have achieved this result in the time it took Mike, even if I had worked non-stop over the last three weeks. I will never regret having spent the extra money on the finest materials, nor bartering the time that I spent on Mike's Rover! Just do it, man, go for the best, if at all you can.

To put it into perspective what Mike did for me, here is a shot of the Max Cut cut list sheets for each ply and board layout. I couldn't fan them all out enough to fit on this scrap of melamine. There's like 30 sheets, at least.
Image
Image

I think I owe him some more time on the Rover...in September, after the trip.

Here's a better shot of the templates after I got them uncovered and swapped around into a pose. Had to stand on a ladder to get this shot. There is a 3/4 inch gap designed into the skins between the cabin and galley sides to act as a dado for the bulkhead frame.
Image

There was some shipping damage from a fork truck fork piercing the box. This uncut sheet took the worst of it, but there are several other edges that have smaller similar dents. Hopefully they will all be in discrete locations, or will be easily hidden.
Image
Image
Also, some of the sheets have some areas near the edge with dark spots or streaks of spots that look like stain, as if someone was slinging a wet brush. It seemed well dried and I can only assume that it happened before arriving at Mike's place. I'm pretty sure that it is all on the back side. If not I should have plenty of opportunity to arrange things in my favor and I will cope with it however I can if it should occur on the good face where it will show.

Karl had these panel carts left over from a big sheet metal panel job he did in a high end restaurant in Manhattan; had to haul a bunch of sheets from limited parking up an elevator to the roof top restaurant. I don't know how I could have ever handled this much material all at once at my home shop. It took a solid hour, at least, just to unload the truck piecemeal.
Image
Image
Image
Image
All the really little pieces are drops, but I'm sure there will be a use for many of them (not all of the little details have been worked out yet).

Karl needed to load up some of the air sucker rigs that he and Dave are flipping, taking them with him to deliver while visiting his in laws in PA, so I finished up by giving him a hand situating the tools that he had brought for the railing job (iron worker and Bader), putting the alum. stair out back, and loading up the crate of vent suckers.

Home at 9 pm, dead beat tired. It was a good day.

Tomorrow it is up bright and early to build the floor. WoooHooo! :twisted:
Last edited by KCStudly on Sat Nov 17, 2012 8:55 pm, edited 2 times in total.
KC
My Build: The Poet Creek Express Hybrid Foamie

Poet Creek Or Bust
Engineering the TLAR way - "That Looks About Right"
TnTTT ORIGINAL 200A LANTERN CLUB = "The 200A Gang"
Green Lantern Corpsmen
User avatar
KCStudly
Donating Member
 
Posts: 9640
Images: 8169
Joined: Mon Feb 06, 2012 10:18 pm
Location: Southeastern CT, USA
Top

Re: The Poet Creek Express - Foamie Hybrid

Postby bonnie » Sat Jun 16, 2012 7:31 am

I'll lend you my dog, Daisy. She's great at early morning wakeups. :lol:
Remember, the turtle won. :)
User avatar
bonnie
Donating Member
 
Posts: 1390
Images: 107
Joined: Sun Jul 24, 2011 4:14 pm
Location: Roxana, IL
Top

Re: The Poet Creek Express - Foamie Hybrid

Postby eaglesdare » Sat Jun 16, 2012 8:35 am

i am still following along. can't wait to see the shell come together. :wine:
Louella
May the foam be with you.
User avatar
eaglesdare
Donating Member
 
Posts: 3168
Images: 13
Joined: Tue Aug 26, 2008 7:06 pm
Top

Re: The Poet Creek Express - Foamie Hybrid

Postby parnold » Sat Jun 16, 2012 9:36 am

KCStudly wrote: (not all of the little details have been worked out yet).


What????? ;)

Nice pile of lumber there KC. Here's hoping all the blemishes are out of sight!
User avatar
parnold
Donating Member
 
Posts: 2344
Images: 302
Joined: Mon Feb 08, 2010 4:49 pm
Location: Northwest New Jersey
Top

Re: The Poet Creek Express - Foamie Hybrid

Postby KCStudly » Sat Jun 16, 2012 11:14 pm

Paul, "Eventually you have to stop engineering and go into production".

Bonnie, We have cats. They have learned that the earlier they try to wake us, the longer they have to wait for their morning meal, and they are indoor cats, so the other end of the feeding process is on there own terms, no need for a morning walk out.

Eagle, glad to hear you are still watching. Ready or not, here it comes.

So last night while I was unloading the wood I asked Karl to start cleaning off the bench some. It was pretty much covered from end to end over almost every square inch, he was going away this weekend and I don't know where everything goes so would have a hard time cleaning it up myself. He picked away at it, reducing the population and making a small clear section at the end of the bench. I joked that he might find the rest of it in a pile somewhere when he got home.

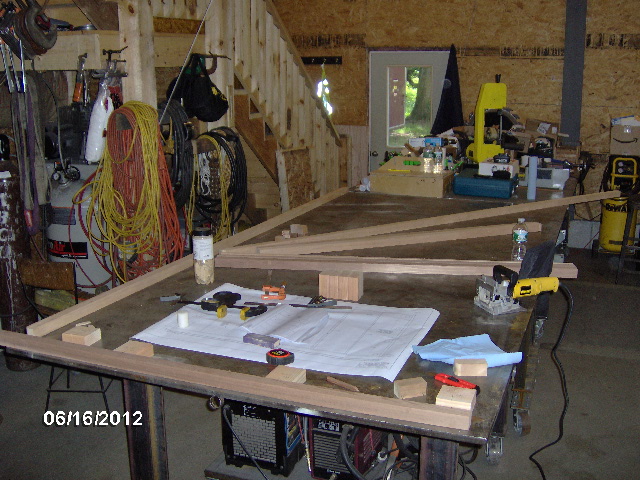
Well, when I arrived this morning the bench looked like this.
Image
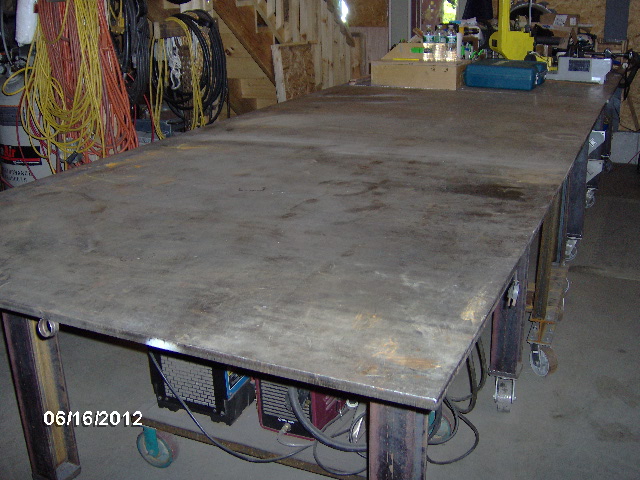
Karl is the best kind of friend.

Seemed to have lost a pic, but it looked just like this one of the front end of the floor frame outer stringers, shown here back to back.
Image

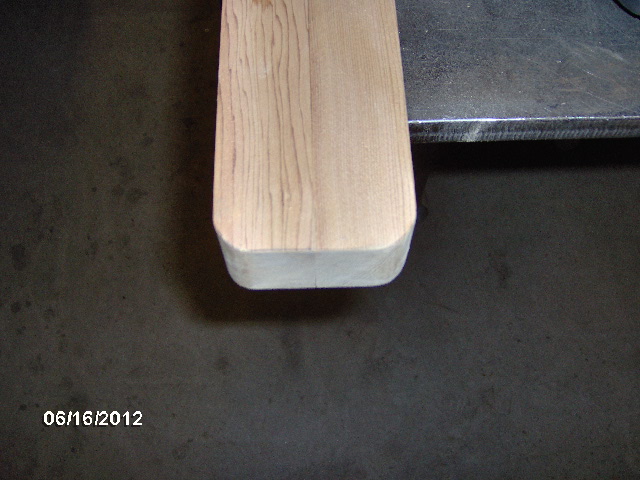
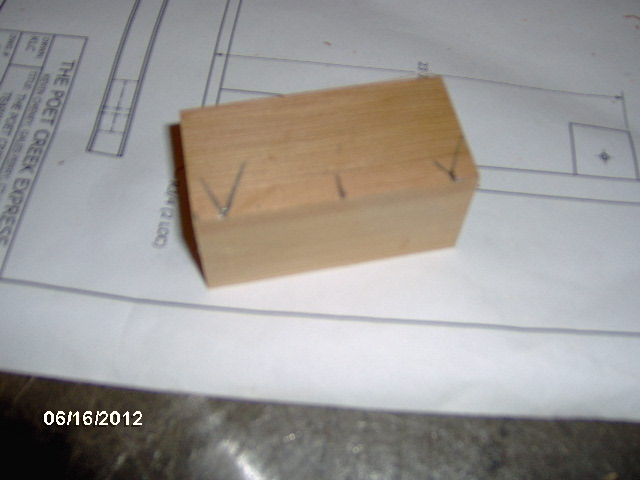
I started by making a test block, tracing the radius around a piece of 1-1/2 inch dia. delrin stock, and using Karl's cordless Makita jigsaw. The blade did not cut perpendicularly around such a tight thick curve so I had to sand some to true them up.

Then I did the first set (the lost pic)...when I realized that I had mistakenly rounded over two of the four 2x xmbrs instead of the long side stringers. Dumb. Same old problem; good plans if you look at them.

Not a difficult fix. I'll just use them in the two middle locations, saving the other two 2x xmbrs for the front and back, then fill the under cut with thickened epoxy or Great Stuff foam later on.

Here's a mock up of the stringer, front xmbr and front curbside corner block.
Image

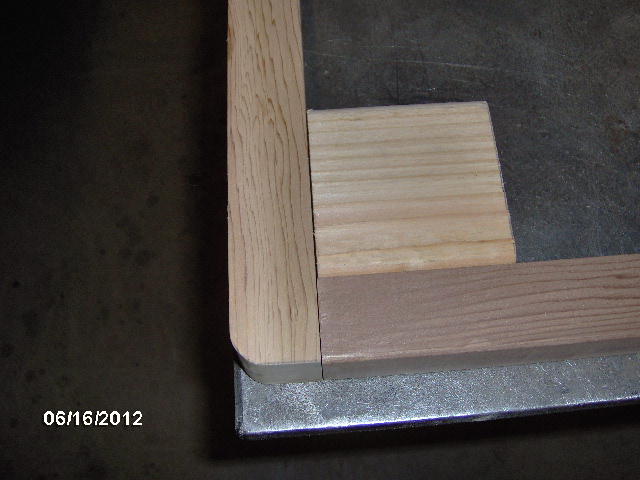
Here's a shot where I'm starting to get organized laying out the pieces and figuring out where the front blocking goes.
Image

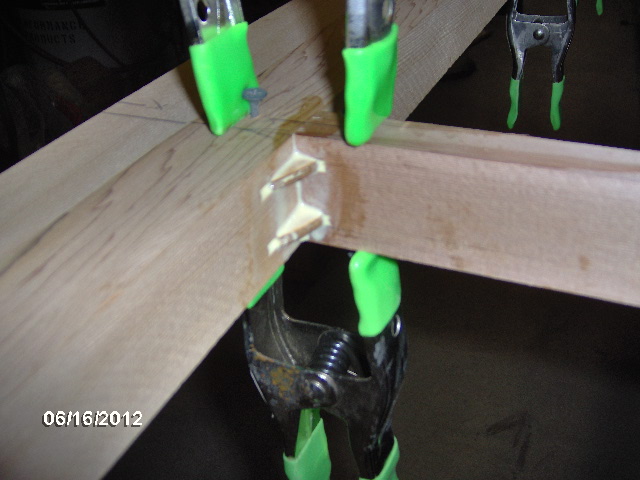
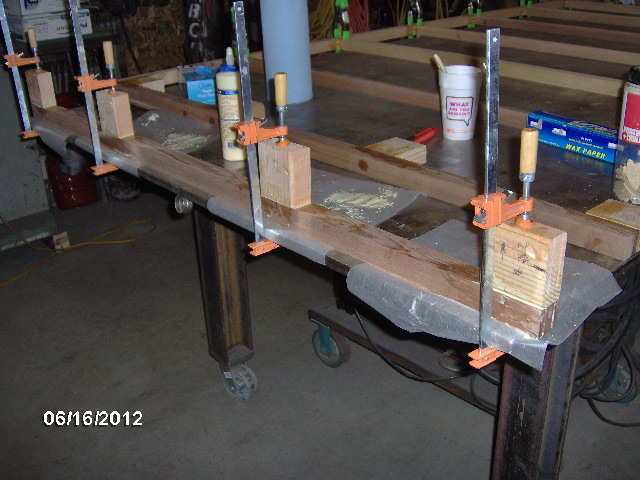
I planned to use a double stack or row of biscuits at each joint, but rather than constantly adjusting the biscuit cutter height and risk not getting it the same each time, I simply set it for 3/8 inch high and used a 3/4 inch thick scrap to step up to the upper slot. That way both the upper and lower slots are each 3/8 inch away from the adjacent face, with 3/4 spacing in between.
Image

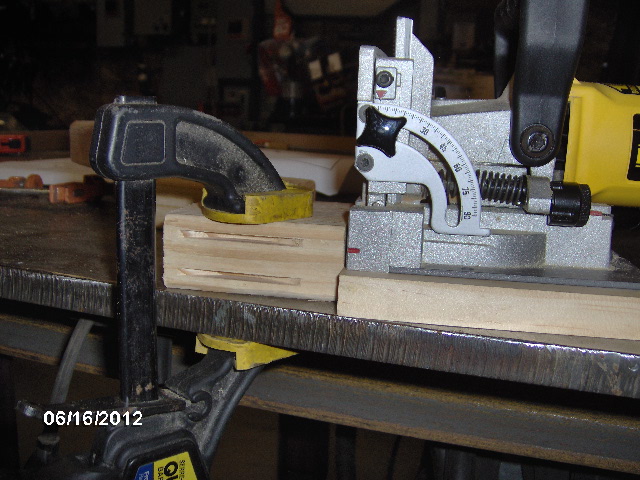
I also made a little gauge block with the center of the biscuit, the edges of the blade when set for a #10 size biscuit (crows feet marks) and then trimmed the block so that each end represented a comfortable margin to avoid blowing out at the end of the slot.
Image

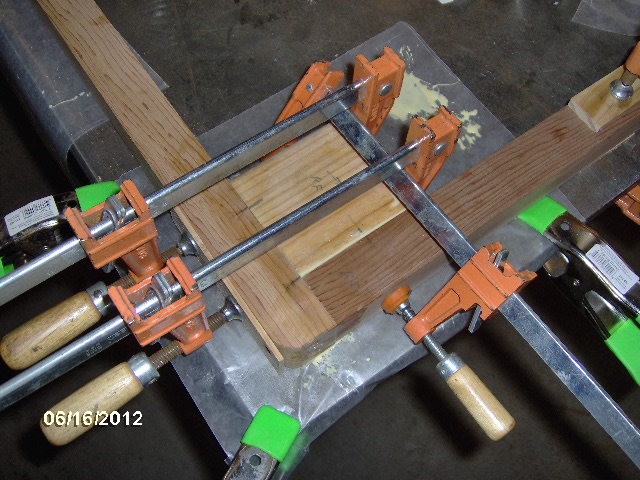
This shows the glue up of the front corner block to the front xmbr, as well as a dry fit up of the front curb side stringer. The stringer to block biscuits were set with the gauge block from the rear of the corner block, and by bisecting the joint between the xmbr and block.
Image

And here is the same joint glued and clamped.
Image

The rest of the front mounting blocks biscuit glued and clamped.
Image

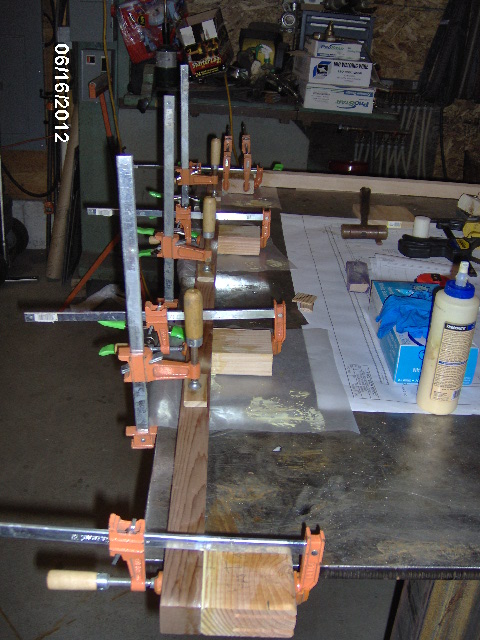
A shot of the remaining xmbrs with biscuit slots. Note the errant radii on the second and fifth from the front (3rd and 6th actual).
Image

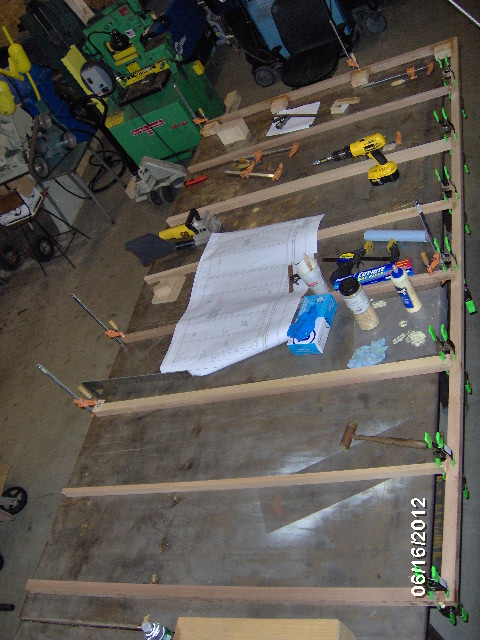
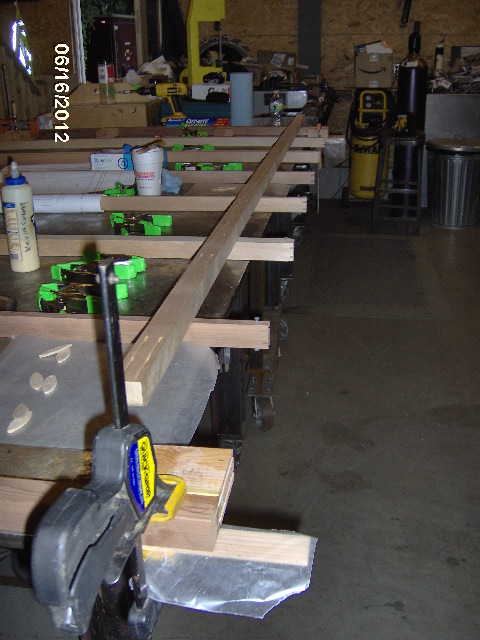
Working my way down the curbside adding xmbrs.
Image

Used the same drywall screw and spring clamp method as seen on the hatch rib glue up. I'll come back and trim out the excess biscuit protrusions before fitting the foam.
Image

Right after taking this pic I realized that I had not attached the rear xmbr blocking before gluing it to the stringer. Didn't think I could get the biscuit cutter into the corner so I quickly pulled the joint apart and wiped the still wet glue off as best I could.
Image

Added the rear blocking to the rear xmbr. Clamped this one right to the bench.
Image

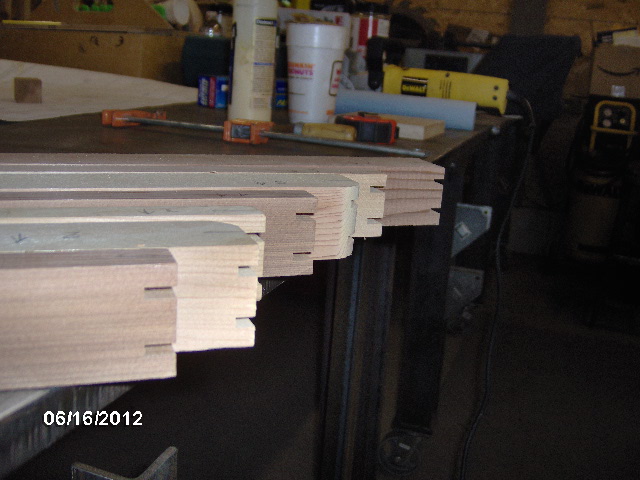
During the 30 minute setup time for each of the glue ups (24 hrs no load) I started sorting and labeling the different plywood parts.

I ran the biscuit cutter into the slots that had been previously glued in order to clean them out and present a fresh surface for the next round of glue. Here is the curb side stringer assembled with all of the xmbrs.
Image

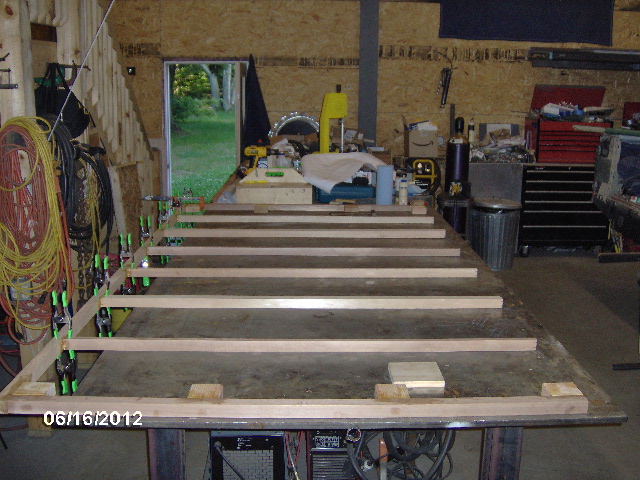
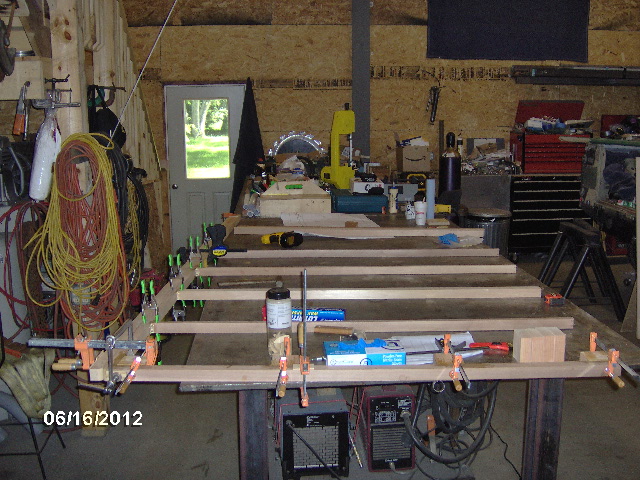
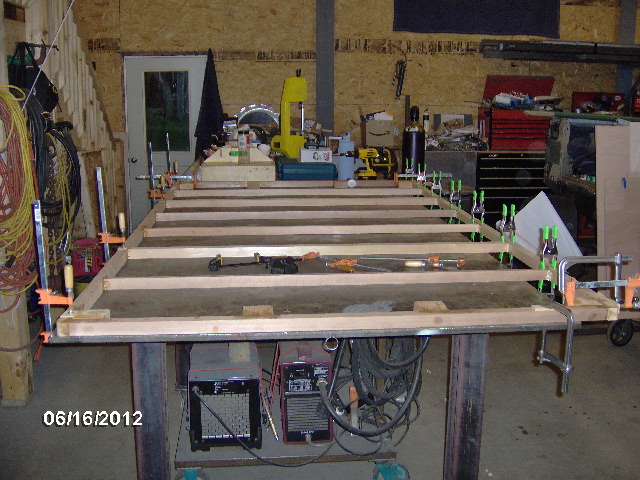
Once that had set up enough to reposition I clamped the curbside stringer to the edge of the bench to anchor it (in case I had to tap the street side stringer into place on the opposite side), making sure to sight down the length making it arrow straight.
Image

This conveniently left the street side hanging off of the other side of the bench. Here you can see that I've got everything set up (almost... read on) for the more complex glue up.
Image
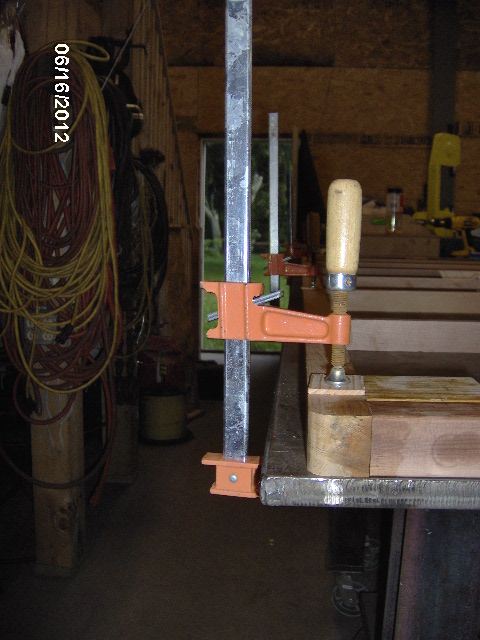
Also note that I have clamped on some ledger blocks to support the stringer while I start the alignment (the wax paper covered stick sticking out near and far). I even added the screws to the top and bottom of the xmbrs, ready for the spring clamps. Can you see what is missing?

After starting the glue up and beginning to worry if the glue would start to skin over before I could get everything coated and joined, I suddenly realized that I had forgotten to pre drill and add the clamp screws to the stringer side of the joint. Doh! Hurry up, finish applying glue, get the biscuits started all at the same time, clamp both ends at the blocking enough to engage all of the xmbrs, align all of the marks, bump them together, grab the drill with drill/driver quick change bit, scramble to pilot the holes, scramble to run around to the back of the bench and get more screws that I had already put away, drive the screws and finally get the spring clamps all on. Whew! Plenty of time. Glue was still wet and got good squeeze out everywhere.

The results of a 10 hr day.
Image

The biscuit joinery went pretty quickly. I haven't ever used a Kregg, but I assume the layout time, clamping in place, and drilling takes at least as much time as the biscuit jointer. The huge advantage that I see the biscuit jointer having over the Kregg is that with the biscuits I can put a screw in anywhere I want without having to worry about hitting another screw.

Some more observations about the cedar: it is a pleasure to work with and the feather weight continues to impress. No regrets, worth every penny.

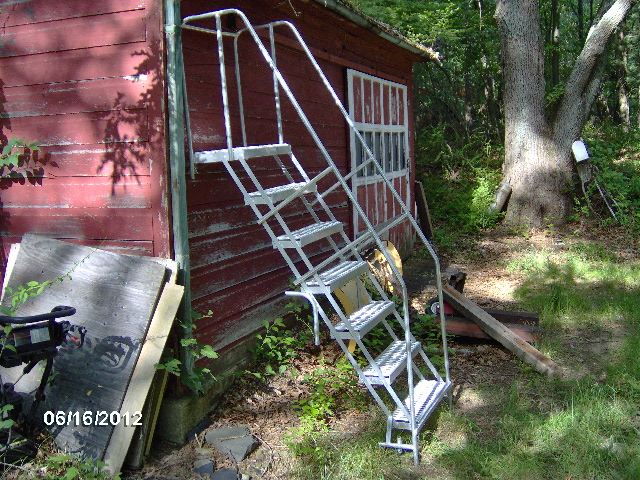
OT - Here's a pic of the aluminum stairs leaning against Karl's old shed barn for perspective.
Image
KC
My Build: The Poet Creek Express Hybrid Foamie

Poet Creek Or Bust
Engineering the TLAR way - "That Looks About Right"
TnTTT ORIGINAL 200A LANTERN CLUB = "The 200A Gang"
Green Lantern Corpsmen
User avatar
KCStudly
Donating Member
 
Posts: 9640
Images: 8169
Joined: Mon Feb 06, 2012 10:18 pm
Location: Southeastern CT, USA
Top

Re: The Poet Creek Express - Foamie Hybrid

Postby KCStudly » Sun Jun 17, 2012 10:59 pm

Up and out. Stopped at Ho-De-Po for some more #10 biscuits. Not sure I need them, but I was running low and I just I don't want to run out in the middle of something. Also got some #0 (smaller size) ones because it seems likely that I will need them going forward. Thought I might pick up some drop cloths to protect the wood from shop dust and grinding debris during the week, but then I remembered that Karl has a bunch of moving blankets so I skipped those. Stopped at the grocery store to get a case of bottled water to keep at the shop, and some more waxed paper.

On the way to Mecca yesterday I stopped at a tag sale benefiting the Boy Scouts, but they must have kept all of the camping stuff for themselves.

Today I went a different way and stopped at a garage/moving sale. Asked if they had any camping gear, lanterns or stoves, but they had already sold the only lantern. I asked if they had any old bed sheets, and they did, but had to go in the house to get them because they didn't think anyone would want used bed sheets. Let me take just the top sheets. I got 3 king and one single (I think). Also got a nifty folding tray stand like you'd use for breakfast in bed. I thought it might make a good multifunction galley feature. Legs down and it can sit over the stove (when not in use) for additional counter space; can use it as a tray to carry things to the picnic table; and might just have breakfast in bed. The crutches can be used for galley outrigger table legs, if I ever get around to building some (need to add blocking to the outside of the walls for future expansion). All this for $5.
Image
Image

Here's a look at my radius oops after assembly and trimming the excess biscuit w/ the cordless jig saw (that thing is nice; really good variable speed control; and no cord to get in the way or hang up).
Image

Another angle.
Image

Trimmed all of the excess biscuits with the jig saw and chiseled them flush.
Image
Image

Apparently the glue lifted some black gunk up from the steel table in a few spots where I had removed the waxed paper early, even though I had wiped the table down pretty good before starting.
Image
No big deal. Most of it sanded out in the next step, and will all be hidden by the skins anyway.

And here is the frame after sanding all the little inconsistencies and glue stubble on both sides.
Image

Carried the floor frame out to the trailer for a fit check (it's surprisingly light).
Image
Image
Image
Image

Set up the scarfing jig. I wasn't completely happy with the face that the saw rides on so I hit that with the palm sander some; still not super happy, but it looked reasonably straight. Clamped a 2x6 to the far edge of the bench to act like a squaring fence. Used both a panel square and the 3-4-5 measuring technique to make sure the jig and fence were square. Threw a few scraps of 3/4 stock down on the table to match the jig, and set the two mid floor pieces for the underside (the ones with the splotchy stains) up in the jig (started with the under side pieces in case I mess up).
Image

Here's a closer look at the setup. Notice that the top sheet is a little further back, and the clamp bar has more shims underneath it in the middle to compensate for bowing in the bar.
Image
I made a slight adjustment and re-clamped before cutting in order to push the lower sheet back a little under flush with the jig.

Started the first cut and found that the saw did not reach all the way through the upper sheet (was afraid of that). The sash stop molding I had used for the saw guide fence did a good job of guiding the saw shoe, but kept the saw from being adjusted all the way out due to the motor housing. I readjusted the depth of the saw as close to the guide as I could and it would still not get through, leaving about half the upper ply veneer and an unfinished step at the top of the scarf. Decided it was a good time to step back and take lunch, think through my options.

Anyway, here's the wedge shaped sliver that came out from the bottom sheet when I "completed" the circular saw cut.
Image
It's a little wavy in places.

Karl's circular saw has a completely different shoe on it and I would have to reconstruct the jig, so no go there. I figured I could maybe cut the remaining flap off with a razor knife and then power plane the step down, but the plane we got from dad's estate was still packed in a bear box with his other tools at my sister's and that would be a bit of doing to get a hold of. Called Karl to see if he has a power plane (long shot). He doesn't. Called Larry (who gave me the 275 turd) because I knew he would have one. He does, but was at a cookout for another hour or so before he would be home.

Went to the do drop for $1 tacos. On the way I called my brother in law (who lives up the road from Karl's) but he doesn't have one and was on the road out of town anyway (Laconia bike weekend).

While eating lunch I decided that I might be able to trim the little step off by using one of those Japanese style pull saws, using the kerf made by the circular saw as a guide, so after lunch I went back to Ho-De-Po to look for one of those. No dice. Ended up getting these.
Image
Clockwise from top: block plane (probably not the best choice for use across the grain, but figured I could use it elsewhere on the project); small Sure Form grater style rasp (disappointed to find the tensioner to be cheap plastic, didn't work well in this app) a 1-1/4 wide wood chisel (tedious in this app, but didn't have one and can use); and a small "fine" hand saw.

Called Larry back and let him know what I was up to. He had his power plane and will bring it in tomorrow if I still need it.

Back at Mecca I tried a little bit of everything with limited success, and some harm. Ended up resetting just the top sheet in the jig and running the circular saw again.

If I had it to do over, I would have just bought the extra sheets of ply and not messed with the scarfing at all, but that would have cost quite a bit more and would have yielded a lot more left over ply.

Probably should have done some practicing on cheap underlay before committing to the good marine ply. Oh well.

Here's the scarfed joint dry fit on the trailer.
Image
Note the 1-1/4 shortfall on the curbside.

Some closer shots of the joint. The 1x is just holding the joint down a bit. Not as nice in person as the photo makes it look.
Image
Image
Also note the stain marks on the lower right.

With the panel flush to the street side, here's the short fall on the curb side.
Image

So the fix will be to center it up and add a coupe of filler strips to the outsides.
Image
Image

I took the scarfing jig down and planed the saw face to try to get it smoother. Also took the saw fence molding off and will see about planing or ripping it down after work tomorrow. I have a piece of luan left over from the hatch rib template that I can practice on and see about tuning up the process.

Fall back plan is to add some blocking down the middle of the floor frame and just butt the sheets over that, do away with the scarfing altogether, but add some weight. There should be enough cedar left over to accomplish that.

Covered all of the wood with the bed sheets, and tucked the floor frame standing up under the stairs.
Image
Image

Tic-tock-tic-tock.
KC
My Build: The Poet Creek Express Hybrid Foamie

Poet Creek Or Bust
Engineering the TLAR way - "That Looks About Right"
TnTTT ORIGINAL 200A LANTERN CLUB = "The 200A Gang"
Green Lantern Corpsmen
User avatar
KCStudly
Donating Member
 
Posts: 9640
Images: 8169
Joined: Mon Feb 06, 2012 10:18 pm
Location: Southeastern CT, USA
Top

Re: The Poet Creek Express - Foamie Hybrid

Postby KCStudly » Mon Jun 18, 2012 10:13 pm

Hmm, crickets. Oh well, the build goes on.

Ordered some foam, the fenders (aluminum Jeep style flat top 36x10), the door hinges (lift off 2 piece stainless from McMaster-Carr), and the rubber isolator mounts for the tongue box. I'll tally it up tomorrow.

With some coaxing from Karl, I decided to just abandon the scarfing and add blocking to support butt joints. So tonight I did an inventory on the cedar cuts, organized and labeled everything so that I could see what was left over. That yielded enough left over stock to add blocking down the middle of the floor frame and more than enough to do the bulkhead, too.

A couple of the pieces of cedar had to be ripped. During a spring storm one of Karl's large pine trees came down and clipped the back of the shop with some of its branches. Now that the weather has been better he pulled Ben's table saw out to where he could use it for the trim boards, etc.

Well, that's the first time I've ever used a really nice table saw. This thing has a Teflon lined fence that is easy to set and perfectly true. The table top is some sort of slick plastic laminate, and the blade is thin and sharp. It cuts like a dream.

After fitting each of the blocks and doing a little lay out work to mark the centerline, I climbed up on the bench to cut the biscuit slots (couldn't reach the centerline well enough from the ground). Used a single #0 biscuit at centered in each end of each block so as not to weaken the xmbrs.

Glue up will be on Wednesday.

Looking forward I have a few questions that I'll ask here and in the construction techniques section: Many people mention using a different glue on the floor frame to ply than they use on the foam to ply. Such as PL or TB2 for the frame and contact adhesive for the foam. So if I used TB2 to glue the upper skin to the frame and then spray the cavities and foam pieces with contact adhesive, how careful do I need to be about avoiding getting adhesive on the edges of the frame? Should I use masking tape to keep the spray adhesive off of the frame then peel it off and add the PL or glue, or am I worrying about nothing? Just not sure if the adhesive and glue will play nice together. Any good reason not to just use the spray adhesive for all of it, skins and foam (besides having to make sure everything is pretty level because the spray adhesive will not fill gaps like the PL)?
KC
My Build: The Poet Creek Express Hybrid Foamie

Poet Creek Or Bust
Engineering the TLAR way - "That Looks About Right"
TnTTT ORIGINAL 200A LANTERN CLUB = "The 200A Gang"
Green Lantern Corpsmen
User avatar
KCStudly
Donating Member
 
Posts: 9640
Images: 8169
Joined: Mon Feb 06, 2012 10:18 pm
Location: Southeastern CT, USA
Top

Re: The Poet Creek Express - Foamie Hybrid

Postby linuxmanxxx » Mon Jun 18, 2012 10:52 pm

I use the contract on everything and add a line of tb3 on wood to wood on top of the 3m and it bonds solid. The 3m doesn't stick as well wood to wood so added tb3 makes it turkey proof (hi glen wink)
User avatar
linuxmanxxx
500 Club
 
Posts: 802
Images: 10
Joined: Fri Sep 10, 2010 1:50 am
Location: Abilene TX
Top

PreviousNext

Return to Foamies

Who is online

Users browsing this forum: No registered users and 14 guests