Another foam standie...

Canvas covered foamies (Thrifty Alternatives...)

Moderator: eaglesdare

Re: Another foam standie...

Postby atahoekid » Sat May 26, 2012 11:42 pm

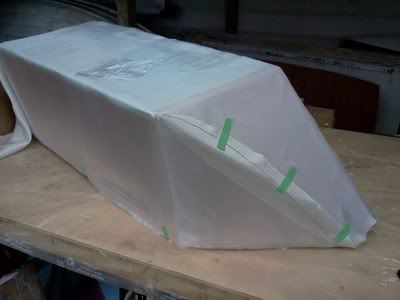
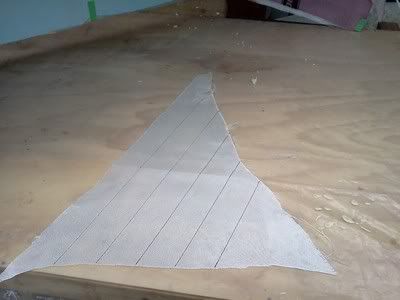
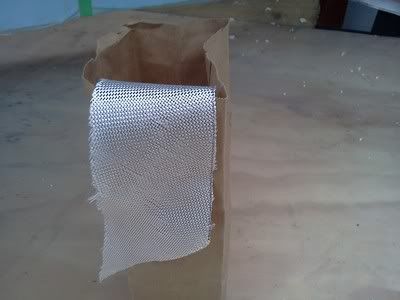
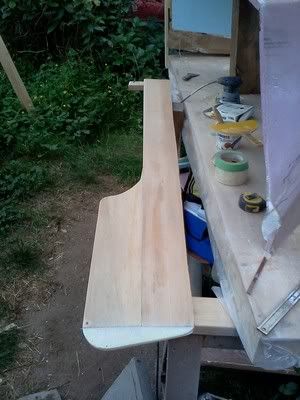
WW, you're ingenuity amazes me. I'd have never thought of shaping a intake for it that way. I figure if I tried that, it would take several hours (like 5 or 6 at least) lots of swearing, a huge mess and several scrapped trials. Your handiwork looks pro. Nicely done!
Mel

"Believe in your abilities... Remember amateurs built the ark, professionals built the Titanic"

"Indecision may or may not be my problem" Jimmy Buffet

Image

The Road Foamie Build Thread: viewtopic.php?t=45698
User avatar
atahoekid
Platinum Donating Member
 
Posts: 1773
Images: 158
Joined: Sat Jul 24, 2010 2:49 am
Location: Incline Village, NV

Re: Another foam standie...

Postby PcHistorian » Sun May 27, 2012 10:00 pm

Oh great and wise innovative, bodger... I like the "grab the cool air from under the trailer" idea. My sofits are periodically punctured, but that area in the sun does heat up and then the air brought in there would heat up. Hmmm, and the little fans from cooling pc parts I've got stacks of, as soon as I pull them out of the stack of old pc power supplies. (now you guys know where I get most of my electronic parts from... ;-) Not as good as a centripetal tiny squirrel cage, but 12v at 0.25 amps each...

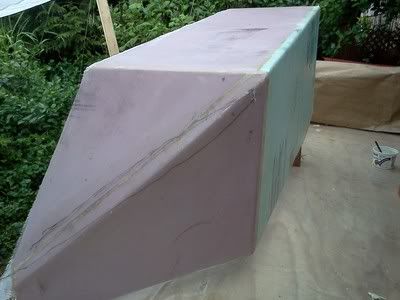
Next question my epoxy guru.
look at this floor, can epoxy level it easily?
Image

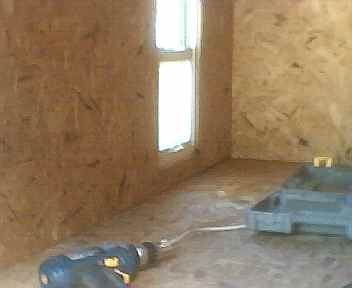
I already sealed it with a latex floor paint (for concrete or wood) but I want a bead of water to run right off that floor with any kind of an angle on the trailer. (I'm considering making the entire interior "the shower" but I have to make the floor sealed and drain. Oh, and I have to hydraulically seal all the cabinets so bedding and clothes stay dry. It would beat washing in a bucket and be the height of luxury. (as long as I had water, heat for the hot, and everything else done.) Even better in case the roofed leaked some time or the road I traveled were flooded and the trailer had to swim to keep up with the tow vehicle... ) Still, I plan on 3-4" of foam rubber and a piece of shag carpet. So the jagged floor might be a bit away, but I'd hate getting accidental splinters should I ever have to take those out again and work on the interior. How shallow can I pour that in and have it set up level? (that would be fun, and the fumes. LOL) or squeegee it with hard plastic. hmmm... I'd never get my paneling walls off again, but it would seal. :-)
Elf Cottage
Image

Build Documentary
https://sites.google.com/site/pchistorian/home/hobby/camping/elf-build
Build Forum
http://www.tnttt.com/viewtopic.php?t=48462
Build Album
http://www.tnttt.com/gallery/album.php?album_id=42

progress is progress. (don't look a gift "progress" in the mouth.)
User avatar
PcHistorian
The 300 Club
 
Posts: 354
Images: 198
Joined: Fri Dec 09, 2011 1:06 pm
Location: S.E. Michigan

Re: Another foam standie...

Postby Wobbly Wheels » Mon Jun 11, 2012 8:31 pm

Sorry I missed your posts guys, I've GOT to come back to this thread more often. Now that the Glacier is advancing again, I'll remember to check.

KC, thx for the praise. It means a lot, given the craftsmanship I've seen you turning out.

Mel, half the magic in glassing is in making it look like it's supposed to be that way. I've certainly had my own share of cursing sessions while on my 5th or 6th redo... :x :x

PcH, You certainly could seal that floor, but if what I've seen in boats holds true...you can't waterproof a cabinet effectively. One of the biggest problems in boats is working out a towel locker (cabinet) that keeps moisture out but is also ventilated to keep mold and mildew from taking over - the K.I.S.S. solution usually comes down to a shower curtain.
If you can isolate one end, you can snap the curtain in place when needed, then take it outside to dry. The problem is that you will still have the water vapor soaking your bedding and I think you'd have problems ventilating a space that small effectively. This is all JMHO though.
I've used industrial flooring epoxy (Interlux) in shipping containers and it would definitely do what you're asking. It has enough self-leveling capacity to put a smooth finish on OSB, but if you have any dips they would need to be addressed first.
With a level floor, I think you would have problems getting it to drain without having to squeegee it. The rule of thumb when building decks, etc is to build in at least 1/4" per foot drop so that water will run off. If you've ever wondered what those extra lines are for on a bubble level, now you know.
Image
Last edited by Wobbly Wheels on Mon Jun 11, 2012 10:07 pm, edited 1 time in total.
User avatar
Wobbly Wheels
Donating Member
 
Posts: 1080
Joined: Tue Mar 15, 2011 9:51 am
Top

Re: Another foam standie...

Postby Wobbly Wheels » Mon Jun 11, 2012 10:04 pm

I picked up another 25 yds of glass cloth last week, so the Glacier is advancing again.
The last panel I did was just two straight, flat pieces of cloth. Now that I'm working on the corner, I figured I'd post up the sequence of shaping the cloth for anyone who's not sure how to do it. It's easy and is by no means the only way to skin the cat, this is just the way that works for me.
Never fear, I won't go into this much detail for every panel since the layup is the same for all of them.

The first step is to cut out a 'bite' of the trailer to work on:
Image
Image

Now drag it downstairs to the table (as much as you can 'drag' something that weighs only 5 or 10 lbs):
Image
And nope, the rowboat hasn't moved since the last post....and there are prawns to be had..... :D

A bit of 'fairing-compound-in-a-can' to fill before final sanding:
Image

The next pics are milky this was where I wrapped my phone in Saran Wrap just in case there was a good time during the layup to take a pic (there never is). The table with the hanger up for the cloth:
It's covered with paper because crap gets into the weave otherwise, especially if you're working outside.
Image

Cloth laid out for length:
Image

Note the cheap disposable scissors - don't need pricy shears for 6 oz cloth. Razor knives (Olfa, etc) also work great when run along a straightedge....just not when you table is covered in plastic sheeting to ward off epoxy drips ! :
Image

Get that cover back on the cloth !
Image

Gathering the excess cloth in the corner and checking that the bottom and far edges are squared to the foam. Oh, and giving up on the Saran Wrap, too.
Image

Laying out the dart to cut out of the corner. Grab the trusty Sharpie and run a line down the corner. Then fold the corner the other way to get the other line (on the bottom):
Image

And wind up with the rough triangle you need to cut out.
Image

I've left myself a bit of an overlap to ensure that the corner will have two thicknesses of cloth over it. The overlap decreases as you get to the end of the cut to keep the cloth from 'piling up' in the corner.
Image

Taped into place. After smoothing the cloth towards the other end and making sure the weave is square, repeat the cut on the opposite corner.
Image

The leftovers will become tape. Cutting it into short strips will give me a way to use any leftover resin to add more glass to the corner.
Image

And into a bag to keep it clean.
Image

No mid-layup shots, but here's the result. Notice that the Sharpie marks show through.
Image

My faithful assistants gave up on me:
Image

But that's ok, they went to the park later.
I have been using this rudder build as a place to use up leftover resin - I hate when it goes to waste just because I didn't think of it before mixing the batch.
Image
By the time I'm doing the final outside layer of glass, I'll be laminating the tiller or the dagger board for that project.
User avatar
Wobbly Wheels
Donating Member
 
Posts: 1080
Joined: Tue Mar 15, 2011 9:51 am
Top

Re: Another foam standie...

Postby PcHistorian » Tue Jun 12, 2012 11:26 pm

I have to level the surface of the bottom before I can pour or lay, that's fine, I can use my screw jackstand for that, on the tongue, magnetic level. But I'm using this stuff to fill in the imperfections of the board chips, right?

Maybe I could get like a hospital circular track, like those bed curtains use, but put on a plastic curtain to protect the cabinets. Far future considerations, the floor perfected is on the way to all places...

Well the "tilt" of my shower would be the tilt of the trailer. I like the head a teeny bit higher than the foot, for sleeping. so I'd put the drain near the door or in the door frame. The bedding would be put away in to the cabinets during the shower function. Those space bags and a 12v auto vacuum should cover that. Just have open cell foam for the mattress.

On your cloth layout. I can appreciate the perfect cuts and folds and the tape... Is there anything you can put on the surface to prevent shifting as you are laying it out and cutting, like spraying water mist or an oil, that would bond with the epoxy once it gets added? I'd hate to have to let it dry even from a fine misting before I could actually epoxy. I was thinking though that a few straight pins here or there wouldn't hurt while laying it out and doing final tugging and shaping, even cutting... up until the actual spreading of the epoxy. Or until just after the epoxy is spread, pull the straight pins before it hardens.

LOL, and I had envisioned you out there with, like an "electric turkey knife" cutting up your build to epoxy it. Actually you can do the build with the idea that it will be dismantled in sections for the epoxy one phase, so that you aren't making cuts where there aren't already joints... or sections/modules, like that corner piece you just did.
Elf Cottage
Image

Build Documentary
https://sites.google.com/site/pchistorian/home/hobby/camping/elf-build
Build Forum
http://www.tnttt.com/viewtopic.php?t=48462
Build Album
http://www.tnttt.com/gallery/album.php?album_id=42

progress is progress. (don't look a gift "progress" in the mouth.)
User avatar
PcHistorian
The 300 Club
 
Posts: 354
Images: 198
Joined: Fri Dec 09, 2011 1:06 pm
Location: S.E. Michigan
Top

Re: Another foam standie...

Postby Wobbly Wheels » Wed Jun 13, 2012 12:25 am

Thx PcH. To answer your questions,
As far as the drain goes, that idea is what I'm doing as well. I've cut out the foam for the two sides of the bulkhead that close off the head. Under the toilet is a floor drain that ends in a 1-1/2" hose barb so I can run off the water away from camp. The trailer will be 'leveled' as slightly nose-down to drain. After a week of tramping mud in and out, I can also just hose 'er down and it'll run out the drain.

It's funny you mention the curtain track - I was thinking of the oval ones they sell for clawfoot bathtubs. Space bags are a good idea too.

For the floor, it will definitely smooth out the OSB. You've already got the sealer on so the epoxy won't soak in at all, but OSB ought to have more than enough texture for it to grab. When you mentioned 'leveling', it read like the floor had dips in it.

Straight pins work great for holding cloth as long as the cloth isn't hanging off them. I've been sanding the foam and sweeping off the dust right before I start cutting cloth. It gives the foam a clean, rough surface that seems to hold the cloth pretty well. I've heard hair spray works, but I wouldn't put anything on it and potentially compromise the layup. JMHO though.

And, nope: this time it was a hacksaw blade in a wooden handle :lol:
User avatar
Wobbly Wheels
Donating Member
 
Posts: 1080
Joined: Tue Mar 15, 2011 9:51 am
Top

Re: Another foam standie...

Postby bonnie » Wed Jun 13, 2012 6:06 am

Wobbly Wheels wrote:It's funny you mention the curtain track - I was thinking of the oval ones they sell for clawfoot bathtubs. Space bags are a good idea too.


There's also an rv type oval curtain rod that folds back on itself to store. Pretty cool looking. I like the idea of Space bags, too.

Cheers,

Bonnie
Remember, the turtle won. :)
User avatar
bonnie
Donating Member
 
Posts: 1390
Images: 107
Joined: Sun Jul 24, 2011 4:14 pm
Location: Roxana, IL
Top

Re: Another foam standie...

Postby PcHistorian » Wed Jun 13, 2012 8:26 am

Well the straight pins would just be used to hold the cloth in place for the shaping and cutting. I realize if you do a vertical surface, it is liable to "sag" while drying, between the pins and that's the whole point in taking the pieces off to epoxy.

Well, for the space bags, and the auto vac (oreck) and standard lighter "outlets"... HECK YEAH!. I need some 2.5' x 6" x 4" expanded bags though. My current ones are like MUCH bigger, for like comforters. I should try them but the "bed room" cabinets for me (straight in, all the way forward) are sub divided because it is the front of the trailer and the exterior needs the wind structural bracing for the exterior vinyl siding. Maybe I'll have to name one cabinet on the right side of the trailer the "Linen closet"... LOL

That foam you are using on the joints for crack filler, is that the "great stuff" and can I mix it is small amounts. I was putting my foam under the floor from the bottom of the trailer and there are some small gaps in the insulation I'd like filled. I don't need a whole can of the stuff, and putty knife placement would be nice. Any other choices for foam insulation filler from underneath? I should epoxy protect that foam from rocks and stones too. (from pulling it over a LARGE rock too? is glass/clothed epoxy strong enough for a "skid pan"? LOL!)

Yes, there is some sag between the trailer frame beams underneath. Especially when I do "tree truck section" loading on the floor, for fire wood. (split at destination.) I had been thinking angle iron with notches on the angle at the ends, get underneath and swing the bracing into place, so I have a sort of bridge across the center of support between the frame beams for such heavy loading. But, maybe I could put small metal rods lengthwise down the floor on the top and epoxy them in, for industrial strength, lightweight flooring, like rerod in concrete... but dowel diameter metal rods, like those screw/threaded rods in size. If I'm adding in a 1/16th" to the floor to level the chips, how much further to make that 1/8th". (I wonder if I should caulk the bottom edge of the paneling walls at the floor so I can get the walls off if I need to, after I pour in the epoxy floor? With a layer of foam rubber and carpeting it should be invisible, esthetically.) Also with the insulation going on the bottom, the angle iron floor supports could no longer have an access to the gap between floor and frame, that first 1/2" under the floor is already filled with insulation foam sheets. (hmm, next build)

Hmmm, circular shower curtain... 40" wide, 92" long (4'x8' - 2"x4" walls at each end...) It'd be nice if just the track showed with the curtain swooped around and into a ceiling/roof storage compartment, or could be set up on hooks just for the shower event. (I'm so behind on my posting, documenting, etc... and I feel like I'm hijacking your topic. :-(
I am planning on using the velco-leather straps from 10 years worth of velcro fasten shoes (my fav.) to tack on the roof at various points (beams) so I can attach stuff, temporarily or semi-permanent, without BREAKING OPEN my skull against metal hooks, eyelets and things to hang decorations or run temporary cords, hang air fresheners, etc.... (might even pad the beams... maybe I should just tack down the "Loops" on the beams, (to "pad" the beams) and then use the "hooks" side on whatever to attach, instead of doing it as a velcro-circle like for power cord storage holders. (as the velcro shoe straps cut loose now))

(is it topic hijacking if I stay with things to be used on YOUR build as well? lol My way of "bringing the mountain to Mohamed." :-)
Last edited by PcHistorian on Wed Jun 13, 2012 1:52 pm, edited 1 time in total.
Elf Cottage
Image

Build Documentary
https://sites.google.com/site/pchistorian/home/hobby/camping/elf-build
Build Forum
http://www.tnttt.com/viewtopic.php?t=48462
Build Album
http://www.tnttt.com/gallery/album.php?album_id=42

progress is progress. (don't look a gift "progress" in the mouth.)
User avatar
PcHistorian
The 300 Club
 
Posts: 354
Images: 198
Joined: Fri Dec 09, 2011 1:06 pm
Location: S.E. Michigan
Top

Re: Another foam standie...

Postby GPW » Wed Jun 13, 2012 11:09 am

You could just bend up some PVC pipe for a curtain rod ... $2.00 :thinking:
There’s no place like Foam !
User avatar
GPW
Gold Donating Member
 
Posts: 14920
Images: 546
Joined: Thu Feb 09, 2006 7:58 pm
Location: New Orleans
Top

Re: Another foam standie...

Postby PcHistorian » Wed Jun 13, 2012 3:50 pm

how do you bend pvc around to itself like that? heat it?
Elf Cottage
Image

Build Documentary
https://sites.google.com/site/pchistorian/home/hobby/camping/elf-build
Build Forum
http://www.tnttt.com/viewtopic.php?t=48462
Build Album
http://www.tnttt.com/gallery/album.php?album_id=42

progress is progress. (don't look a gift "progress" in the mouth.)
User avatar
PcHistorian
The 300 Club
 
Posts: 354
Images: 198
Joined: Fri Dec 09, 2011 1:06 pm
Location: S.E. Michigan
Top

Re: Another foam standie...

Postby GPW » Wed Jun 13, 2012 4:24 pm

heat gun , bends easily once softened ... just don’t burn it ... gets brittle ...
There’s no place like Foam !
User avatar
GPW
Gold Donating Member
 
Posts: 14920
Images: 546
Joined: Thu Feb 09, 2006 7:58 pm
Location: New Orleans
Top

Re: Another foam standie...

Postby PcHistorian » Fri Jun 15, 2012 10:20 pm

What happens with the tape, as you apply the epoxy? Do you go around and let that harden, then take it off and do the next coat?
Elf Cottage
Image

Build Documentary
https://sites.google.com/site/pchistorian/home/hobby/camping/elf-build
Build Forum
http://www.tnttt.com/viewtopic.php?t=48462
Build Album
http://www.tnttt.com/gallery/album.php?album_id=42

progress is progress. (don't look a gift "progress" in the mouth.)
User avatar
PcHistorian
The 300 Club
 
Posts: 354
Images: 198
Joined: Fri Dec 09, 2011 1:06 pm
Location: S.E. Michigan
Top

Re: Another foam standie...

Postby bonnie » Sat Jun 16, 2012 7:21 am

PcHistorian wrote:What happens with the tape, as you apply the epoxy? Do you go around and let that harden, then take it off and do the next coat?


GPW and others use the tape to reinforce seam areas and as tabs to connect things. It stays on the work. When WW says tape, he means strips of fiberglass.

Been reading up on the entire process. Still considering. Hmmmmm.
Remember, the turtle won. :)
User avatar
bonnie
Donating Member
 
Posts: 1390
Images: 107
Joined: Sun Jul 24, 2011 4:14 pm
Location: Roxana, IL
Top

Re: Another foam standie...

Postby GPW » Sat Jun 16, 2012 7:34 am

FWIW, I just used the Fiberglass tape because I had a big roll of it , Went over the main seams on each side from under the floor in the back , up the back, over the top and down the front and back under the floor ... just for the added strength and the look of a somewhat uniform seam ... The glass tape was also applied to the cross seams just for added strength ... glued on with T2 and then painted over... Surviving just fine to this day ... :thumbsup:
78940
There’s no place like Foam !
User avatar
GPW
Gold Donating Member
 
Posts: 14920
Images: 546
Joined: Thu Feb 09, 2006 7:58 pm
Location: New Orleans
Top

Re: Another foam standie...

Postby PcHistorian » Sat Jun 16, 2012 10:48 pm

No, I don't mean the fiberglass cloth tape, I mean that green tape that is used to hold the cloth in place while you put the epoxy on.
You can't remove the green tape until at least some epoxy is on, and the cloth is held to the shell... you don't epoxy the green tape in...
Elf Cottage
Image

Build Documentary
https://sites.google.com/site/pchistorian/home/hobby/camping/elf-build
Build Forum
http://www.tnttt.com/viewtopic.php?t=48462
Build Album
http://www.tnttt.com/gallery/album.php?album_id=42

progress is progress. (don't look a gift "progress" in the mouth.)
User avatar
PcHistorian
The 300 Club
 
Posts: 354
Images: 198
Joined: Fri Dec 09, 2011 1:06 pm
Location: S.E. Michigan
Top

PreviousNext

Return to Foamies

Who is online

Users browsing this forum: No registered users and 3 guests