Another foam standie...

Canvas covered foamies (Thrifty Alternatives...)

Moderator: eaglesdare

Re: Another foam standie...

Postby GPW » Mon Apr 16, 2012 8:26 am

QUOTE: “ Like an engineer, I'll just build it to what looks right then later I'll back it up with some math and some babbling about laminar flow and production efficiency or some such. “ :lol: :lol: :lol: Works for me !!! :D :thumbsup: :beer:

I think it’s going to be really Cool !! ... and Not that heavy ... ;)
There’s no place like Foam !
User avatar
GPW
Gold Donating Member
 
Posts: 14920
Images: 546
Joined: Thu Feb 09, 2006 7:58 pm
Location: New Orleans

Re: Another foam standie...

Postby KCStudly » Mon Apr 16, 2012 3:22 pm

Like I've said before, TLAR (That Looks About Right) is a valid engineering principle! :thumbsup: :D
KC
My Build: The Poet Creek Express Hybrid Foamie

Poet Creek Or Bust
Engineering the TLAR way - "That Looks About Right"
TnTTT ORIGINAL 200A LANTERN CLUB = "The 200A Gang"
Green Lantern Corpsmen
User avatar
KCStudly
Donating Member
 
Posts: 9640
Images: 8169
Joined: Mon Feb 06, 2012 10:18 pm
Location: Southeastern CT, USA

Re: Another foam standie...

Postby GPW » Tue Apr 17, 2012 5:33 am

KC, I use TLAR All the time... It’s my job !!! :D
There’s no place like Foam !
User avatar
GPW
Gold Donating Member
 
Posts: 14920
Images: 546
Joined: Thu Feb 09, 2006 7:58 pm
Location: New Orleans
Top

Re: Another foam standie...

Postby atahoekid » Tue Apr 17, 2012 10:30 pm

Wobbly Wheels wrote:Thx Mel.

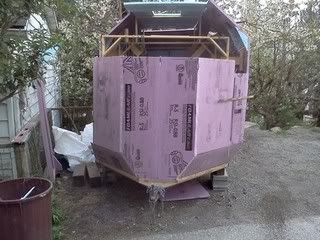
Yeah, once it's all shaped I'm going to take the panels off the form and glass them flat on the table with a layer of 6oz inside and out. Then I'll hang them back on the form, tape the joints and fair the seams. Then it's another layer of 6oz over the outside to fix everything together and to give it a thicker shell, final filling and fairing, and paint.

I've left the seams unglued where the panels join so I can separate both side walls, the back wall, the roof, the door jamb and the nose into panels small enough to work with. I have to carry them around the house and down a flight of stairs, so it's a good thing it's foam.


Sounds like great minds think alike. Pretty much the same method I've been considering. I hadn't planned on a final 6 oz layer but I might consider that. Can't wait to see your 'glass work in progress. :pictures: :pictures: :worship: :worship: :worship: Lots of Pics.... Please!
Mel

"Believe in your abilities... Remember amateurs built the ark, professionals built the Titanic"

"Indecision may or may not be my problem" Jimmy Buffet

Image

The Road Foamie Build Thread: viewtopic.php?t=45698
User avatar
atahoekid
Platinum Donating Member
 
Posts: 1773
Images: 158
Joined: Sat Jul 24, 2010 2:49 am
Location: Incline Village, NV
Top

Re: Another foam standie...

Postby atahoekid » Tue Apr 17, 2012 10:34 pm

KCStudly wrote:Like I've said before, TLAR (That Looks About Right) is a valid engineering principle! :thumbsup: :D


AGREED!!!
Mel

"Believe in your abilities... Remember amateurs built the ark, professionals built the Titanic"

"Indecision may or may not be my problem" Jimmy Buffet

Image

The Road Foamie Build Thread: viewtopic.php?t=45698
User avatar
atahoekid
Platinum Donating Member
 
Posts: 1773
Images: 158
Joined: Sat Jul 24, 2010 2:49 am
Location: Incline Village, NV
Top

Re: Another foam standie...

Postby Wobbly Wheels » Tue Apr 17, 2012 11:18 pm

Hey Mel,
The panels SHOULD be fine with a single layer both sides and the seams taped inside and out, but a final layer of cloth on the outside will positively lock all the panels together. It will take a little more cloth, but I will most likely run the outer layer on the bias so the strands are oriented 45 degrees from the first layer. If the extra cloth is going on anyway, it makes sense to give it the maximum strength, especially since I can only really make educated guesses as to the loadings involved.
It will also make it a little easier to fair the seams in - I can fair them before I put the outer layer on without having to seal the fairing compound or worry about anything telegraphing through the paint.
BTW, how's your Road Foamie build going ?
Or did you get sidetracked after getting the jockey box in ? :beer:

'TLAR'...that DEFINITELY needs to be a graphic on the trailer somewhere.
Thx KC, it was probably reading your mention of it that made me think of it.
EDIT: Found it !
KCStudly wrote:I call it, 'that looks about right' engineering.


I think I'm going to cut the openings oversize and use wood trim with a rabbet for windows, doorstops, etc instead of doing it all in foam. When I built the door jamb, I allowed 1" on the top and sides as a doorstop. That cut my finished opening down to 22" wide which, now that I've tried it on the trailer, is a little narrower than I'd like at the shoulders. I think I'm going to cut the stops out, glass it flush, then add wood stops later (like a residential door). That will give me back about 23 1/2" if the stops are 1/4".

With the door, I hacked out the recess to flush mount the (fixed) window and laid down some thickened epoxy but it will be tricky to sand flat without trashing the surrounding foam. It's not a big deal with that window because I'll be using black adhesive and the substrate won't show, but I'll still know...
On the others I think it will be far simpler to just lay in a 1X cedar frame around the windows like others are doing here.
The skylights are fixed pieces of tempered glass about 5' long, so I'll make a cedar surround and rout a recess for the glass, which will be glued in. It will be flush on the outside so water runs off. Cedar is my pick because I've used it with epoxy before, it's porous so it absorbs resin really well, is really light, and it's local so the price isn't too bad for clear stock...I might even have enough on hand.
To join them to the foam, I'll do what I did to join the fir threshold to the foam jamb. I used 3/8" dowels that ran from underneath the wood and up into the jamb 3" or so. The holes were a little oversize to allow for the PU glue to expand and it seems to have worked like a charm (in addition to the surface joint).

I'm off tomorrow so the plan is to get going on the nose (weather dependent), trim off the doorstops, and and to get some sealer onto the threshold. I may have lucked into a gallon of 105/205 for cheap and I have about 5 yds cloth so I may start glassing sooner than later. The curved center section of the roof will be the first on the table, so fairing that is on the list as well.
User avatar
Wobbly Wheels
Donating Member
 
Posts: 1080
Joined: Tue Mar 15, 2011 9:51 am
Top

Re: Another foam standie...

Postby PcHistorian » Sun Apr 22, 2012 11:30 am

that is one heck of a build going on there. :-)
I'm taking notes. :-)
Elf Cottage
Image

Build Documentary
https://sites.google.com/site/pchistorian/home/hobby/camping/elf-build
Build Forum
http://www.tnttt.com/viewtopic.php?t=48462
Build Album
http://www.tnttt.com/gallery/album.php?album_id=42

progress is progress. (don't look a gift "progress" in the mouth.)
User avatar
PcHistorian
The 300 Club
 
Posts: 354
Images: 198
Joined: Fri Dec 09, 2011 1:06 pm
Location: S.E. Michigan
Top

Re: Another foam standie...

Postby Wobbly Wheels » Sun Apr 22, 2012 12:04 pm

Thx Pc.

Today the roof became a flat one. Fairing the two shapes (nose and roof) together was going to mean basically carving the inside and outside out of a giant hunk of foam for no major benefit. I already have enough headroom inside, so I cut out the ribs and the curb for the vent. Next is to trim the panel and bevel the edges so it drops into place - it's there now mainly to support the tarp since the rain is rolling in again. The strip screwed on at an angle gives an idea of the approximate angle of the slope.
Image

The front is trimmed but still needs to have the edges sanded. I've got a dock billet (big rectangular hunk of foam) that I'm going to use to fair that flat panel in the front. I'll sand it round and use it as a plug to glass up a clamshell that opens up a shelf at the wide spot. It looks like I'll be able to get two 20lb LPG bottles in there if I do two doors hinged on the outsides and latched in the middle. A single piece means just one bottle in the middle. The lower section will be open at the bottom since that's where the tongue jack will be. That way, when I'm towing, the jack and bottles will be faired in to keep the drag down.

GPW has mentioned wheel pants: well, this one will have bottle pants !
Image

A thought occurred to me as I was sliding the roof panel up - when I first started poking around this forum, I would NEVER have though I'd need a stepladder to reach the top of whatever I wound up building. :lol:
Well that and how silly those little wheels look under that expanse of foam.....
Last edited by Wobbly Wheels on Sun Apr 22, 2012 10:03 pm, edited 1 time in total.
User avatar
Wobbly Wheels
Donating Member
 
Posts: 1080
Joined: Tue Mar 15, 2011 9:51 am
Top

Re: Another foam standie...

Postby PcHistorian » Sun Apr 22, 2012 9:44 pm

I would think just get a piece of the foam and tack down the sides to the curved bottom edges, over the curve, then the foam piece would still naturally want to flatten out at the forward end. Just let the foam flex. Maybe put in a centerline wood brace and one at each side edge. And glass. :-) If you are going to do two layers of the foam, put them down separately, because once together they are going to resist flexing.
Elf Cottage
Image

Build Documentary
https://sites.google.com/site/pchistorian/home/hobby/camping/elf-build
Build Forum
http://www.tnttt.com/viewtopic.php?t=48462
Build Album
http://www.tnttt.com/gallery/album.php?album_id=42

progress is progress. (don't look a gift "progress" in the mouth.)
User avatar
PcHistorian
The 300 Club
 
Posts: 354
Images: 198
Joined: Fri Dec 09, 2011 1:06 pm
Location: S.E. Michigan
Top

Re: Another foam standie...

Postby Wobbly Wheels » Sun Apr 22, 2012 10:08 pm

Hehe...if anyone's reading and it doesn't make sense - I edited a post from this morning with pics. Pc Historian was replying to something I had posted then deleted about having problems fairing the roof and nose together.
I just eliminated it by flattening the roof since I didn't really need the extra height anyway.

The main issue was getting a compound curve out of a flat panel - even kerfed in two directions, it wouldn't match both the lateral curve of the roof's camber and the longitudinal curve of the top of the nose. Plus, it would have to match where the sides of the nose close in. This way, I can develop the whole shape from triangular & trapezoidal panels on the sides and rectangular across the front. Easy peasy, albeit with a 'faceted' look. I'll just have to figure out how many panels to do it in to get the degree of roundness I want....or I could do it like a Bucky Ball !
User avatar
Wobbly Wheels
Donating Member
 
Posts: 1080
Joined: Tue Mar 15, 2011 9:51 am
Top

Re: Another foam standie...

Postby atahoekid » Sun Apr 22, 2012 10:29 pm

Wobbly Wheels wrote:Hey Mel,
BTW, how's your Road Foamie build going ?
Or did you get sidetracked after getting the jockey box in ? :beer:


Sorry, somehow missed that question during my first read through of your response.

Unfortunately, the build is going slowly, life keeps getting in the way. I've only been able to work one weekend this month and so I'm getting nowhere in a hurry. Next weekend is out too!!!! :( :( :( I'm hoping that after May starts, I'll have weekends to myself. The bad part is I know every time I think that I'm going to have a free weekend, something happens. In the meanwhile, I'm watching you make great progress. I'm so jealous!!! Good Work! Cheers! :beer:
Mel

"Believe in your abilities... Remember amateurs built the ark, professionals built the Titanic"

"Indecision may or may not be my problem" Jimmy Buffet

Image

The Road Foamie Build Thread: viewtopic.php?t=45698
User avatar
atahoekid
Platinum Donating Member
 
Posts: 1773
Images: 158
Joined: Sat Jul 24, 2010 2:49 am
Location: Incline Village, NV
Top

Re: Another foam standie...

Postby aggie79 » Mon Apr 23, 2012 12:15 pm

W2,

Your build is really coming along. I don't get by the Foamie section too often, but I need to - you guys work fast! I'll be tuning in regularly when you get to glassing your TTT. I'm trying to learn everything I can from the pros before I start my next build.

Take care,
Tom
Tom (& Linda)
For build info on our former Silver Beatle teardrop:
Build Thread

93503
User avatar
aggie79
Super Duper Lifetime Member
 
Posts: 5405
Images: 686
Joined: Tue Aug 07, 2007 5:42 pm
Location: Watauga, Texas
Top

Re: Another foam standie...

Postby Wobbly Wheels » Sat Apr 28, 2012 2:52 pm

Haven't checked the thread in awhile...

Thx Mel. The foam is so easy to work that it looks like progress but there's still a mountain of work to do and that elephant ain't gonna eat itself... I hear ya on the distractions thing - I've been sidelined all week to give my knee a rest and it's bugging me knowing that I could be building. Done a bit on it but not more than an hour or two.

Hey Tom, it looks like I might start glassing next weekend, depending on how much I get done this week.
I'll pick up the epoxy tomorrow and I've got a few yards of 6oz cloth: enough to start the first panel. Mid-May I'm going into town for an MRI so I'm looking to pick up the rest of the cloth and some more microballoons, then I'll see how well my mold/frame works in practice.

The shell itself is almost together now (I'll get some pics up when I get the last couple pieces in - prob tomorrow night), so I'm looking to get it sanded this week.
The cloth will be 38" wide, so that will be the width of the sections I cut out to glass. I'll do that all the way around the trailer, then do the roof once the other pieces are all back in. I think I am going to cut the gussets out - it will mean I don't have to cut the cloth around them, nor radius the outside corners to wrap the glass, nor fillet the inside corners for the glass.
If I want to put them back later, I can do that pretty easily, but I don't think I'll need them with the cabinetry in.

Another change that I've been mulling over is the bed. The plan calls for a slide out off the back to give me 4' of legroom (+ 3 1/2' inside) without compromising the interior space or having to fold the dinette down to sleep. For now, I'm going to do a double bed transversely across the back wall so I can "git 'er done"and get camping in it sooner. If I like the rest of the layout after using it a bit and no design gremlins rear their heads, I'll invest the extra time and money: heavy duty 4' drawer slides aren't cheap. The inside width is 75" and I'm around 6' so it'll be cozy but workable. I can take 4' of bed width (trailer length) without sacrificing too much interior space.

Now that it's pretty well enclosed, I'm starting to mentally place the interior components. I'm blown away by how much difference it made by extending the sides vs trying to fit the same appliances into the old floorplan. It's only a foot (6" per side), but it makes the difference between always feeling cramped and having a bit of space to stretch out. You'll be able to get past the cook to go in and out of the trailer or get into the head.

As I walk around inside, the carcass flexes a bit, but once it's glassed it will stiffen up. I've had to reglue some of the joints when they've popped from flexing. It will also stiffen it when I open up and backfill the seams with canned foam. It doesn't happen at all when it's blocked up level at 4 points, only when it's nose-down on it's wheels with a block under the tongue. I do that to keep it nose-down so any rainwater will run out the floor drain...which it's been doing a lot of lately !


Next time, I won't use 1/8 as a substrate for the floor on top of the foam. As I've been walking around, I can feel it flexing and I suspect there are areas where I've indented the foam core a bit. Once the cabinets are in, I'll fill the lows, glue down some 1/4" in the traffic areas, and call it a lesson learned.
User avatar
Wobbly Wheels
Donating Member
 
Posts: 1080
Joined: Tue Mar 15, 2011 9:51 am
Top

Re: Another foam standie...

Postby Catherine+twins » Mon Apr 30, 2012 5:50 pm

Wobbly Wheels wrote:Haven't checked the thread in awhile...


Next time, I won't use 1/8 as a substrate for the floor on top of the foam. As I've been walking around, I can feel it flexing and I suspect there are areas where I've indented the foam core a bit. Once the cabinets are in, I'll fill the lows, glue down some 1/4" in the traffic areas, and call it a lesson learned.


I didn't use a foam sandwich for my floor, and I'm regretting it. Mine (1/2") feels too flimsy, so I'll be adding another 1/4 inch in the walking areas, too.

Catherine
Build Thread Penguino II: viewtopic.php?f=55&t=54919
Build Thread Penguino I: viewtopic.php?t=44431
Image
"Oh, let's just stay here and sing camp songs for a while." 1966, My mom in Isle Royale, MN, in a women's bath house with a momma bear and two cubs outside the door, and three tired kids trapped inside
"Dad! Dad! There's a bear outside!" 1967, Lolo Hot Springs, MT, in a tent-top trailer
"Oh, no, there it goes!!" Nov 10, 2012 as Penguino I blew over in high winds
User avatar
Catherine+twins
The 300 Club
 
Posts: 478
Images: 124
Joined: Sun Dec 12, 2010 2:43 pm
Location: Northern New Mexico
Top

Re: Another foam standie...

Postby Papi » Mon Apr 30, 2012 8:40 pm

KCStudly wrote:Like I've said before, TLAR (That Looks About Right) is a valid engineering principle! :thumbsup: :D

One of the pioneers of rocketry, back before manned space flight, admitted in his biography they used TLAR when they built scale mock-ups that went into testing before building the real thing!
At first when I looked at your build, I had to scratch my head. Now that I can see where it's headed, I like it! :thumbsup:
I dream of a day when a chicken can cross the road without having his motives questioned.
User avatar
Papi
Teardrop Master
 
Posts: 177
Images: 50
Joined: Thu Jul 29, 2010 9:07 am
Location: North GA
Top

PreviousNext

Return to Foamies

Who is online

Users browsing this forum: Google [Bot] and 8 guests