- - - - - - - - - - - - - - - - - - - - - - - - - - - - - - - - - - - - - - - - - - - - - - - - - - - - - - - - - - - - - - - - - - - - -
MILESTONES, UPDATES, & MAINTENANCE:
02/01/2010: Started preliminary design using AutoCAD
02/23/2010: Finalized the profile and plans
03/04/2010: Frame assembly begins!
03/11/2010: Sawdust hits the floor
04/02/2010: Major assembly begins - sides, spars, bulkhead
04/10/2010: Major assembly finished,including hatch
04/11/2010: And then there was paint!
04/12/2010: Scuttlebutt goes for a test drive (minus doors and roof)
04/16/2010: Screen roof installed
04/18/2010: Vinyl roof installed
04/22/2010: Doors installed
04/24/2010: Curtains from Mom!
05/09/2010: Tongue box/12VDC electric finished
05/13/2010: DEPART on MAIDEN VOYAGE to TEARSTOCK!!
05/24/2010: Installed gas struts for galley hatch
05/28/2010: Install "bread shelf"
10/12/2010: Removable insulated ceiling panels finished
10/26/2010: Made removable oak trim ring clamp to seal the vinyl top around the fan
11/21/2010: Wired 110VAC outlets - 2 interior, 1 galley
12/25/2010: Got a Spa Sensations 4" memory foam mattress
03/22/2011: Added a divider and shelf in the lower galley
04/03/2011: Cleaned and repacked the wheel bearings
04/12/2011: Built underfloor storage
06/06/2011: Replace screen roof
06/16/2011: Modified fan trim ring/rain cover
08/01/2011: New curtains and hatch graphics
08/13/2011: Modified tongue with an extension
10/18/2011: SOLD to make room to build The X-II
---------------------------
ORIGINAL THREAD....
---------------------------
February 3, 2010
First with the basics... (for anyone who didn't read my noob thread)
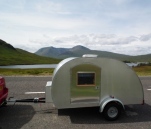
The Urabus Scuttlebutt, based loosely on horrible plans from ebay, will be constructed using 3/4" plywood for the floor & sides. I was considering doing insulated sidewalls to save weight, but it would have over-complicated my first build. Also, with it being a convertible, the insulation really wouldn't have done much.
As for electric, I don't really do many campground trips, so I'll be sticking with basic DC for now... a tow-n-charge system with a deep cycle battery. I'm thinking 2 interior lights, one galley light, and a couple 12V power/5V usb sockets. All auxiliary lights are to be low power LED's.
On to the initial shopping list...
Trailer hitch & Harness for the Suby
4x8 1720lb Trailer
Fan-tastic Vent 4000R w/ low profile
D-shape weatherstripping (40 feet)
Black Beauty Asphalt Fence Post Paint for underfloor protection
CPES to seal the plywood
S.S. Piano Hinges
Power Tender Plus 12 Volt 5 Amp Battery Charger
(2) 'factory-style doors'
LED Lighting with Remote Control
3/4" Oak Plywood for sides
Helmsman Spar Urethane Satin for interior
Rustoleum Oil Based Enamel for exterior
Kilz Premium Indoor/Outdoor Primer
Snaps/Snap Screw Studs
Marine Vinyl removable top
Insect mesh roof
The design:

There are a few hurdles that I will have to clear once construction begins. Fortunately, Kerry (aka ToyPusher) lives a mere 10 minutes from me! Also, we have a member on here that has already worked on this type of teardrop - thank you Barb (aka b.bodemer) for sending me pics of the one that you helped complete!